Argus Model C camera

My Argus Model C camera

During my time working in a camera store from the mid-1970s until the mid-1990s, I must have seen hundreds, if not thousands, of Argus cameras, and to be more specific, the Argus C3, or as they were affectionately known as, "The Brick" because of their boxy shape and very sturdy construction. These cameras came in on an almost daily basis just because they were so popular back in the 1940s and '50s.

 I saw so many Argus C3 cameras in my time in the camera store that, when it came to collecting cameras, I had no interest in collecting this particular model. Yet, it seemed like every time I purchased a group or "lot" of cameras, there was always an Argus C3 in the groupings of cameras. 

 I still recall thinking that if I collected enough Argus C3 cameras, I could build a retaining wall in my front yard out of them, as it was cheaper to get the Argus C3 than to purchase real clay bricks.

 To this day, I still see the Argus C3, or similar models like the C2, C3 Matchmatic, or C33, all the time at people's garage sales, estate sales, and camera shows. It is undoubtedly one of the most sold cameras in the history of photography.

 With that said, I'm still looking for one model, which I'm certain I came across during my time at the camera shop. It's the original Argus Model C camera, featuring a dual range switch located under the shutter cocking lever. It's a little earlier than the camera in this blog post, but the pricing for one of these is higher than I'm willing to pay for, so I'll wait and see if I can find one during my quest for a camera. 

 For me, the fun is the hunt for the treasures. The thrill comes from finding a camera or other photo item I've been looking for, especially when it's in an unexpected place and hopefully at a reasonable price.

History:

 Argus Cameras holds a unique place in photographic history as a pioneering American camera manufacturer that made high-quality photography accessible to the masses. The company was founded in 1931 in Ann Arbor, Michigan, as the International Radio Corporation (IRC), by local businessmen including William E. Brown Jr., George Burke, and Charles Albert Verschoor. Initially, IRC's primary business was radios, but seasonal sales fluctuations led Verschoor to seek another product to stabilize revenue. Inspired by the success of his molded plastic radio cases, he envisioned an affordable camera built with similar materials.

This is the early version with switch under cocking lever

 In 1936, IRC launched the Argus Model A, the first low-cost 35mm camera manufactured in the United States. Priced at just $12.50 when most competing models were much more expensive, the Model A democratized 35mm photography and quickly found commercial success. The Model A's innovation lay in its molded plastic body, making it both durable and less costly to produce.

 This success prompted IRC to focus entirely on cameras, eventually adopting the name Argus, Inc. in 1944, and later Argus Cameras, Inc. in 1949. The company's most iconic product, the Argus C3, was introduced in 1939. With its brick-like appearance and robust rangefinder mechanism, the C3 became known as "The Brick" and enjoyed a production run lasting until 1966, with more than two million units sold. The C3 is widely regarded as one of the best-selling cameras in photographic history.

 During World War II, Argus shifted its production to support the war effort, manufacturing military optics and radio equipment for the U.S. and Allied armed forces. By the war's end, Argus had received multiple Army-Navy "E" Awards for excellence in production. After the war, civilian production resumed, and Argus became the second-largest U.S. camera manufacturer, trailing only Kodak.

 In the late 1950s, the company was acquired by Sylvania Electric Products and later sold to Mansfield Industries. Over time, as competition intensified, especially from Japanese manufacturers, Argus struggled to maintain its leadership. U.S. camera production ended by 1969, but the Argus brand persisted in importing photographic products.

Today, vintage Argus cameras, especially the Model A and C3, are valued collectibles. The legacy of Argus endures as a symbol of inventive American manufacturing and mass-market photographic innovation.

My Camera:

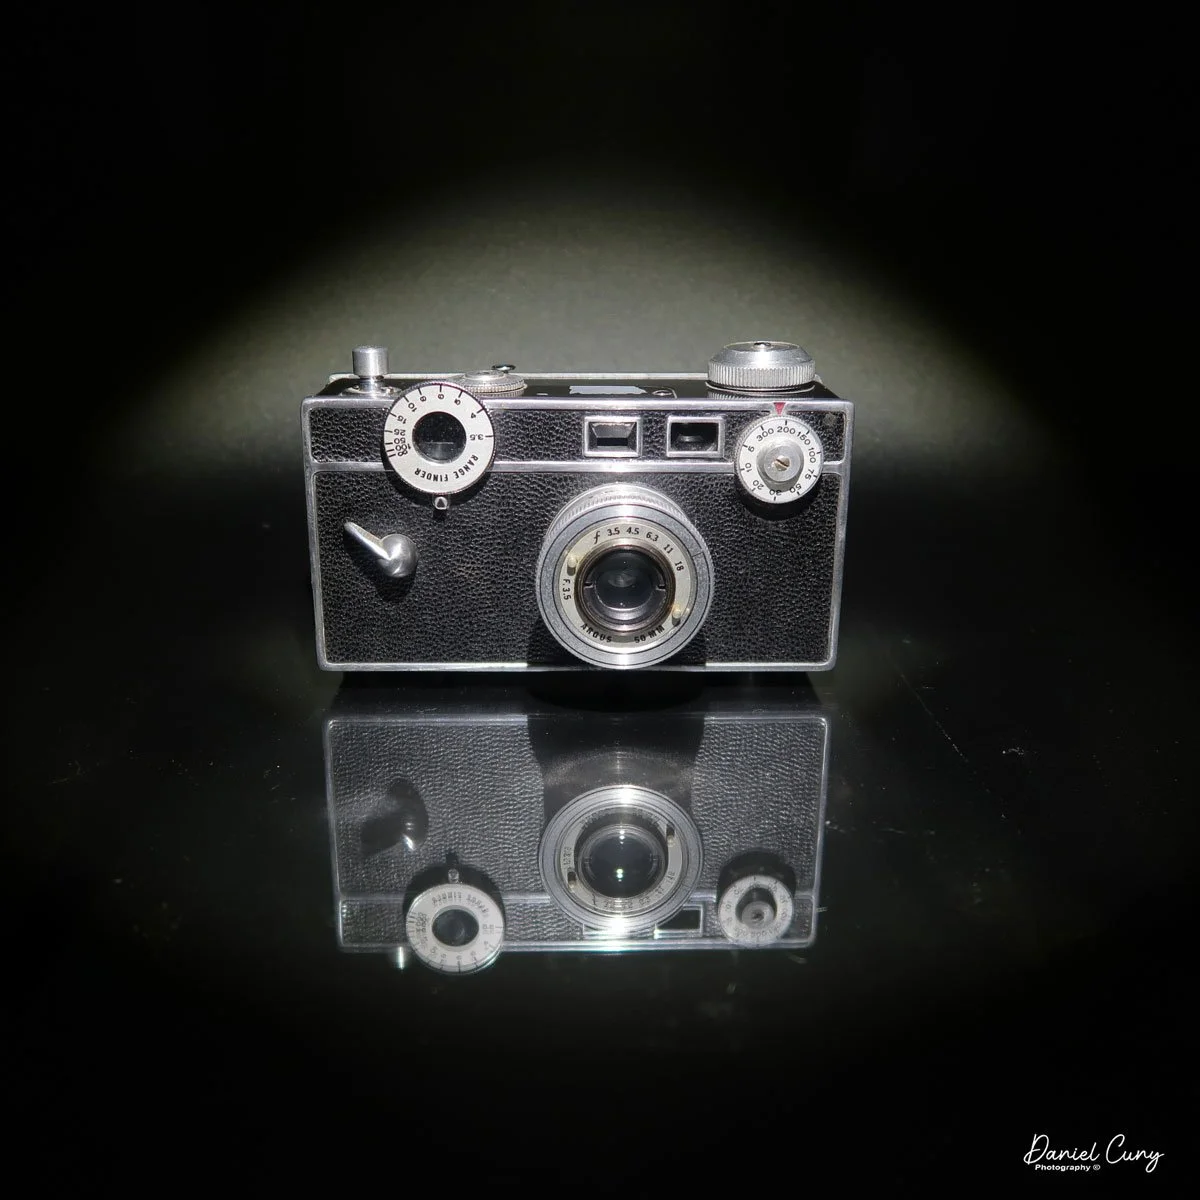
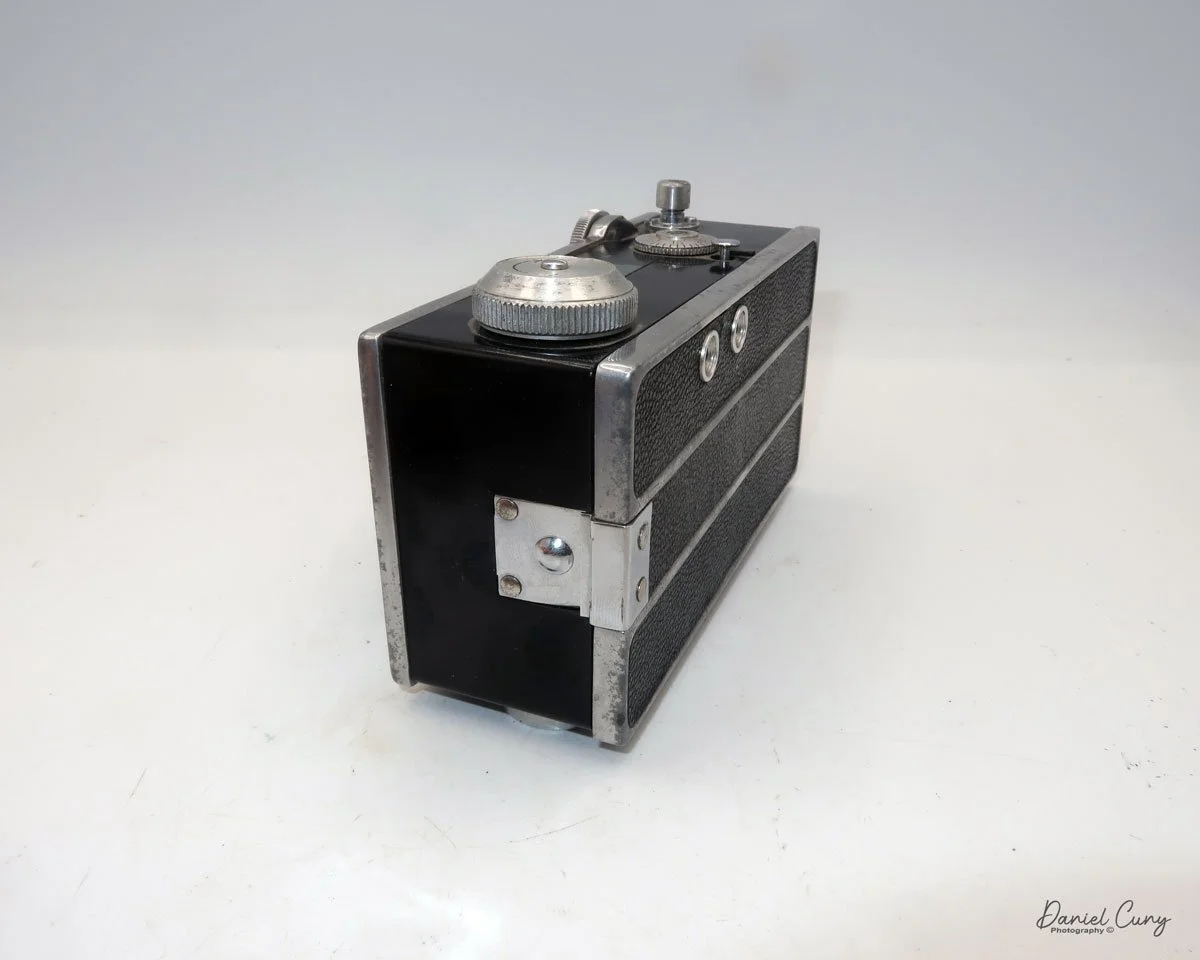
 My Argus C dates from 1938, has a serial number of 12127C, so it's not one of the earliest models, but it was introduced before the Argus C2 was introduced in late 1938. The Model C measures 5 3/8" wide by 3" tall, including the shutter release, by 3" deep, including the lens. My Argus Model C camera weighs 1 pound, 7.4 ounces without film loaded in the camera.

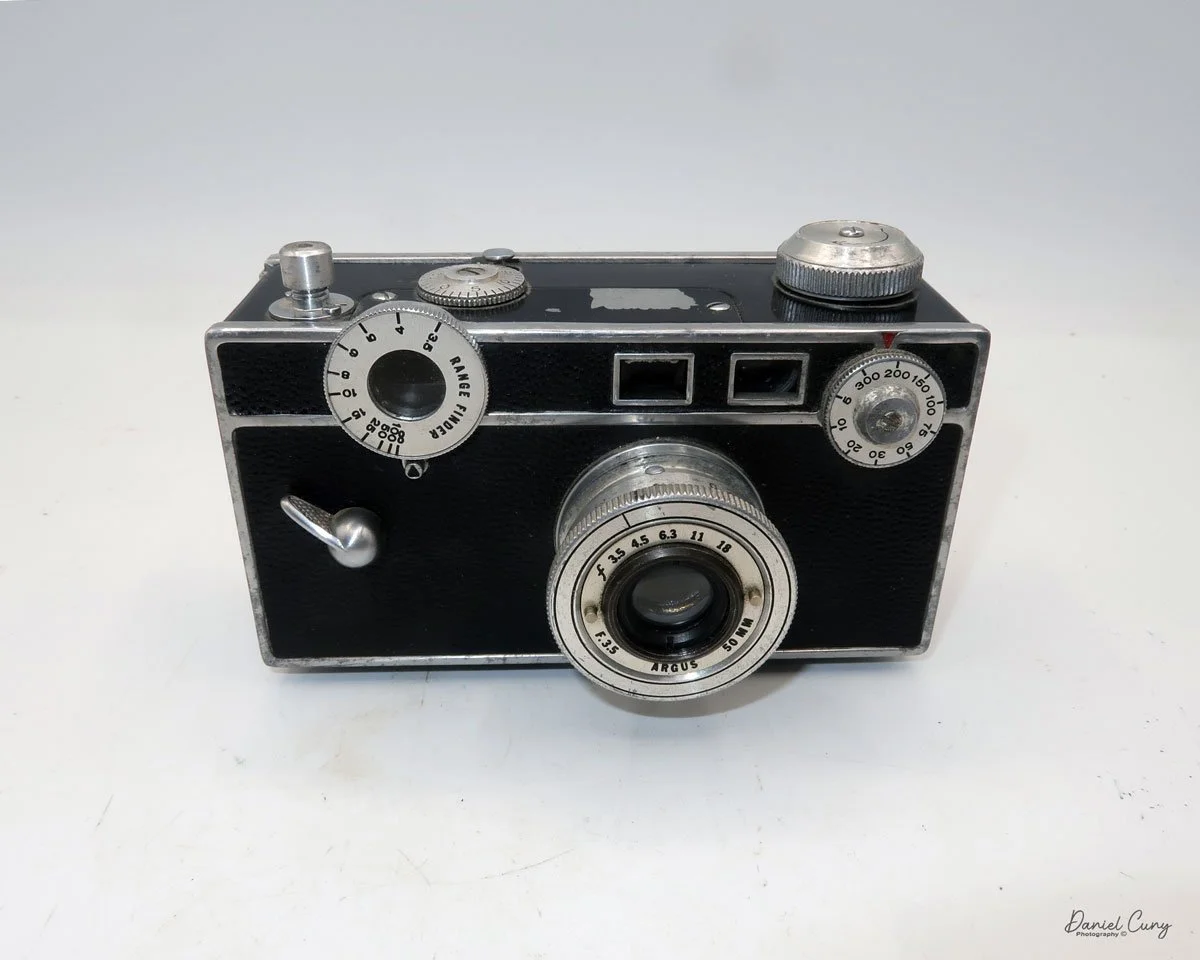
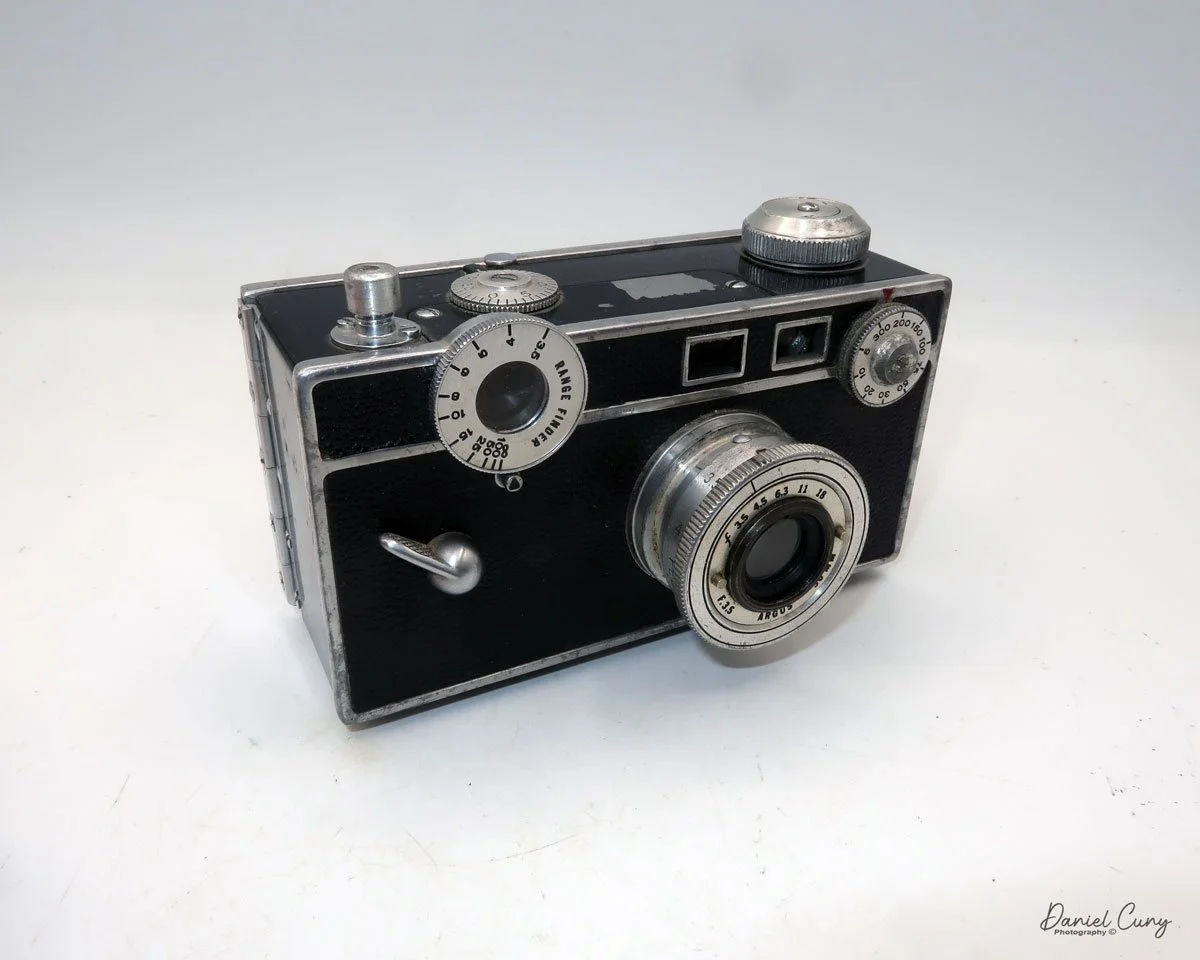
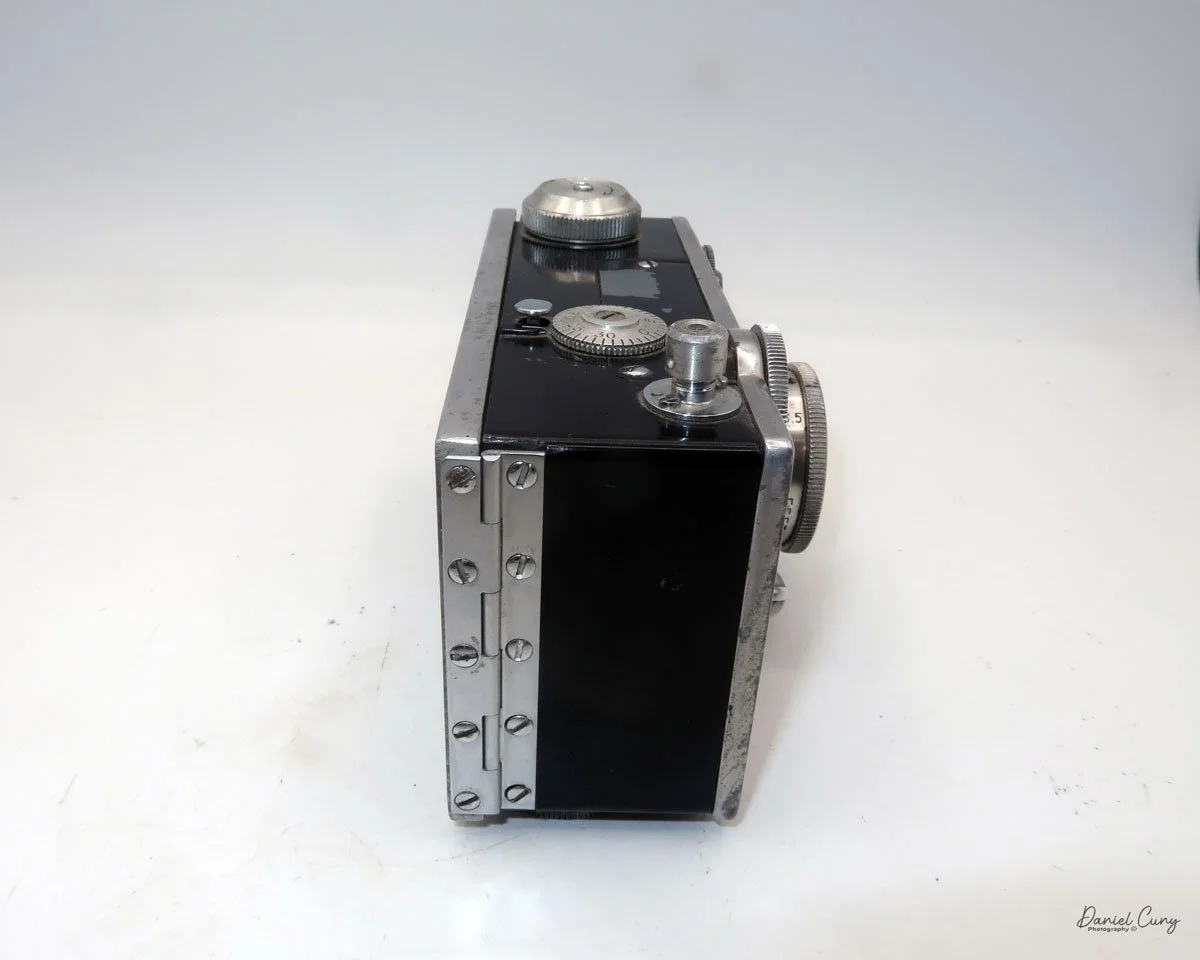
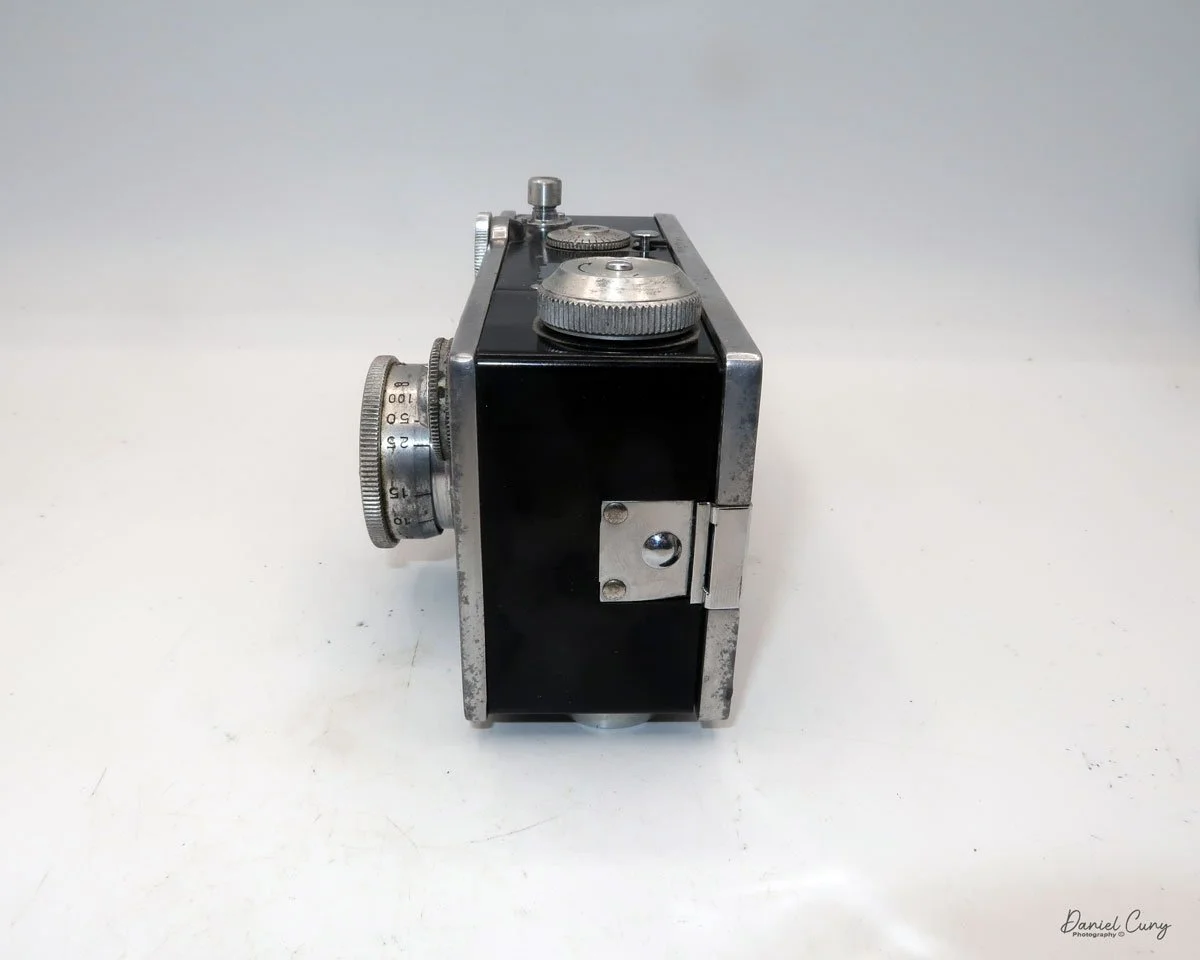
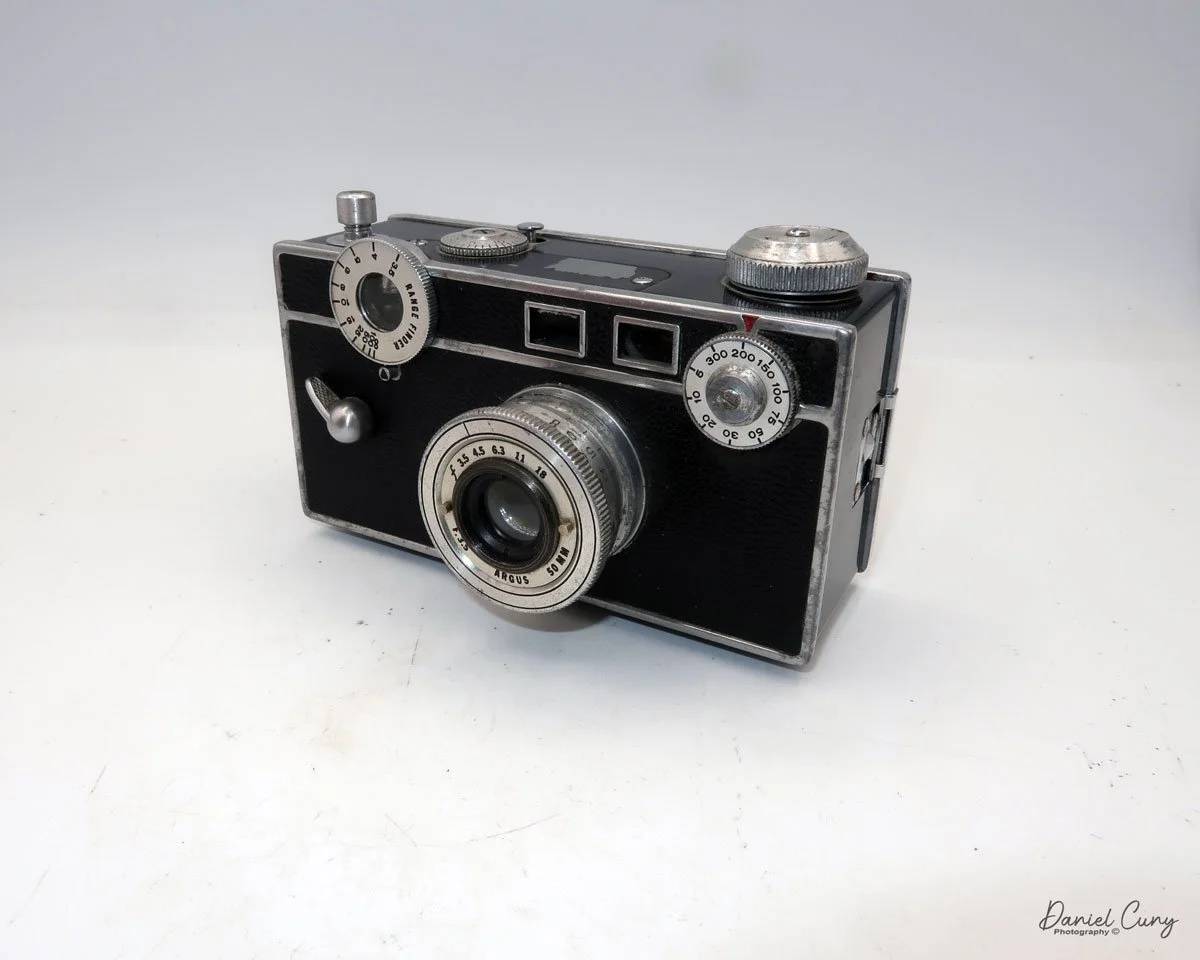
The camera has a 50mm f3.5 Argus lens with aperture settings of F/3.5, 4.5, 6.3, 11, & 18, which are odd compared to aperture settings now. The aperture setting is made by turning a ring with two knobs on the inside of the lens that line up with a black line on top of the lens. 

The item missing on early Model C cameras is the coupling gear connecting the focusing ring on the top left to the lens, which adjusts the lens distance during focusing. To focus this model, look through the rangefinder window on the back of the camera, bring the two lines together to focus, and then check the front of the rangefinder dial to determine your distance from the subject. Finally, set that distance on the lens. On the side of the lens, there are markings indicating the focusing distances for the subject. There is an aluminum thread in style lens cap for the Argus Model C camera I own.

The shutter speed dial is located on the top right-hand side of the camera, on the front. The shutter speed settings are 1/300, 200, 150, 100, 75, 50, 30, 20, 10 & 5. There is no "B" setting on the shutter speed dial. The "B" setting is actually set on the "mushroom" shaped shutter release. You can turn the shutter release to either settings, "I" for instant, or to "B" for bulb, or timed exposures.

 The camera's shutter also needs to be cocked before you can snap the photo. The shutter cocking lever is located on the front of the camera, positioned on the far left side, in the middle. It looks like a handle that you flip down to cock the shutter, then springs back up after the shutter is released.

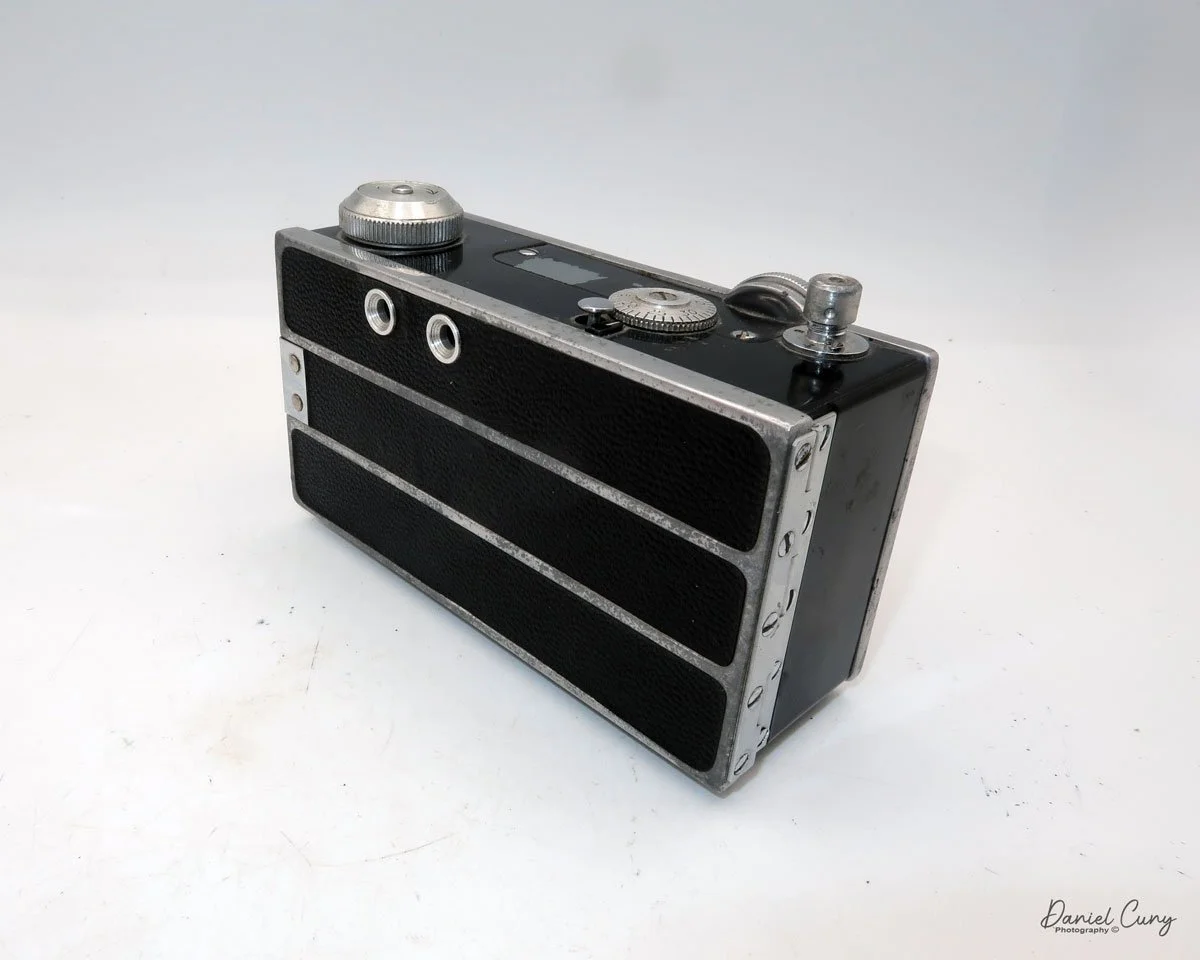
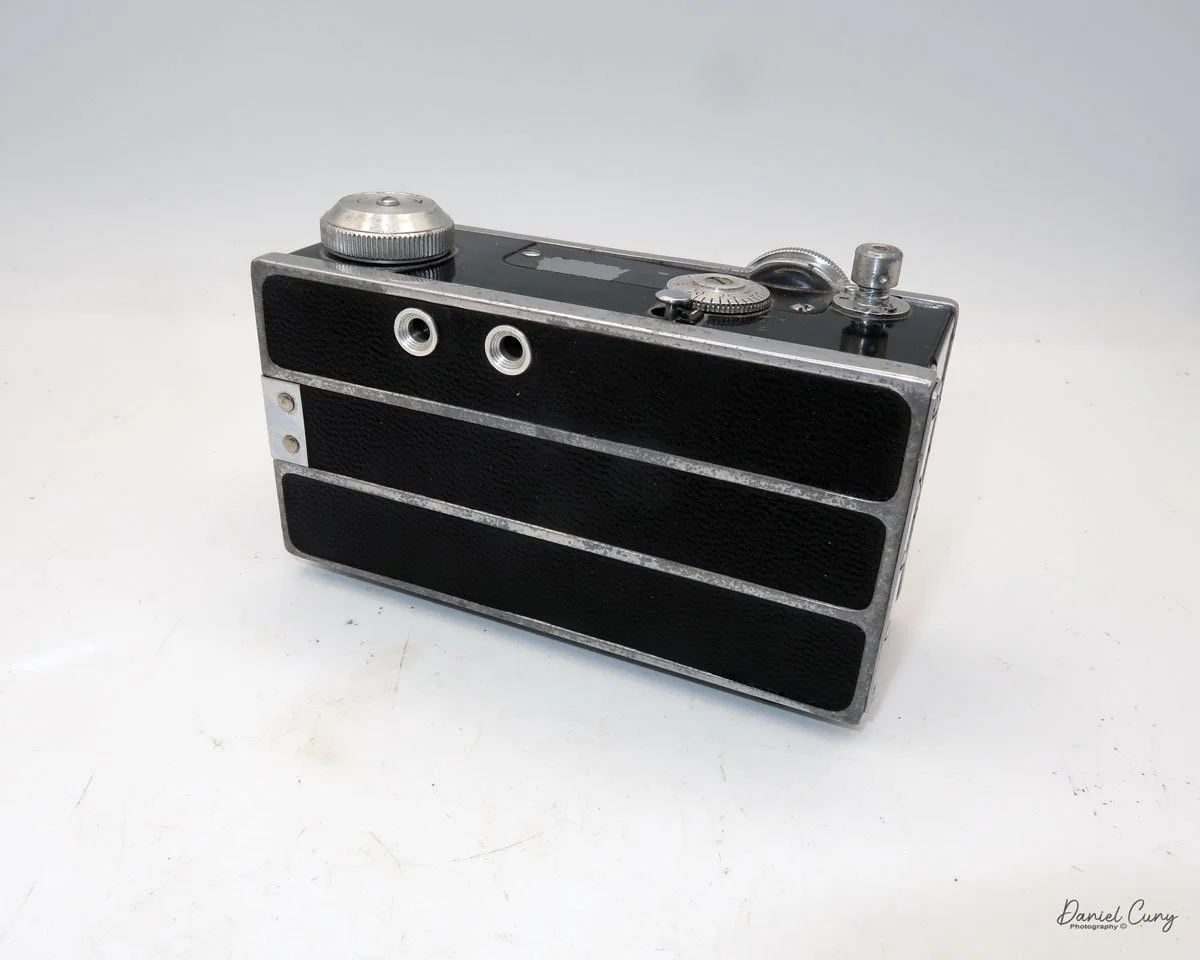
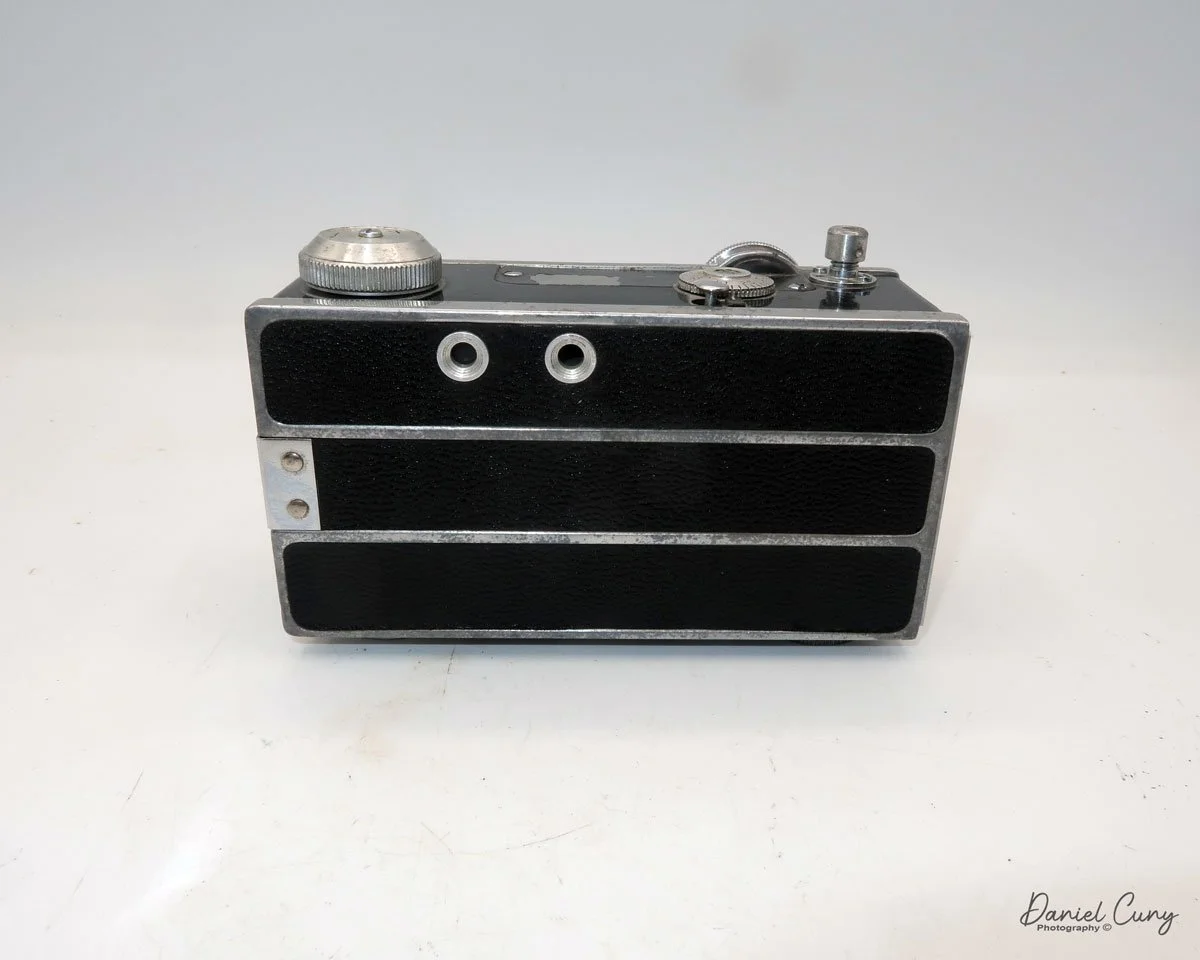
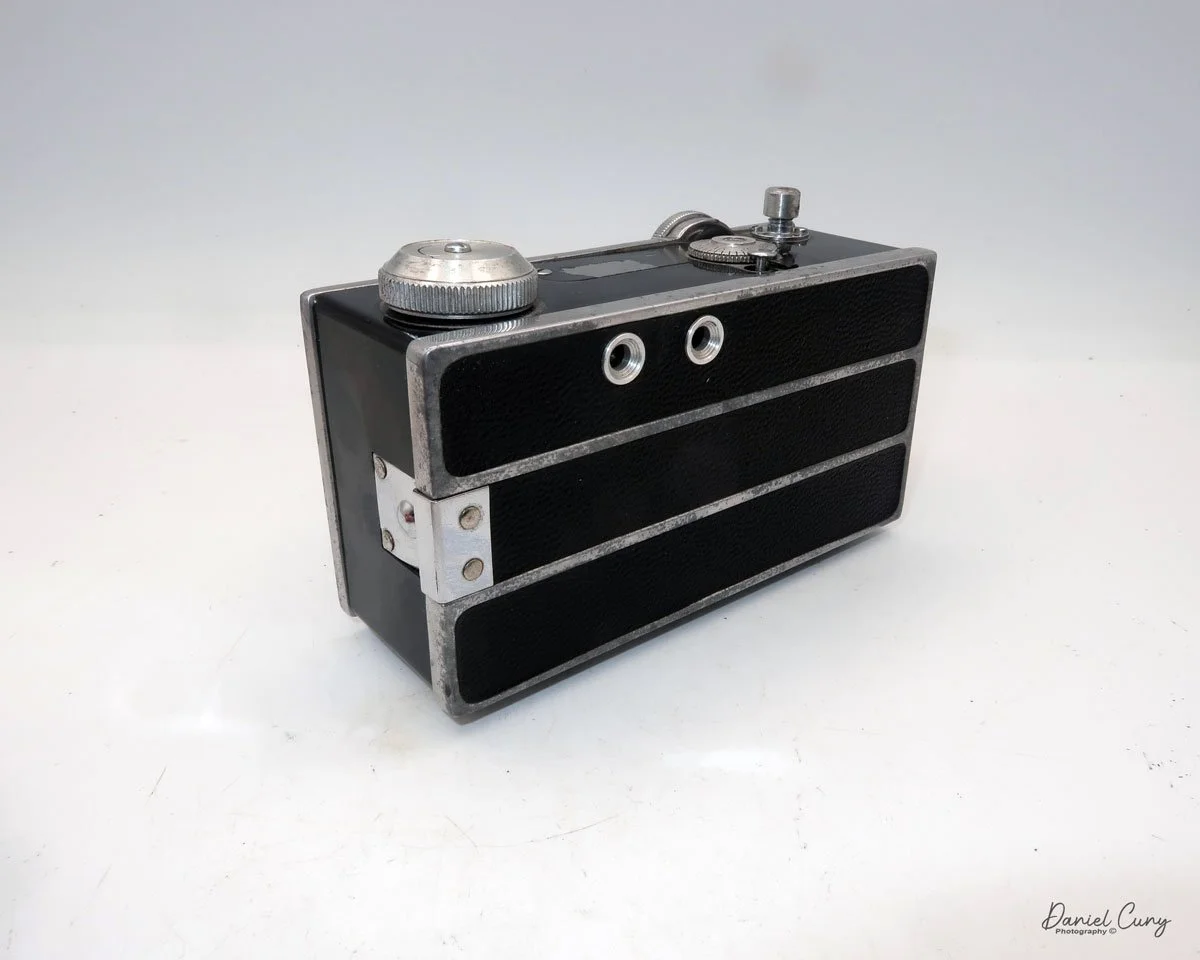
 On the back of the camera are just two small viewfinders. The one on the right is the rangefinder, which has a split that, by turning the focus wheel, will bring two separated vertical lines into one straight line when focused. The other window on the left is the framing window used to frame your subject when you're ready to take the photo.

To open the back to load the film, press the bump on the left side of the camera. This presses in a bar that holds the back onto the body. My camera is very difficult to open by just pressing the button, so I sometimes need to use a small screwdriver to pry the back up slightly to get it to open.

 Once open, the camera looks like any other 35mm camera, with the take-up spool on the left side. The fresh roll fits onto the right side by pulling pot the rewind knob on the bottom of the camera, bring the lead over to the take up spool, and thread into the take up spool. The film advance knob is on top of the camera. To wind to the first frame, there is a small locking lever just behind the frame counter that needs to be pressed down. This unlocks the winding gear, allowing you to wind to the first frame. Close the back of the camera and start taking photos.

This process must be repeated every time you wish to advance to the next frame. Additionally, at the end of the roll, the locking lever must be pressed down to unlock the drive gears, allowing the film to be rewound into the 35 mm cassette.

 The real reason to write about this camera was more of an exercise on how easy it was to use the early Mode Cameras, especially during a time of rapid change with cameras. Like many cameras from this era, it's not the quick and easy cameras of today, where either the shutter or aperture is being set for you. In many circumstances, both settings are being set. 

 To use cameras from this era, you need to take your time and use an external light meter to get the proper settings for your camera. Set the shutter speed and aperture settings depending on the film used. Do you lean more to the aperture and depth of field, or shutter speeds and stopping motion? Then focus on your subject. In this case, focus, then transfer the settings to the lens regarding distance. Frame your image and take the photo.

 On my camera, I also have an accessory finder, which clips onto the top for showing what a 35mm wide-angle or 100mm telephoto will do. I leave it on my camera to hide a bit of paint scratched off by it, as it's more for show, and I don't have either of these lenses. There were several different lenses available for the Argus C line of cameras, as the lens just unthreaded from the body. 

My Results:

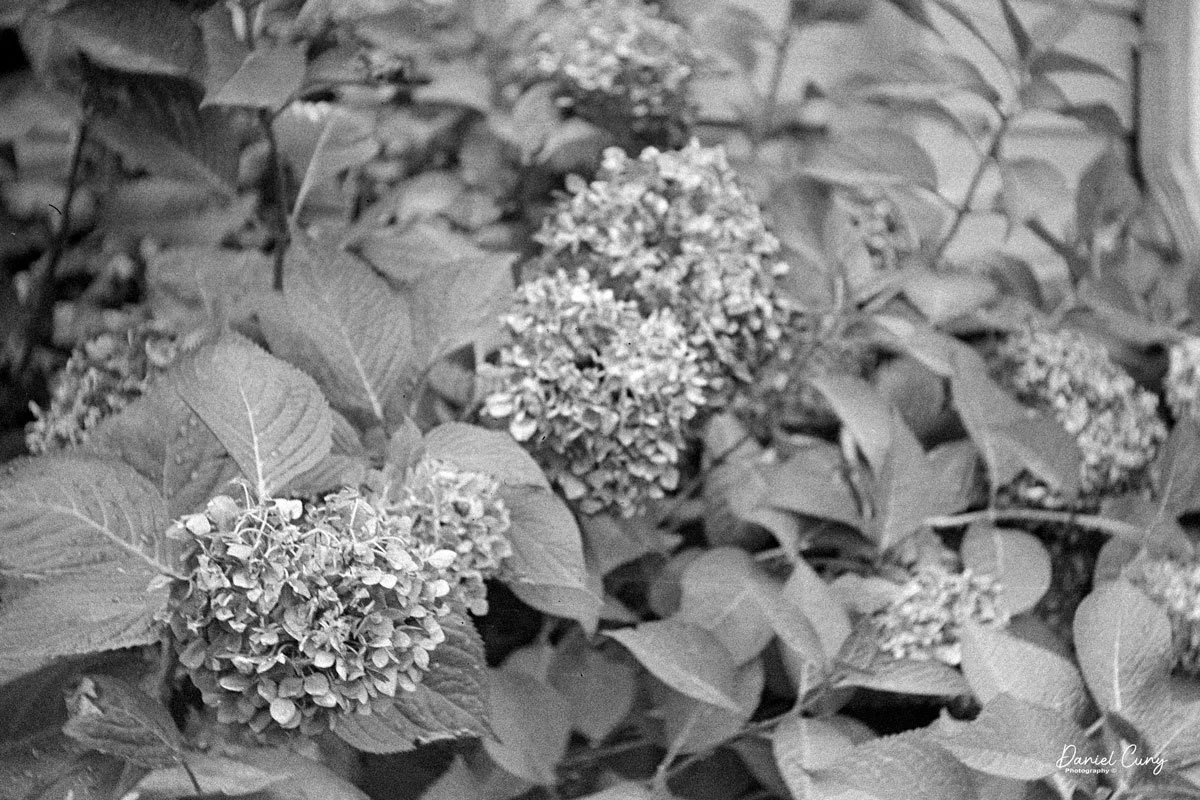
 Once you slow down and think about the process, which I'm very used to, the images are really nice. Here are a few from my walk around the neighborhood.

 I photograph similar items, which I am sure you'll notice if you're a regular reader.

Conclusion:

 While the camera isn't the most ergonomic one I've used, it's certainly not the worst.

 The camera performed very well. The images are sharp, and the shutter and aperture were easy to use. The one thing that slowed me down was the process of focusing, then transferring the distance to the lens before taking the photo. The addition of the coupling gear between the focusing wheel and the lens, which sets the distance on the lens, was a vast improvement for Argus. Without this improvement, I doubt they would have sold the number of cameras as they did.

 Thank you for taking a few minutes from your day to familiarize yourself with this early model camera from Argus.

 Here is a link to my other camera reviews.

I also have a shop on eBay, Cuny's Cameras and Photo. Please stop by and see what new and wonderful photo items I have for sale.

 Until next week, please be safe. 

Polaroid SX-70 Camera

My Polaroid SX-70 camera.

When I was looking over the cameras in my collection and thinking about which camera to write about this week, the Polaroid SX-70, which I have right over my desk, seemed to jump up and say, "My turn this week." I thought about it for a moment and thought, "It's not that old of a camera, but it is." 

 The Polaroid SX-70 was introduced in 1972, during the era of many "modern" inventions, like the home VCR, floppy discs, and email. It was not too far after the music and pop revolution in the late 1960s, which brought interesting and new designs. Currently, the SX-70 is a 52-year-old camera and, in my opinion, the last camera introduced with a genuinely different and unusual design.

 Being a fan of Polaroid from an early age, I remember getting a Polaroid Swinger for Christmas of 1965, just a few months after the camera was introduced. To focus the Swinger, you'd squeeze the focus dial until a "YES" would show up in the viewfinder, telling the photographer the camera was focused and ready to take a photo. That was tremendous and, to this day, a fun innovation of its time.

 When the SX-70 was introduced, there was much fanfare, magazine covers, and writing about this revolutionary camera from Polaroid. The SX-70 was officially sold in the Miami area in late 1972 and became nationally available in 1973. It was sold for $180.00 for the camera and $6.90 for the film, with ten photos in each pack.

 The interesting thing about the Polaroid SX-70 film was that the batteries that powered the camera were in the film packs, so every time you put a fresh roll of film into the SX-70, you were also putting fresh batteries in the camera. Batteries in the film pack were good unless you tried a pack with depleted batteries or tried out-of-date film where the batteries were dead. At that point, the camera was unusable.

Polaroid Acecssory Kit

 What made this camera unique was its odd and different design and its very slim design. It was an SLR camera with through-the-lens focusing, exposure control, and accessories that would enhance the photo experience, such as a remote shutter cable, tripod mount, close-up lens and diffuser, lens hood, self-timer, and accessory holder. Other companies soon came out with accessory lenses and electronic flash units.

 In 1974, due to the success of the original SX-70, with its chrome and tan-colored leather covering, Polaroid introduced lesser-expensive models and kept introducing other models soon after that. 

 The SX-70 camera was a massive success for Polaroid and gave instant photography a shot in the arm like few I've seen in the photo industry. Kodak would create their version of an instant camera in 1976. Still, Polaroid sued them for patent infringement, which led to Kodak discontinuing production of their line of instant cameras in 1985.

Company History:

The Polaroid Company, founded by Edwin H. Land in 1937, pioneered light-polarizing technology. Originally called the Polaroid Corporation, the company first made waves by producing polarized sunglasses and optical devices. However, its true innovation came in 1947 when Land introduced the first instant camera—an invention that would forever change photography.

Polaroid SX-70 ad from 1970s

 Land unveiled the instant camera at a meeting of the Optical Society of America, demonstrating how it could develop photos within minutes. This breakthrough led to the Polaroid Land Camera Model 95 commercial release in 1948. The camera's unique ability to produce finished photographs quickly became a cultural phenomenon, redefining personal photography for decades.

 Throughout the 1950s and 60s, Polaroid expanded its product line and refined its instant photography technology. It gained popularity among both amateur photographers and professionals. The introduction of color film in 1963 further solidified Polaroid's position as a dominant force in the camera industry.

 Polaroid also became known for its iconic camera designs, such as the SX-70 in 1972—a folding single-lens reflex camera that was both portable and innovative. During this golden era, Polaroid enjoyed tremendous commercial success and was often seen as a symbol of American ingenuity.

Cutaway view of Polaroid SX-70.

 However, the rise of digital photography in the late 1990s and early 2000s caused Polaroid to struggle. Despite attempts to adapt, including digital products and partnerships, the company couldn't maintain its market dominance. In 2001, Polaroid filed for bankruptcy and began selling off assets.

 The brand saw several changes in ownership over the following years. Yet, in a surprising turn, Polaroid experienced a revival in the late 2000s and 2010s, fueled by nostalgia and a renewed interest in analog photography. The Impossible Project, a group of former Polaroid enthusiasts, acquired the brand's last factory and began producing new instant film. Eventually, this effort led to the relaunch of Polaroid as Polaroid Originals in 2017, and later simply Polaroid.

 Today, Polaroid continues to produce instant cameras and film, embracing its vintage roots while appealing to new generations of photographers drawn to the charm and simplicity of instant photography.

My Camera:

My SX-70 camera measures 7" long by 4" wide by 5.5" tall when it is opened and only 1.5" tall when it is collapsed. It weighs only 1 lb. 7.6 oz. and has a 4-element 116mm f8 glass lens. My camera is one of the earlier models because it has the embossed serial number on top of the film chamber. The serial number on my camera is FE3028170DK.

 To open the SX-70 camera, place it in the palm of your hand, grip the top ribbed section of the viewfinder, and pull up. This will open the camera and lock it into place. The locking bar is on the left side of the camera. If the camera isn't locked when you pull up on the viewfinder, you can slide the locking bar forward to lock the camera open. 

Once the camera is open, it exposes the black rubber bellows built into it. It also exposes the rear viewfinder for focusing, and on the front of the camera, the red shutter release button and the exposure control the camera. I was taught to hold the camera in the palm of my left hand, and with my right hand, I can focus on the camera. 

 Putting the camera up to your eye and looking through the camera, you'll see a split-image focusing screen. A small black wheel controls the camera's focus on the camera's right side. Turn the black wheel back and forth until the subject looks sharp. The split image focusing allows the photographer to find a vertical item, and when out of focus, the line will be split and together in one line when in focus. The camera can focus as close as 10.4" from the subject.

On the other side of the camera is the exposure control wheel. The camera is auto-metering, which is metered by the opening just below the lighten/darken wheel. Generally, you leave this wheel in the center position with half the white or black portion in the middle. 

 If you want the following image to be lighter, move the wheel so more of the white is showing. If you want it darker, turn the wheel so that more black is showing. There is no rule of how much to move the wheel for a lighter or darker image. It's all just a guess. The camera shutter can shoot from 1/175 to longer than 10 seconds.

To open the camera to load the film pack, on the right side of the camera is a button with a yellow sticker, and inside that yellow sticker is a "down arrow." Push that button down, and the front door opens to reveal where the film pack fits. The original film packs were color-coded, so you would line up the yellow, black, and blue sections of the film back to the colors on the film chamber and slide the film pack into the camera. You must press it all the way in so the film door can close. Closing the film door with a fresh film pack in the camera will eject the dark slide from the film pack through a small slot in the film door. The camera is ready to take its first photo when the dark slide or cover is ejected. There is a small window on the back of the camera, the frame counter.

When you take a photo and light hits the film, the camera ejects the film through a pair of rollers on the film chamber door. When the film passes through the rollers, they squeeze the chemicals onto the film, and the photo starts to process.  These need to be cleaned; otherwise, the photo won't be processed correctly after you take a photo. Another issue that dirty rollers can cause is dots on the photo. The dots are caused by dirt on the rollers, and they press into the photo, and the chemicals can't reach that area, causing white dots throughout the photo.

 If you're indoors and there's not enough light to take a photo, a flashbar fits into the slot just above the lens and takes five electronically timed flashes per side of each flashbar. They worked well. All you needed to do was snap the flashbar in the slot, and everything was done for you, except for turning the flashbar after five flash photos.

Flashbar on Polaroid SX-70 camera.

The electronic cable release attaches to two small holes on the camera's right side. The accessory tripod mount would fit on the bottom of the camera, and the accessory holder and close-up lenses would fit into the flashbar holder. 

 To close the camera, slide the locking bar back toward its arrow. The camera will start to close. Press the top down into the body, and the camera will click into the closed position.

A common issue with the SX-70 is the mirror gets locked in the up position, and the camera won't close all the way. You can also tell when this happens when you look through the viewfinder; there is nothing to look at, and the finder is black. The lock-up can be caused by a lack of power from the battery or the film not getting ejected properly, but there's not enough power to cycle the camera. Something you can do to correct this is a bit tricky and not too difficult, but it means taking a small and fragile piece of plastic off the camera to expose the gearing system of the camera. If you're nervous or think you'll break the piece of plastic, DON'T try it.

 On the right side, by the film release button, is a small and thin piece of plastic that you can CAREFULLY pull up at the front of the plastic piece. Some are easy to come off, and some are very tight, so please be careful. Once the piece is off, you can see the gears in the camera's body. The front gear can be turned, which will bring down the mirror system allowing you to view through the camera and cocking the camera. Many videos on YouTube show this process if you are interested. Once the camera's mirror comes down, you can put the piece of plastic back and snap it into place. You'll need a new and fresh film pack to ensure the camera is in good working condition.

My images:

Unfortunately, I didn't buy film before I wanted to write about this camera, and when I looked to purchase some, they were out of stock, so I'm forced to show photos from the late 1970s or early 80s. 

 Here are some of the family photos from the SX-70 camera.


Conclusion:

The SX-70 brings back many fond memories we had with family and co-workers. It's one of the classic cameras made in the 20th century, and I am thrilled to have a good early model in my collection.

 One of the real advantages of the original SX-70 film was the ability to manipulate the images during the processing, which took a minute or so. We'd take different thicknesses of knitting needles and swirl the chemicals around, which would cause a flow in the photo, which was very artistic. The new film doesn't allow for this creativity.

 Thank you for taking a few minutes from your schedule to read about this wonder camera from the 1970s.

 Please feel free to email me if you have questions or concerns. Until next week, please be safe.

 Click on the link to read about the cameras reviewed