Hasselblad X-Pan

My Hasselblad X-Pan w/finder

Throughout my photographic career, my passion for panoramic images and cameras, as well as daguerreotypes, has consumed a significant part of my interest in collecting photographic items, including those with unusual or colored features. I recall the timeline when I first acquired specific working models of panoramic cameras.

 In my early days of collecting, I recall purchasing my first panoramic camera, a Russian-made 35mm Horizont camera. That camera helped spark the purchase and use of more panoramic cameras. When I bought a Kodak Panoram 1, I just put it on my shelf. When I found out that 120 film fit into the Kodak Panoram, Model 1 camera, I almost jumped for joy, because I could use it, rather than look and admire it.

 Wanting to add to the panoramic camera family, the elusive Widelux F7 was still years away, as I had a young family and was careful about the types of cameras I purchased to grow my collection. During this time, I came across a few Multiscope Al-Vista cameras, particularly the Baby, because, like the Kodak Panoram 1, the Baby Al-Vista also uses 120 film.

 As time went on, and the kids grew, and I advanced in my career, more funds became available to acquire the more exotic items that were previously out of reach financially when I was younger. A coworker had a friend who was selling an early Panon 120 panoramic camera for a very reasonable price, which I purchased and took with me to Peru’s Machu Picchu when my wife and I took a trip there.

 It was a decade ago when I finally had the chance to acquire a Widelux F7 model at an excellent price. Despite its cosmetic condition, I was determined to bring it back to life. After a visit to Precision Camera Works in Texas, the camera was given a new lease on life. Today, it's one of the most frequently used cameras in my collection, and the one that has captured many of the images in my panoramic section on my website.

My Hasselblad X-Pan w/30mm lens, finder, center filter, 3D printed lens hood and cap.

 The Hasselblad X-Pan was a camera I recall from its introduction to the market in 1998. Like several cameras from Hasselblad during those years, it was a collaboration with Fujifilm in Japan. Hasselblad sold the X-Pan worldwide, except in Japan. In Japan, Fujifilm had the TX-1, which was the same camera, just a different name and model number.

 It wasn't until about five years ago that I had the opportunity to purchase the X-Pan I currently have and am writing about in this post. The Hasselblad X-Pan is a significant addition to my collection, not only because of its unique features but also because of its history and the challenges I faced in acquiring it. I found it on an online auction, but the camera didn't have the standard lens; it only had a 30mm lens. No finder, and the top of the camera was missing the small plastic piece in front of the flash shoe. The camera was used very well, but its working condition was unknown.

 Examining other items being sold in the auction, I discovered a group of items that included the 30mm finder for the X-Pan. I notified the auction house that the finder from this lot should go with the camera from a different lot. They placed the finder in the lot with the X-Pan, which made the items more desirable, especially to me. 

 When it came time for the lot to be sold, I was surprised at the price it sold for, and fortunately for me, I was the high bidder. The price wasn't cheap, but for the items sold, it was a great deal. One of my first reactions was, Is the camera in working condition? I paid the shipping fees, and I just crossed my fingers that the camera wasn't a total wreck, but rather a pile of parts I needed to pay to get repaired. The anticipation and uncertainty of this process added to the thrill of acquiring this unique piece for my collection.

 Once the camera arrived, the first thing I noticed was its physical condition. There were many scratches on the body, and the item missing from the top, near the flash shoe, gave the camera a very "combat" look. The great news was that the center filter was there, which I hadn't noticed, and when I put batteries in the camera, it came to life. All the displays lit up, so I started to feel very good about the purchase.

 Once I put the finder on top of the camera, and it hid the missing piece by the flash shoe, I had a huge smile on my face. The next thing I needed to do was put a roll of film in the camera and try it out. After I did that and the film turned out well, I knew I had a keeper and one I needed to start adding to the rotation of shooting with, especially since it had the lens I desired, the 30mm wide-angle lens and finder.

History:

 The history of Hasselblad, the iconic Swedish camera manufacturer, is inextricably linked to the passion and ambition of its founder, Victor Hasselblad (1906–1978). Though the family business, F.W. Hasselblad & Co., began in 1841 as a trading company, it was Victor's innate interest in photography—fueled by a childhood passion for birdwatching—that transformed the firm into a global innovator. After training in the optics industry across Europe and the United States, even working under Kodak founder George Eastman, Victor opened his own shop, Victor Foto, in Gothenburg in 1937. 

 The pivotal moment for the company arrived during World War II. In 1940, the Swedish military tasked Victor with reverse-engineering and improving a German aerial surveillance camera that had been recovered. His reported reply—"No, but I can make a better one"—set the standard for the company's future. He founded Victor Hasselblad AB in 1941 to manufacture the HK-7 military camera, laying the groundwork for the company's subsequent civilian production.

After the war, Victor applied his modular military design to the consumer market, launching the Hasselblad 1600F in 1948. This medium-format, single-lens reflex (SLR) camera, with its distinctive modular design featuring interchangeable lenses, viewfinders, and film magazines, quickly became the gold standard for professional photographers worldwide, especially with the introduction of the robust 500 series in the 1950s.

 Hasselblad secured its legendary status through its partnership with NASA, which began in 1962. Astronaut Walter Schirra, an avid photographer, suggested using his personal Hasselblad 500C to document space missions. NASA modified the cameras to withstand the harsh conditions of space, and the Hasselblad became the camera system of choice for American spaceflight. The climax of this partnership occurred on July 20, 1969, when a Hasselblad Data Camera (HDC) captured the historic first steps on the Moon, solidifying the brand's legacy as a true pioneer in imaging technology.

My Camera:

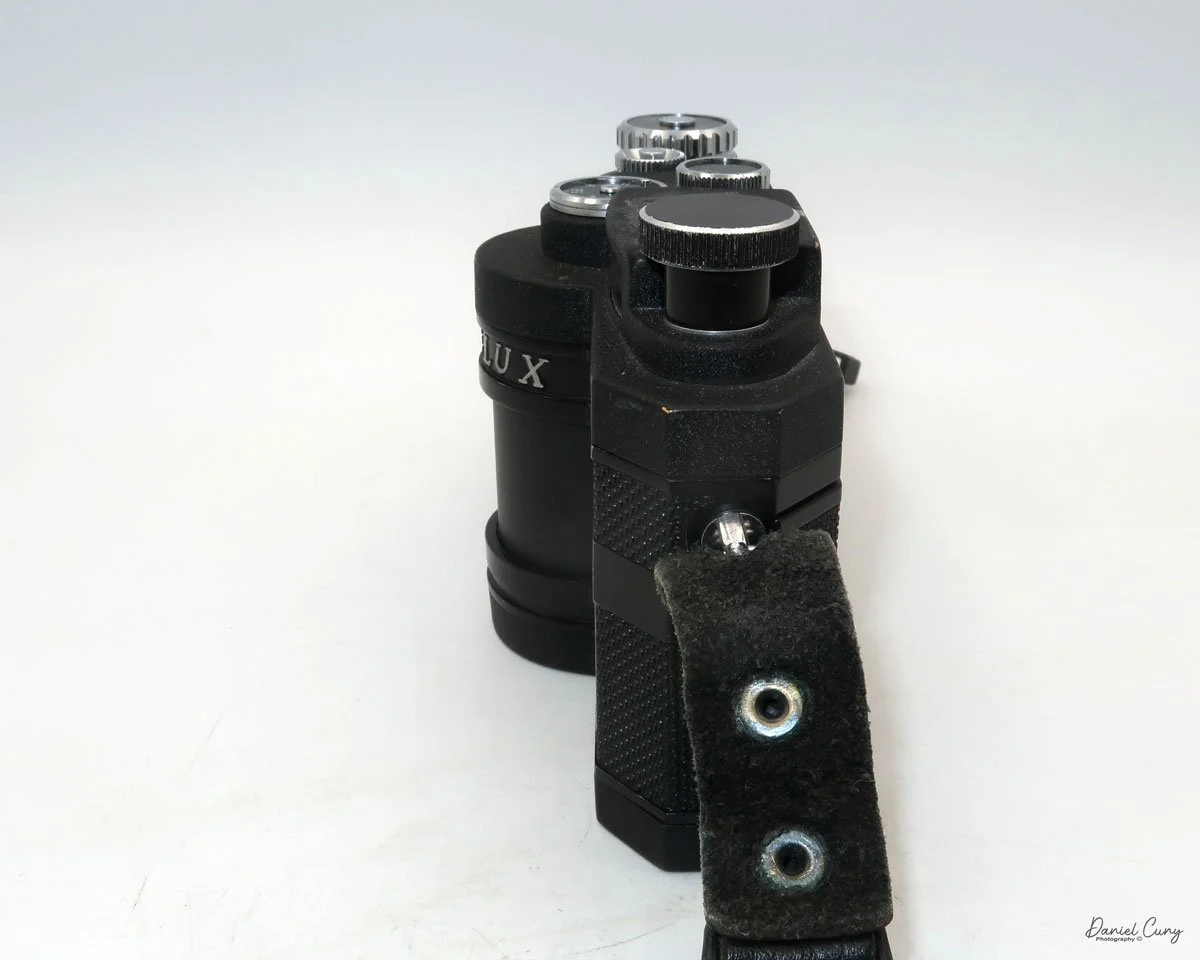
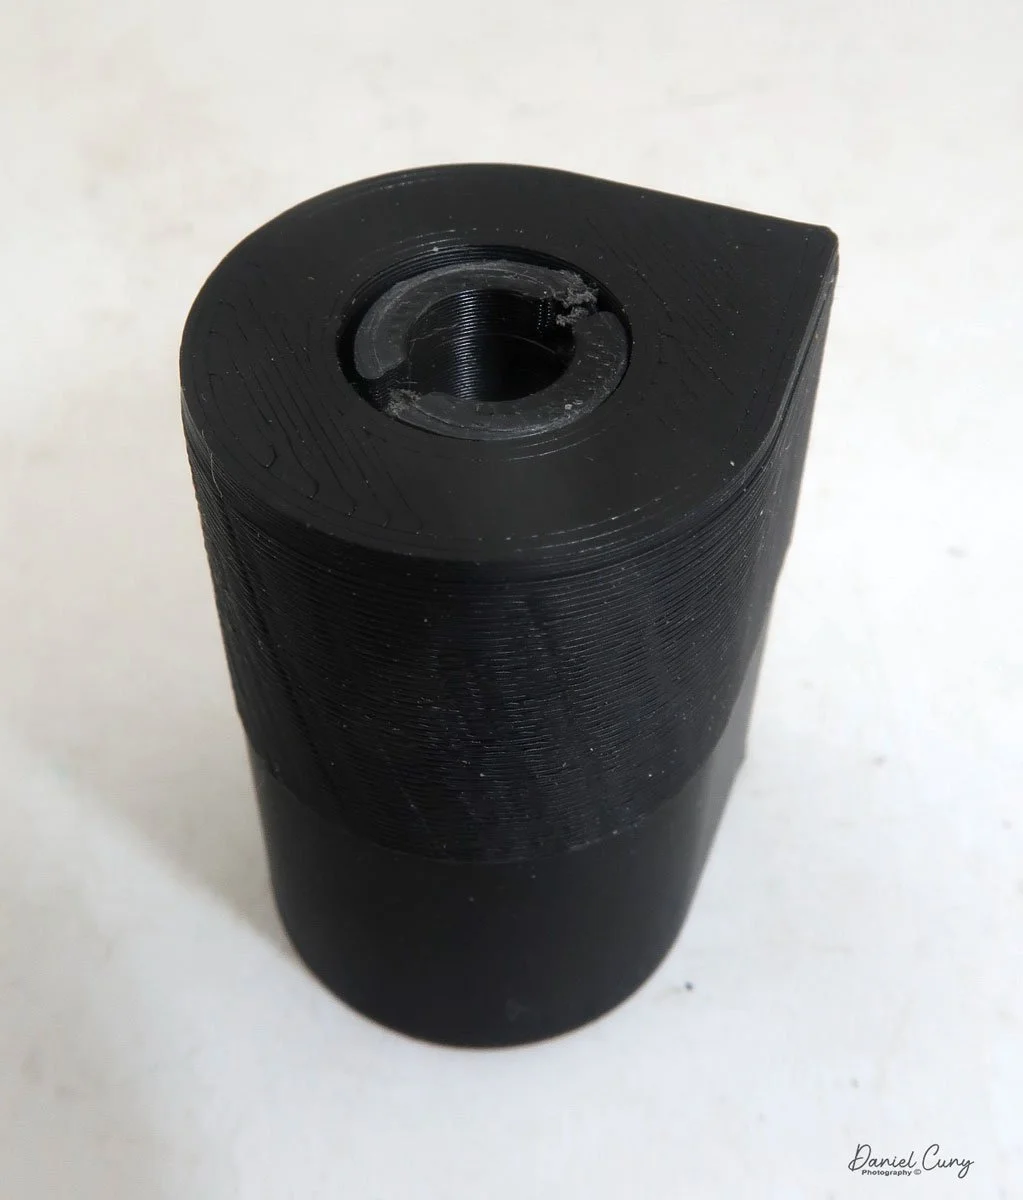
 My Hasselblad X-Pan is 7" wide by 3.25" tall without the 30mm viewfinder and 5.5" tall with the viewfinder by 3.5" deep from the back of the camera to the front of the lens. The camera weighs 2 pounds, 9.6 ounces with the 30mm f/5.6 lens. The camera body serial number is 11EE13969, and the lens serial # is 8SXP13110. I purchased an aftermarket, 3D-printed lens hood and cap for the 30mm lens, which fits well. However, it is shifting on the lens and not staying in the proper position, so I may have to spring for an actual Hasselblad-made hood and cap.

The camera is powered by 2 CR2, 3V photo batteries, which, like many cameras, fit into the bottom of the camera. Most of the controls are located on the top of the camera. Going left to right is the camera's hot shoe for flash. That's something I don't use, except for sliding the 30mm viewfinder onto the hot shoe and then screwing it down to hold it in place.

 To the right of the hot shoe is the shutter speed dial, which ranges from 1/1000 to a full 8-second exposure, accompanied by a green "A" for Auto mode. In the case of the X-Pan, when the selector is set to the green "A" position, the camera is in "aperture preferred" metering, which means you select the desired aperture, and the camera will choose the appropriate shutter speed depending on the film's ISO and the lighting conditions. Even in "auto" mode, there are warning signals within the viewfinder that indicate if you are overexposed or using a shutter speed longer than 2 seconds.

If the camera is not in the "auto" exposure mode and you're selecting both the shutter speed and aperture, a series of lights and signals, indicated by +/-, appears within the viewfinder, showing what a properly exposed image will look like depending on the selected shutter speed and aperture.

 To the right of the shutter speed dial is the shutter release, marked in silver, and a small window behind the shutter release that displays "P" if you're in panoramic mode, as well as the frame number you're on. Further to the right is the main On/Off switch at the bottom, along with "S" for single frame, "C" for continuous shooting, and a clock face for self timer. Turn the On/Off switch to the desired mode, and the camera will be on. On top of the dial is exposure compensation, which allows for up to 2 stops of light lighter or darker than the recommended meter settings when in the "A" or auto mode. These are set in half-stop increments on the dial.

On the back of the camera, from left to right and top to bottom, is the camera's viewfinder, which incorporates a coupled rangefinder. My rangefinder is very bright, which makes the camera extremely easy to focus with. Just above the camera's viewfinder is the 30mm viewfinder. The viewfinder features several different frame lines, depending on the film format used, along with a bubble or spirit level at the bottom to check if your camera is level.

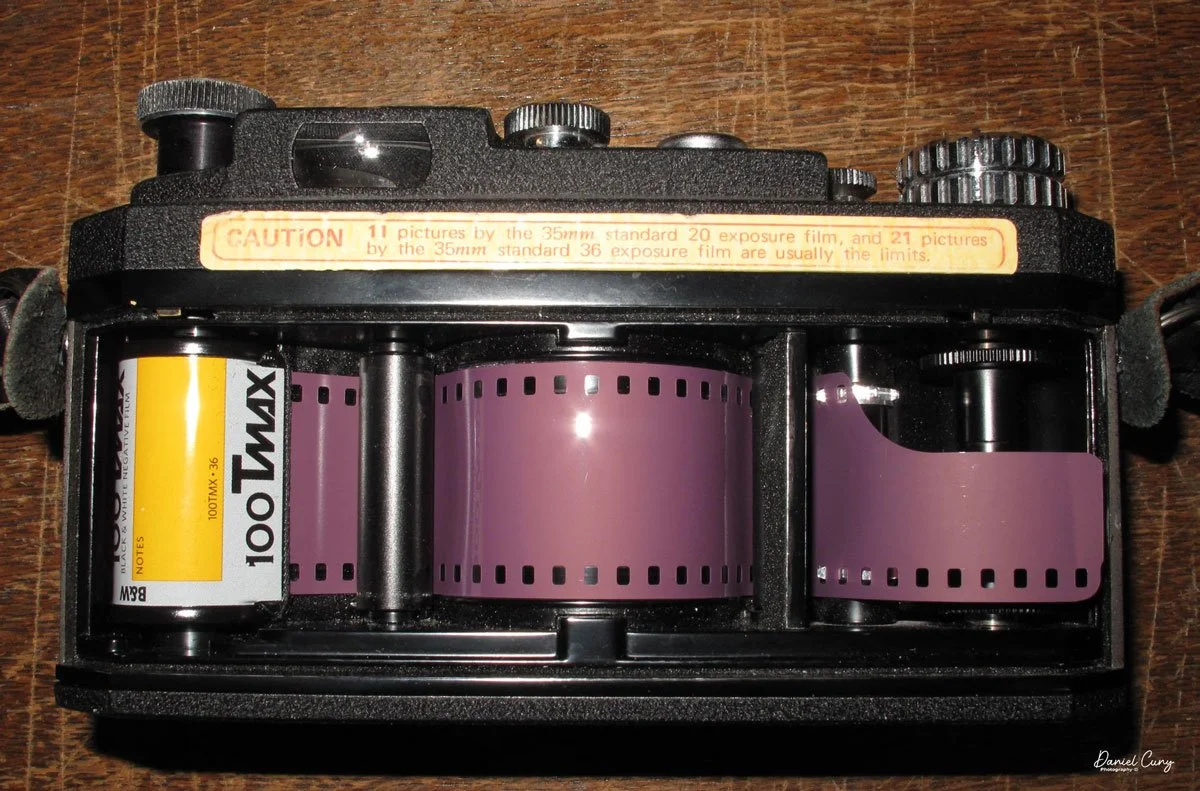
To the right of the camera's viewfinder is an essential switch. The X-Pan camera is compatible with the standard 24x35mm film format. Alternatively, by depressing the button and turning the dial to the "P" position, you can shoot in a panoramic format of 24 mm x 65 mm. On the back of the camera by the shutter, the camera will move blades in or out depending on the film format you're using. I've never really heard photographers using the X-Pan as a standard 35mm camera, only for panoramic purposes, but this can change at any time, and you can go back and forth on the same roll of film if desired.

On the back of the camera, on the back door, there are three settings. Ine is "AEB", or Auto Exposure Bracketing, which allows the photographer to automatically bracket either a half or full stop in between shots. The next button is used to light up the display, which is particularly useful at night or in dark situations. The third button is a very small, indented button that you use to rewind the film before reaching the end of the roll.

 On the front of the camera, in the 11 o'clock position, is a dial to set the film speed. The camera features fully integrated DX coding for modern film. However, if you're using a self-loaded cassette or older non-DX-coded cassettes, the ISO can be set manually. Below the dial is the lens release button, which allows the photographer to change lenses. Opposite the camera is the PC flash sync port, which enables flash use via a PC cable.

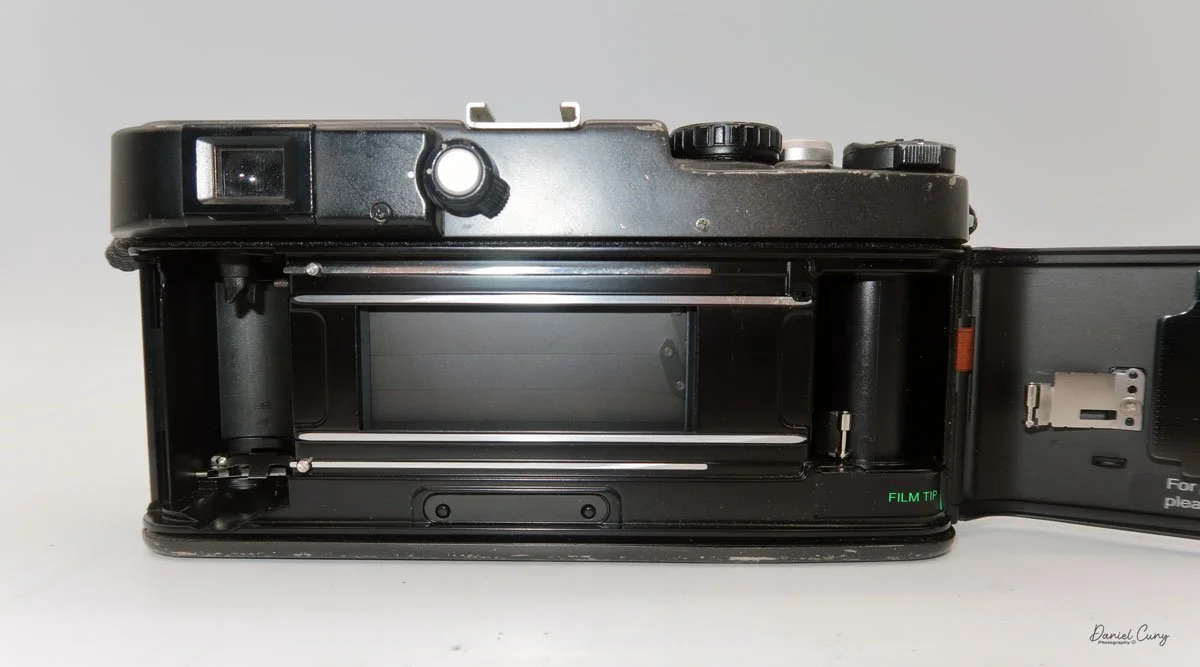
On the left side of the camera, the shutter remote cable socket is located at the top, and the camera's film door lock lever is positioned at the bottom. Flip the lever up, then slide it up to open the camera's film back and load the film.

 To load the film in the X-Pan, insert the film cassette into the film area, guide the leader to the take-up wheel, and then close the back of the camera. The camera will automatically wind the film all the way out of the cassette and onto the take-up spool before you take your first image. 

As a man, and not having read the manual before loading the camera, I started to get concerned. When I closed the door on my initial roll of film and heard the film advance for so long, I thought the camera was broken and needed servicing. That's just how the X-Pan winds film. When you receive your film back and examine the frame numbers, you will notice that the first frame, or Frame #1, is actually the last image you took, and number 36 is the first image.


My Results:

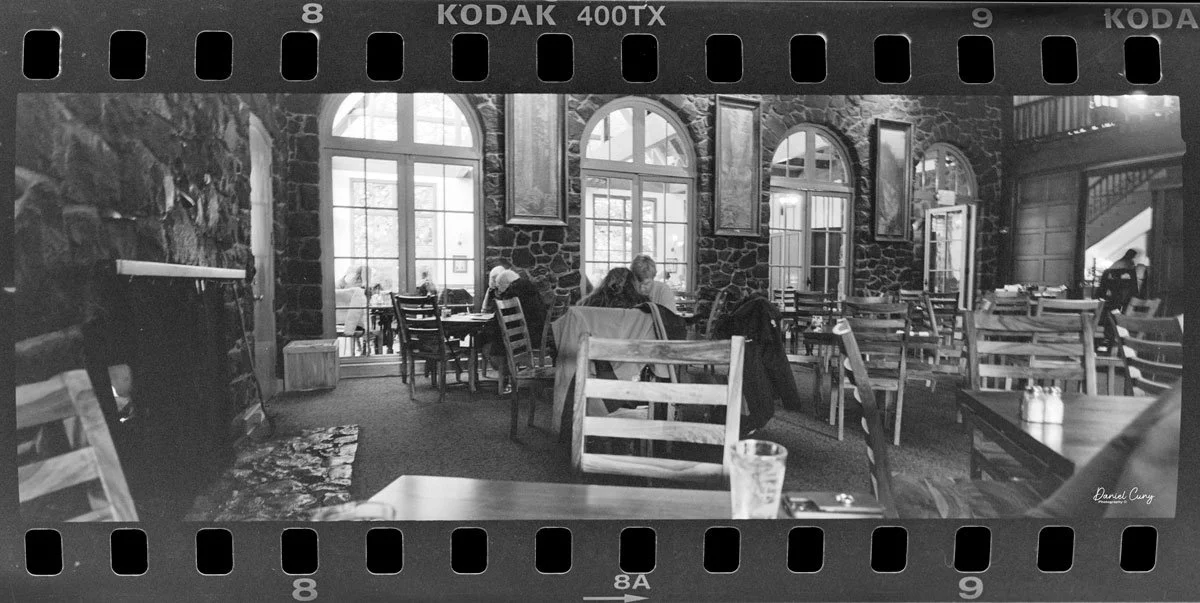
 My wife and I took a drive to Multnomah Falls outside Portland, and since I was going to write about this camera, I took it with me to see how it would perform. 

 Honestly, it's only the third or fourth time I've taken the camera out to shoot with it, mainly because I shoot with the Widelux so much, but this was an excellent time to see how the camera performed.

 The day was overcast, but the crowds were small, and since it had rained recently, the falls were rushing. After shooting the falls, we went into their restaurant to have lunch.

 Here are photos from that small adventure.

Conclusion:

 WOW, what amazing images and camera. I understand why so many people enjoy shooting with this camera. It doesn't have the swing lens curvature like the Widelux has. The X-Pan offers modern advancements over the Widelux, such as auto-exposure, exposure bracketing, and other features, but is physically larger and heavier.

 There's a trade-off for all things, but I'll definitely be using the X-Pan more often. It made shooting very simple and easy. I needed to focus on my subject with the X-Pan, which isn't a bad thing, and the images turned out great.

Another excellent feature of the X-Pan is that it’s a “system” camera, allowing for the use of other lenses. There is a standard wide-angle 45mm f/4 lens, along with a compact telephoto 90mm f/4 lens.

 Thank you for taking a few minutes to read about this fantastic panoramic camera from Hasselblad. A camera I'm fortunate to have in the collection.

 Here's a link to my other Camera Reviews.

 I also have an online store, Cuny's Cameras and Photo. If you see something in my store that interests you, don't hesitate to make me an offer. I'm always looking to negotiate and make deals, and I'd love it if you could share my article.

 Until next week, please be safe.

Panon Widelux F7 Camera

My Widelux F7 camera

I enjoy several different types, styles, or kinds of cameras. When I started collecting cameras over 50 years ago, I was drawn to anything out of the ordinary. If the camera had a different faceplate on a box-style camera or was a different color or shape, these were the items I've always searched for when I go out looking for cameras or anything photographic to add to my growing and now hopefully somewhat shrinking collection as I'm "trying" to downsize my collection.

 One of my favorite types and styles of cameras is panoramic cameras, which fit right in with the odd or unusual types made. They take different forms when you start to look at the various styles of panoramic cameras. They can look like a wood and bellows camera on a geared tripod, which would be a circuit camera and one of the first styles of panoramic camera. They can look like a more extended box style camera but have a lens that rotates across a curved film plane similar to the Kodak Panoram or more intricate Multiscope Al-Vista camera, which employed different sizes of "flags" to speed up or slow down the rotation of the lens. Or an elongated camera similar to the Fuji 6x17 or Horseman 6x12 camera.

Image taken from Widelux F7 Manual

 Essentially, panoramic cameras expose a longer piece of film in the camera itself. They generally have a wide-angle lens to expand the area the camera and film see. It is very similar to cropping the top and/or bottoms of any format film to give the appearance of a longer, broader photo. I remember in the 1980s and 90s when the camera had the "panoramic" feature built into the point-and-shoot camera that did nothing more than have a blade within the camera close to the film plane that would crop the top and bottom of the film frame to take what appeared to be a panoramic negative. Heck, they even had disposable cameras that did just that.

 I have several panoramic cameras, and a few years ago, I purchased a very good Widelux F7 camera. Cosmetically, it wasn't the best, and it needed some work, so I researched where and who could repair the camera for me. Ultimately, I sent the camera to Precision Camera Works in Lakeway, Texas. If the lens turret doesn't move smoothly across the film plane, the camera will cause banding due to the inconsistent movement of the lens.

 Upon completion of the overhaul, they did an outstanding job. They even replaced the difficult-to-turn rewind knob with something better, which makes the camera easier to rewind the film. The best part is the new rewind knob doesn't tear into your skin when you rewind the film, which was one of the big pet peeves of the camera before I had it serviced. They did return the old knob, so if I wanted to have it put back, it's quickly done.

The video below shows the camera being re-wound, then I changed the shutter speed to show the lens movement.

The Old and New Company:

The Old Company:

The Widelux camera was made by Panon Camera Shoko, which was started in 1952 by Nakayama Shozo. A small camera manufacturer originally made the Panon camera, which I wrote about back in 2020. It was a swing-lens camera made for 120-size film. The company was small but specialized in the swing-lens panoramic camera style and improved the larger 120-format camera.

 In 1958, the Panon company, known for its swing lens style of panoramic cameras, introduced its first 35mm panoramic camera, the Widelux F1. This camera, incorporating a 26mm f2.8 lens, exposed a film frame 24x59, approximately 65% longer than the standard 35mm frame. This extra area gives photographers a 140-degree diagonal angle of view and 126 degrees horizontally. Over the years, Panon Camera Shoko continued to innovate and improve its models, leading to the production halt of the F8 model in the mid-1990s.

 1963 Panon introduced the Panophic, a 120-film format swing-lens panoramic camera. This is an updated version of the Panon camera with an interesting design, a curved back, and a much larger viewfinder on top. In 1987, Panon introduced the Widelux 1500.

The New Company:

There is someone more famous than myself who also enjoys panoramic cameras and photography, and that's the Big Lebowski himself, Jeff Bridges, and his wife Susan, a tremendous photographer in her own right. They are partnering with Marwan El Mozayen, Editor-in-Chief of Silvergrains Classic, and Charys Schuler. They have formed SilverBridges, planning to re-introduce the new Widelux X camera. Their goal is to have the camera introduced sometime in 2025. My fingers are crossed, and if they need someone to test the camera and give it a review, I'm personally raising my hand now. I and a thousand other people have a much larger audience than I have.

My Camera:

My Widelux F7 camera is not just a piece of equipment; it's a companion on my photographic journey. It's 6.5" wide, 3 5/8" tall, and 2.25" deep from the front of the lens turret to the rear of the camera. The F7 weighs 1 lb. 14 oz. with a roll of film in the camera. Like all Widelux F7 cameras, I have a 26mm f2.8 lens, serial # 466392. The lens rotates on a cylinder across a curved film plane to get a longer negative area. Because of this longer negative, the camera only takes 21 images on a roll of 36 exposures. I generally get 22 when I use my camera. It will take approximately 13 on a roll of 24. Here is the manual for the Widelux F7.

There are only three shutter speeds on the camera: 1/250, 1/125, and 1/15. The aperture on the lens ranges from F2.8 to F11, so the exposure control, while adequate for most shooting, is less than what most people would consider normal. All of the controls are on the top of the camera, along with a bubble level to make sure things are straight, the film advance and rewind knobs, along with a wide viewfinder to give the photographer an approximate view of what they'll get within the photo.

The more tricky thing about the Widelux camera is the film loading. If not done correctly, which is what happened on my first roll, some of the negative areas won't be sharp. To take the back off the Widelux F7 camera, there is a locking knob on the back to lock by turning counterclockwise to the unlock position and clockwise to lock the back onto the camera, which is clearly seen.

 Once the back is off the camera, the typical film chamber is where you put the fresh roll on the right-hand side. Lift up the rewind knob to put the fresh roll in, then to hold it into place, press the rewind knob down to lock the film cassette into the camera. At this point, I crimp the very end of the film upwards to help the loading process.

There are two columns, one on either side of the curved film plane. The film must go under the first column on the left-hand side, then over the film plane, and then back under the column on the right-hand side. This is where I ran into a problem with my first roll of film. There is a slit between the right-hand column and what you see looking down on the camera. Make sure the film goes all the way down under the column before it comes back up by winding the camera and having the film drive gear pull the film leader back up. The first time I loaded the camera, the film went through the slot, and the right side of my negatives wasn't sharp, and I was disappointed.

One of the reasons why I crimp the end of the film leader is to grab onto the film drive gear when going under the second column. It needs something to catch onto to pull the film up and across the drive gear before I place the leader into the take-up spool. It's not that difficult, but you'll understand once you get the camera. Before I put the back onto the camera, I always take up the slack with the rewind knob, so once I put the film back onto the camera and lock it, I can see the rewind knob turn as I wind to the next frame. This way, I know my film is transporting across the shutter, and I'm taking photos. When I worked retail in a camera store, I can't tell you how many times I had people not load their cameras correctly, and watching the rewind knob turn when advancing the film is a surefire way of telling if the film is loaded correctly.

Arrows showing angle of view.

Now that the camera is loaded and you're ready to start taking photos, it's VERY important to understand how to hold the Widelux camera. You don't hold the Widelux like a regular 35mm camera because of how the lens swings and the wide angle lens; your knuckles and/or fingers will be on the sides of each negative. You want to hold the camera with your thumbs on the bottom of the camera and your fingers on the top—nothing on the sides. Take your meter reading, grab the camera on top and bottom, look through the viewfinder, and press the shutter. You'll hear the whirring of the shutter as the lens swings across the film plane. Wind the film to the next frame and repeat. It will initially feel odd, but once you see your fingers in the photos, you'll quickly correct the holding procedure.

 Now that you've finished the roll of film, press the rewind button on the bottom of the camera and rewind the film into the cassette. Open the back door and take the film to get processed. In my case, take it to the dark bag and processing tank to process the film.

My Results:

I took some photos of walking through the neighborhood for the blog post. I have taken the camera to Africa, Europe, and many other places and absolutely LOVE this camera.

My Conclusion:

What else can I say that I haven't already said in the blog? This is one of my, if not my favorite film cameras. I also love shooting with my Panon, but it's a more prominent and heavier camera, although the results are terrific with the Panon.

 I made a short video on the Widelux F7 basic controls & Loading film.

 Thank you for taking a few minutes from your day to read about this wonderful and exciting camera. I hope many of you have one; if not, you're missing a superb camera.

 Until next week, please be safe.

KMZ FT-2 Panoramic Camera

Since I got into photography, I have been a fan of panoramic cameras and images. The ability to see wide views of subjects similar to what you see in person seems very natural, so it's not unrealistic for me to have a variety of cameras to use during trips and other photographic jaunts I take to make images.

My KMZ FT-2 Camera

I came across a Russian-made KMZ FT-2 camera many years ago when I was a sales representative for one of the companies I worked for. I remember visiting EP Levine in Waltham, MA, and seeing the FT-2 and a Spinshot they had. I asked about the Spinshot because, at the time, I knew the Spinshot was something out of my price range. One of the owners gave me a reasonable price on the camera and case because, like many of these cameras, they take a unique film cassette, which this camera didn't have. I knew at that time I was buying it more for my collection rather than using it, but always in the back of my mind, it was something I wanted to put a roll of film into and shoot with. 

The Company:

KMZ (Krasnogorsky Zavod), also known as the Krasnogorsk Mechanical Works, is a prominent camera and optical equipment manufacturer based in Russia. Founded in 1942 in the city of Krasnogorsk, near Moscow, KMZ played a significant role in the Soviet Union's photographic and optical industries. Initially established to support wartime needs, the company shifted its focus to producing civilian products, becoming a key player in developing photographic technology in the Soviet era.

FT-2 camera, leather case and 2 different 3D printed cassettes

 KMZ became widely known for producing cameras and optical devices for civilian and military use. One of its most famous products is the Zenit series of single-lens reflex cameras, which gained a strong reputation for their durability and affordability. First introduced in the late 1940s, the Zenit cameras became popular among amateur photographers and professionals worldwide, especially during the mid-20th century. These cameras were equipped with reliable optics, often branded under the Helios or Jupiter trademarks, known for their exceptional image quality.

Another well-known KMZ product is the Zorki rangefinder cameras, which were modeled after early Leica designs. The Zorki cameras, like the Zenit series, were affordable and accessible, making photography more attainable for the average user. These cameras are now considered collector's items, valued for their vintage appeal and craftsmanship.

 KMZ also contributed to advancements in optical engineering. The company developed lenses for photography, cinema, and scientific applications, as well as optical sights and instruments for military use. The Helios-44 lens, often paired with Zenit cameras, became legendary for its unique bokeh effect and remains highly sought after by enthusiasts.

 Following the dissolution of the Soviet Union in 1991, KMZ faced challenges adapting to a market economy. While the demand for traditional film cameras declined with the rise of digital photography, KMZ continued producing optical devices and exploring new markets. The Zenit brand was revived by introducing modern digital cameras like the Zenit M, which combines vintage aesthetics with contemporary technology.

KMZ's contributions to the photographic and optical fields testify to its innovation and resilience. Despite economic and technological shifts, the company remains a symbol of Soviet ingenuity, with its cameras and lenses appreciated by photographers and collectors worldwide.

The Camera:

The KMZ FT-2, one of the first 35mm panoramic cameras, is a model of simplicity in design. Its bare-bones appearance, resembling a small black brick, belies its robust mechanical construction. The camera measures 4.75" wide by 3.25" deep by 2.25" tall, including the winding knob, and weighs 1 lb. 7oz. The FT-5 boasts a 50mm fixed F5 lens that swings across the curved film plane to produce 110mm long images on your 35mm film. This unique design eliminates barrel distortion, ensuring your horizontal lines remain straight when holding the camera level. However, due to the extended negative size, 24mm x 110mm rather than the typical 24mm x 36mm, you only get 12 images on a roll of 36 exposures, a testament to the camera's straightforward and uncomplicated nature.

 The FT-2 only has 3 shutter speeds: 1/400, 1/200, and 1/100 second. The shutter speeds are set by changing two levers on top of the camera and located just below the shutter cocking lever. The shutter cocking lever is a larger finger and thumb knob, which you turn clockwise to cock the shutter, and it swings back to the starting position at approximately 11:00 when the exposure is finished. A mechanical braking system slows the shutter to these speeds when shooting at the two slower speeds. When shooting at the maximum speed, the camera jolts when the exposure ends and has a reasonably noisy snap when the shutter spins on its axis and comes to a vibrating finish of the exposure. The shutter release is to the right of the shutter cocking knob and just above the frame counter.

Since the camera produces such a long negative, the manual states that you need to turn the winding lever so that the frame counter does three full revolutions around, then add one number to get to the next frame. So, if you were on frame number 5, after taking the photo, you'd turn the winding lever, watch the frame counter go three revolutions around, and then stop at number 6 to be ready for that photo.

Top view of KMZ FT-2 camera where all the controls are located.

 There is no optical viewfinder, but rather a flip-up mask that you put your eye up to and guess that that's the approximate area that will be in your photo. There is a bubble level on top of the camera, so it's easy to level out the photos. This is not so helpful when looking through the viewfinder, but if you use the camera on a tripod or hold it more at waist level, then it makes sense.

 To open the back of the camera to load film, the front of the camera, in both corners, are silver clips holding the back close to the front. Snap these clips out, and holding the back with one hand and the body with the other, you slide the back off the camera. To put the back onto the camera, there are small channels on the body that the back fits into to slide back onto the camera. Make sure the back fits into the channel slide, then back onto the camera, and snap the clips into position.

Using the Camera:

Fast forward about 25 years, and I pulled the FT-2 out of my shelf and started to play with it. The camera is in excellent mechanical shape, so I wondered if there's a way to adapt a regular 35mm film cassette into the camera for shooting with it. Doing my usual looking on the internet to see what advancements have been made, I came across Roger Hyam's website discussing how he had the same camera and  1 set of cassettes. To make the camera more enjoyable, having multiple cassettes would make shooting with the camera more manageable. Since loading the cassettes is time-consuming, he made film cassettes for his FT-2 with a 3D printer. In that article, he has a CAD design and explains the process.

 At this point, seeing that there is a somewhat easy way to get cassettes made for the camera, I looked into buying a 3D printer for this and possibly other projects down the road. While I still may do that, I found a local company close to my house that does 3d printing, Rex Plastics in Vancouver, WA., and Harvey, one of the engineers who does the 3D printing for the company. I called on a Friday to see if they could do this and sent them the CAD file. While Harvey was off that day, I received a call from him early Monday to say that this could be done fairly easily, and they had produced a Minolta 16 cassette and a 126 film cassette someone else needed, so he was familiar with working with film. 

 On Thursday or Friday, I stopped by Rex Plastics to pick up the cassettes I had ordered, which looked tremendous. They fit into the camera and looked like the items I saw online. I took them home and started to load film into the cassettes, only to find that the design I sent had a minor flaw. Once there was film in the cassettes, the amount of film pushed the knob of the spool through the top of the cassette, making it impossible to fit back into the camera. 

 I told Harvey what the issue was and brought it back to him with film inside to show him the issue. Rex Plastics is such a good company that Harvey said it wasn't a big issue and went back and made the spool smaller to accommodate the film capacity and changed the cassette top to accommodate a different spool that fits into the cassette. This took just a few days, and now I had cassettes I could take home and shoot with the FT-2 camera. One thing I did to the 3D-printed cassettes was to add some felt to the inside cassette to avoid any scratches that may happen when transporting the film from one cassette to the other. I took some old 35mm canisters, pulled the felt off them, and taped them into the 3D-printed cassettes with double-sided tape.

Loading the Cassettes:

Here's the process I used to load the new 3D-printed cassettes with film to put into the FT-2 camera. Most of this process has to be done in complete darkness. I used my light-tight changing bag, which I use to load film onto reels for processing, but this time, here are the items I needed to keep in the changing bag.

 2-3D printed cassettes

1 roll of 35mm film (unexposed)

1 piece of tape taped to one of the spools

1-pencil used to wind film

1-FT-2 camera with the back partially off

 I'll break this down into the steps I used. You may find an easier way, but this process went much quicker than I thought and seemed manageable.


  1. Out in the daylight, I took the leader from the unexposed 35mm film and taped it onto the take-up spool. I then took up some of the slack and put it into one of the 3D-printed cassettes. This is what you can do in the light; all the other steps are done in the changing bag.

  2. Put all the items from the above list into the changing bag.

  3. At this point, I wound all the film from the unexposed film into the take-up spool until I reached the end of the roll. To make the winding easier, I put a pencil into the end of the spool and turned the pencil. Do this for step 7, too.

  4. Tear the end of the film of the unexposed film from its cartridge.

  5. Open the second cassette and tape the end of the unexposed film to the spool of the second 3D-printed cassette.

  6. Slide the spool into the second 3D-printed cassette and put it on the cover.

  7. Rewind the exposed film from the first cassette into the second cassette.

  8. Once you feel the leader, stop winding. Now, you have all your unexposed film into the second cassette.

  9. Put both cassettes into the back of the camera. 

  10. Make sure the winding knob is engaged into the first 3D printed cassette and starts to wind, making sure the film is moving across the film path.

  11. You don't need to wind much, just enough to ensure the film is transporting.

  12. Put the back of the camera on the loaded camera and snap closed.


Now, you can open the changing bag, remove the film-loaded camera, and wind it to the first frame, which should only take a few turns.

 PLEASE REMEMBER: When you're at the end of the roll, you don't rewind it back into the cassette like a standard 35mm camera. You take the camera and load it back into the changing bag so you can load it onto your developing tank for processing. If you wanted to wind hard enough to pull the tape off one spool onto the other, you could do that, but that risks exposing the film if you don't tape the cassettes closed.

My Results:

With the camera loaded into my newly made 3D printed film cassettes and the sun shining on a typically overcast November afternoon, there was a chill in the air and a panoramic camera in my hands. I walked through my neighborhood to see what the camera would produce. After taking the photos, I was excited to see the results, so I loaded the camera, developing tank, and reels into the changing bag. I took the film out of the camera, loaded it onto the developing reel, put it in my developing tank, and processed the negatives. 

The overexposed area on the left of the images must have caused a slight light leak. Here's what I produced.

Conclusion:

What a fun camera! I really enjoyed using it. Loading the cassettes wasn't as big of an issue as others I've read about make it out to be if you think about the process. If you have one and need technical or repair information, I found this very informative website, The FT-2 Panoramic Camera Guide.

If you have one and need cassettes, don't hesitate to get in touch with Harvey at Rex Plastics. I'm confident he can print some for you, and they can ship them to you.

Thank you for taking some time from your day to read about this fun panoramic camera that produces excellent images. 

Until next week, please be safe.

References:

The FT-2 Panoramic Camera Guide: https://lens-club.ru/public/files/pdfs/4e9b2081c1c77ede9e70d985d6bacc5d.pdf

FT-2 Camera Manual: https://cameramanuals.org/russian_pdf/russian_ft-2_panaromic.pdf

Roger Hyam’s Website: https://www.hyam.net/blog/archives/10727

Rex Plastics: https://rexplastics.com/3d-printing-and-plastic-product-design