Rajar No. 6 Camera

My Rajar No. 6 camera

I don't know what it is about the Rajar No. 6 camera, but ever since I purchased my first McKeown's camera guide more than 40 years ago and spent hours leafing through the pages learning about all the different styles and shapes of cameras, I've always desired to have one in my collection.

 It wasn't until just a few months ago that I pulled the trigger and purchased one from a great reseller in the U.K. It was listed for parts that were not working. The seller was selling the camera for a friend and wasn't sure if it was in good working condition. They mentioned the shutter fired but couldn't guarantee the other working parts of the camera, so I took a chance and purchased it. I don't know why it took so long to get one.

 The shape of the face and the crosshatching on the camera's face drew me to it. It has a very classy and classic look, which is something I find on many cameras made during this timeframe.

 It took a while for the camera to arrive from the U.K., but it arrived last week, and I was anxious to see its physical condition. To my surprise, the camera was not only in excellent physical condition with no chips in the Bakelite, but the shutter was firing, and there was a roll of film still in the camera, which the seller failed to mention, so I was doubly happy.

 I took hold of the film advance knob to see if the film was advancing, and it was so at this point, I didn't see anything wrong with the camera. Not knowing how old the film was, I went outside to take the last few frames on the included old roll of film, and it wasn't until I got to the final frame I found out what was wrong with the camera. 

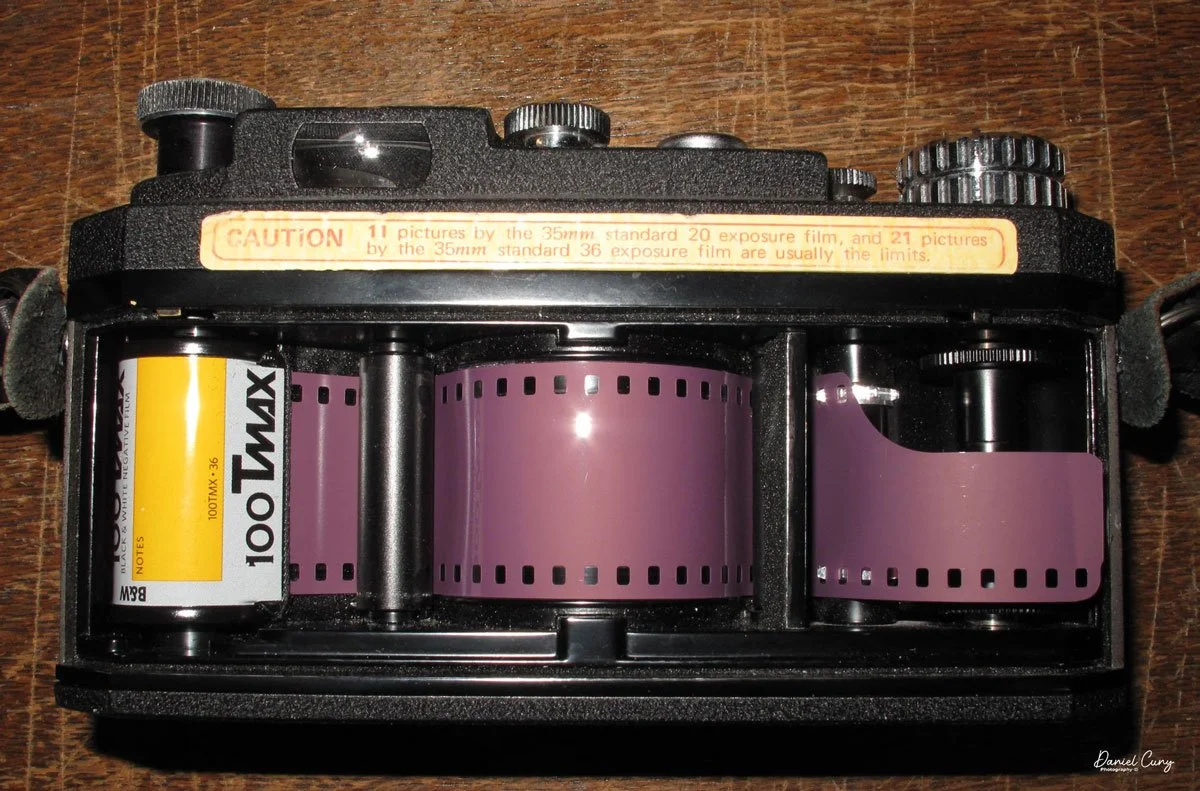
 I wasn't aware of what was so different in the film spool until I took the film out of the camera, which I needed to do in a dark bag since the camera stopped winding right after I took the final photo on the roll of film included with the camera.

 The Rajar No.6 camera has a special take-up spool written right there on the back of the camera, "only the Rajar No. 6 spool will fit this camera". I saw that when the camera arrived and at first I thought I couldn't shoot with it because it took a different or special size of film. Nope, it's the take-up spool. At least in my camera, the take-up spool is special and has a square tip that fits into the take-up spool instead of a slot that fits into most 120 spools. 

 It appears the Rajar No.6 has a brass item attached to the metal take-up spool that had become loose, making it impossible for the camera to wind the film to the next frame. The drive portion came loose, and the film wouldn't advance anymore. The disconnect of the brass piece and the take-up spool must have happened during the winding of the film, as it was working for a few frames. Another explanation is that the brass portion was stuck to the take-up spool and became loose after the film was with a few frames.

The Company:

Rajar No. 6 nameplate

Rajar Ltd. was established in 1901 as an offshoot of Brooks-Watson Daylight Camera Company Ltd., which had a facility in Liverpool. The company produced camera film, paper, and Rajar film backs for daylight loading film. In 1904, it moved to Moberly and was renamed Rajar Ltd.

 In 1921, Rajar Ltd. They merged with six other companies to form APM, Amalgamated Photographic Manufacturers Ltd. In London, in 1928, four companies involved in film manufacturing formed APeM, Amalgamated Photographic Equipment Manufacturers Ltd. APeM, which would eventually be rolled into Ilford, which is still one of the major film companies today.

 The Rajar No. 6 camera was introduced in 1929, just a year after APeM started. APeM also produced box camera as well.

The one thing that makes the Rajar No.6 camera unique is that the camera body, faceplate, and back are all made from Bakelite. The Rajar No. 6  was the first camera to have the majority of the camera built with the new material. As I mentioned earlier, it's incredible that after almost 100 years, the Bakelite is still in fabulous condition. There are no chips to be found, and the camera still has the gorgeous shine of the new camera.

My Camera:

My Rajar camera measures 6.5" tall by 4" wide, including the winding key, by 4.5" deep when the camera is extended. My camera weighs 1 lb. 0,6 oz., so the camera is very light. The camera is extremely simple as it has a meniscus lens, and an "Everest" shutter, meaning it doesn't cock. When you move the shutter release from one side to the other, the shutter fires, and then when you move it back, the shutter fires again, so you'll need to wind the film right after taking the photo to avoid double exposures.

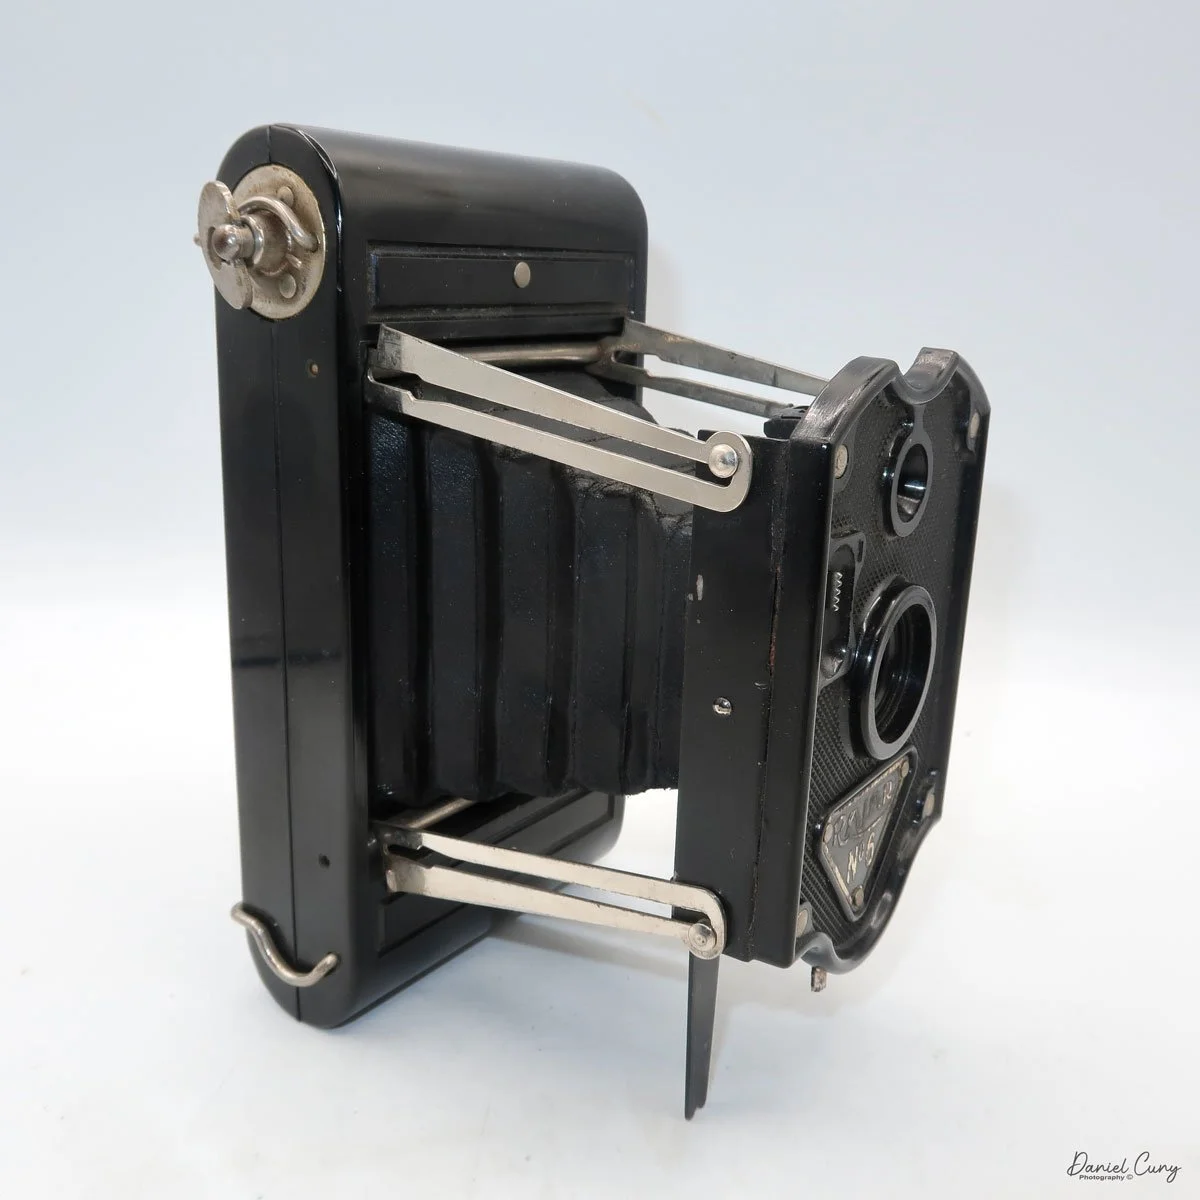
There is no aperture setting, as the lens aperture is set to what I'm guessing at F8. The only shutter speed setting is for instant or timed exposures. The Rajar No.6 camera is a strut-style folding camera, which means the camera body pulls away from the body on four chrome rigid arms, as opposed to the traditional folding bed style.

 It took me a few minutes to figure out how to pull the faceplate away from the body, but when I held the camera upside down, the faceplate dropped, and it was easy to pull it away from the body and lock it into position. To close the camera, you only need to pull outward on the four strut corners, and the faceplate folds back into the camera body. There is a small viewfinder on the top of the camera, but this only works for vertical photos. There is no viewfinder for horizontal images unless you tilt your head, which is very uncomfortable.

To open the back of the camera to load film, two clips hold the back onto the camera's body. Just flip back the clips, and the back can be lifted off easily. The Rajar No. 6 camera is a 6x9 format camera and takes eight exposures on a roll of 120 film. Yes, the only difference between the No. 6 spool is the take-up spool. It's not a different film size, as 120 film fits the camera well. I've even seen that Rajar made an adapter to fit onto its square proprietary film take-up end to fit into 120 film spools. I don't have one of the adapters, so I'll need to keep my special take-up spool and reuse it with each roll of film.

My Photos:

Since the take-up spool appeared to be broken and I couldn't pull the film from it, I glued the special square drive area directly onto the metal spool that it was spinning freely on. After waiting an hour or so for the glue to dry, I loaded a roll of 120 film into the camera and onto the special take-up reel. The take-up spool worked wonderfully, and I got through the roll of film without a hitch. In fact, the film transport was extremely smooth.

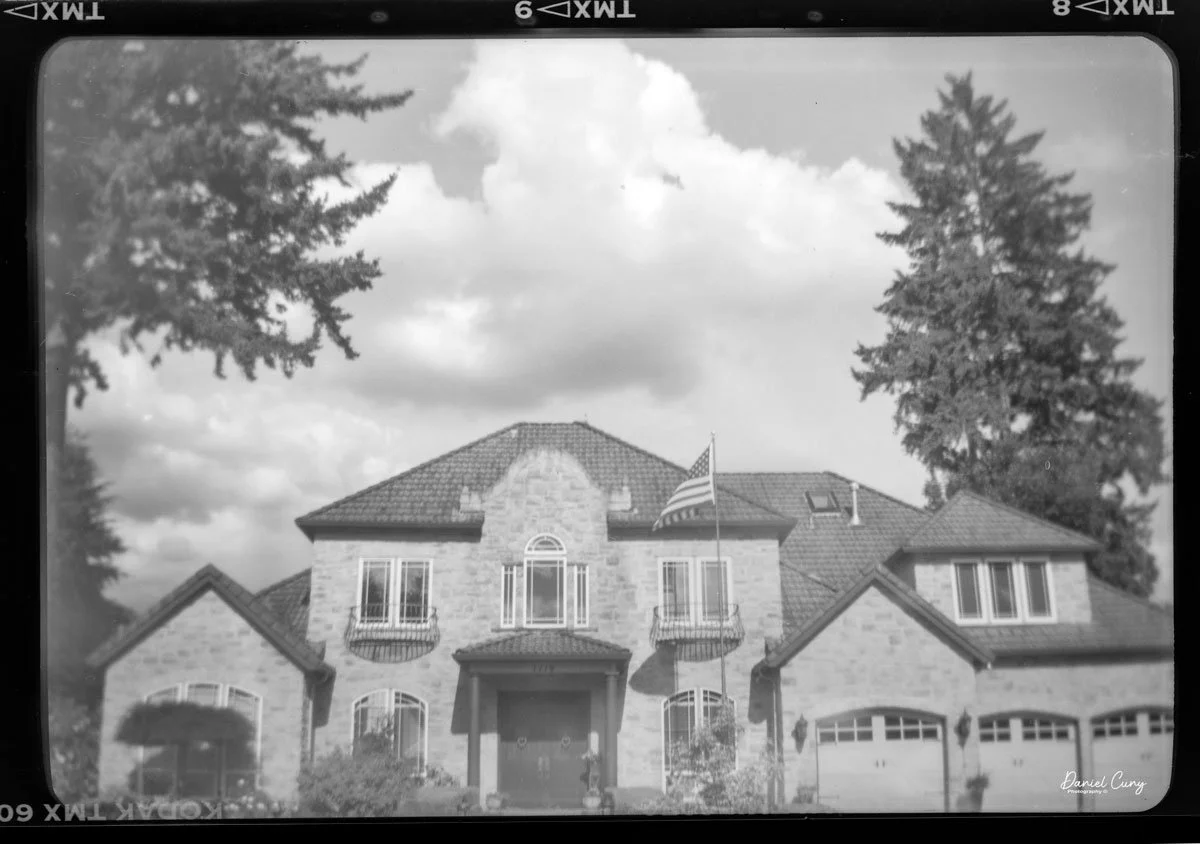
 Here are some results from walking through my neighborhood with the Rajar No. 6 camera.

Conclusion.

The images have a softness that I find appealing. They are very similar to Lomography-style cameras like the Diana. They seem a bit sharper than a Diana, but the lens has a creamy effect on the images (in my opinion). I enjoy that the corners are rounded on the negatives. I also see that the images extend into the rebate portion of the film's border, as I can see the film name and other information in the image area.

 The camera worked great. The shutter was smooth, and the film transport was even smoother. Once I glued the two pieces together and dropped the film into the camera, the photo-taking experience went flawlessly.

 The camera is compact, rugged, and a real "point-and-shoot" style camera. I aimed the camera for horizontal images and figured the lens on the camera was most likely for wide images, which proved to be true.

 Thank you for taking a few minutes to read about this fun and easy camera to shoot with.

 I'd love to hear from you, so if you have any experience with this camera or any of the others I've written about, please email me.

 Until next week, please be safe.

Panon Widelux F7 Camera

My Widelux F7 camera

I enjoy several different types, styles, or kinds of cameras. When I started collecting cameras over 50 years ago, I was drawn to anything out of the ordinary. If the camera had a different faceplate on a box-style camera or was a different color or shape, these were the items I've always searched for when I go out looking for cameras or anything photographic to add to my growing and now hopefully somewhat shrinking collection as I'm "trying" to downsize my collection.

 One of my favorite types and styles of cameras is panoramic cameras, which fit right in with the odd or unusual types made. They take different forms when you start to look at the various styles of panoramic cameras. They can look like a wood and bellows camera on a geared tripod, which would be a circuit camera and one of the first styles of panoramic camera. They can look like a more extended box style camera but have a lens that rotates across a curved film plane similar to the Kodak Panoram or more intricate Multiscope Al-Vista camera, which employed different sizes of "flags" to speed up or slow down the rotation of the lens. Or an elongated camera similar to the Fuji 6x17 or Horseman 6x12 camera.

Image taken from Widelux F7 Manual

 Essentially, panoramic cameras expose a longer piece of film in the camera itself. They generally have a wide-angle lens to expand the area the camera and film see. It is very similar to cropping the top and/or bottoms of any format film to give the appearance of a longer, broader photo. I remember in the 1980s and 90s when the camera had the "panoramic" feature built into the point-and-shoot camera that did nothing more than have a blade within the camera close to the film plane that would crop the top and bottom of the film frame to take what appeared to be a panoramic negative. Heck, they even had disposable cameras that did just that.

 I have several panoramic cameras, and a few years ago, I purchased a very good Widelux F7 camera. Cosmetically, it wasn't the best, and it needed some work, so I researched where and who could repair the camera for me. Ultimately, I sent the camera to Precision Camera Works in Lakeway, Texas. If the lens turret doesn't move smoothly across the film plane, the camera will cause banding due to the inconsistent movement of the lens.

 Upon completion of the overhaul, they did an outstanding job. They even replaced the difficult-to-turn rewind knob with something better, which makes the camera easier to rewind the film. The best part is the new rewind knob doesn't tear into your skin when you rewind the film, which was one of the big pet peeves of the camera before I had it serviced. They did return the old knob, so if I wanted to have it put back, it's quickly done.

The video below shows the camera being re-wound, then I changed the shutter speed to show the lens movement.

The Old and New Company:

The Old Company:

The Widelux camera was made by Panon Camera Shoko, which was started in 1952 by Nakayama Shozo. A small camera manufacturer originally made the Panon camera, which I wrote about back in 2020. It was a swing-lens camera made for 120-size film. The company was small but specialized in the swing-lens panoramic camera style and improved the larger 120-format camera.

 In 1958, the Panon company, known for its swing lens style of panoramic cameras, introduced its first 35mm panoramic camera, the Widelux F1. This camera, incorporating a 26mm f2.8 lens, exposed a film frame 24x59, approximately 65% longer than the standard 35mm frame. This extra area gives photographers a 140-degree diagonal angle of view and 126 degrees horizontally. Over the years, Panon Camera Shoko continued to innovate and improve its models, leading to the production halt of the F8 model in the mid-1990s.

 1963 Panon introduced the Panophic, a 120-film format swing-lens panoramic camera. This is an updated version of the Panon camera with an interesting design, a curved back, and a much larger viewfinder on top. In 1987, Panon introduced the Widelux 1500.

The New Company:

There is someone more famous than myself who also enjoys panoramic cameras and photography, and that's the Big Lebowski himself, Jeff Bridges, and his wife Susan, a tremendous photographer in her own right. They are partnering with Marwan El Mozayen, Editor-in-Chief of Silvergrains Classic, and Charys Schuler. They have formed SilverBridges, planning to re-introduce the new Widelux X camera. Their goal is to have the camera introduced sometime in 2025. My fingers are crossed, and if they need someone to test the camera and give it a review, I'm personally raising my hand now. I and a thousand other people have a much larger audience than I have.

My Camera:

My Widelux F7 camera is not just a piece of equipment; it's a companion on my photographic journey. It's 6.5" wide, 3 5/8" tall, and 2.25" deep from the front of the lens turret to the rear of the camera. The F7 weighs 1 lb. 14 oz. with a roll of film in the camera. Like all Widelux F7 cameras, I have a 26mm f2.8 lens, serial # 466392. The lens rotates on a cylinder across a curved film plane to get a longer negative area. Because of this longer negative, the camera only takes 21 images on a roll of 36 exposures. I generally get 22 when I use my camera. It will take approximately 13 on a roll of 24. Here is the manual for the Widelux F7.

There are only three shutter speeds on the camera: 1/250, 1/125, and 1/15. The aperture on the lens ranges from F2.8 to F11, so the exposure control, while adequate for most shooting, is less than what most people would consider normal. All of the controls are on the top of the camera, along with a bubble level to make sure things are straight, the film advance and rewind knobs, along with a wide viewfinder to give the photographer an approximate view of what they'll get within the photo.

The more tricky thing about the Widelux camera is the film loading. If not done correctly, which is what happened on my first roll, some of the negative areas won't be sharp. To take the back off the Widelux F7 camera, there is a locking knob on the back to lock by turning counterclockwise to the unlock position and clockwise to lock the back onto the camera, which is clearly seen.

 Once the back is off the camera, the typical film chamber is where you put the fresh roll on the right-hand side. Lift up the rewind knob to put the fresh roll in, then to hold it into place, press the rewind knob down to lock the film cassette into the camera. At this point, I crimp the very end of the film upwards to help the loading process.

There are two columns, one on either side of the curved film plane. The film must go under the first column on the left-hand side, then over the film plane, and then back under the column on the right-hand side. This is where I ran into a problem with my first roll of film. There is a slit between the right-hand column and what you see looking down on the camera. Make sure the film goes all the way down under the column before it comes back up by winding the camera and having the film drive gear pull the film leader back up. The first time I loaded the camera, the film went through the slot, and the right side of my negatives wasn't sharp, and I was disappointed.

One of the reasons why I crimp the end of the film leader is to grab onto the film drive gear when going under the second column. It needs something to catch onto to pull the film up and across the drive gear before I place the leader into the take-up spool. It's not that difficult, but you'll understand once you get the camera. Before I put the back onto the camera, I always take up the slack with the rewind knob, so once I put the film back onto the camera and lock it, I can see the rewind knob turn as I wind to the next frame. This way, I know my film is transporting across the shutter, and I'm taking photos. When I worked retail in a camera store, I can't tell you how many times I had people not load their cameras correctly, and watching the rewind knob turn when advancing the film is a surefire way of telling if the film is loaded correctly.

Arrows showing angle of view.

Now that the camera is loaded and you're ready to start taking photos, it's VERY important to understand how to hold the Widelux camera. You don't hold the Widelux like a regular 35mm camera because of how the lens swings and the wide angle lens; your knuckles and/or fingers will be on the sides of each negative. You want to hold the camera with your thumbs on the bottom of the camera and your fingers on the top—nothing on the sides. Take your meter reading, grab the camera on top and bottom, look through the viewfinder, and press the shutter. You'll hear the whirring of the shutter as the lens swings across the film plane. Wind the film to the next frame and repeat. It will initially feel odd, but once you see your fingers in the photos, you'll quickly correct the holding procedure.

 Now that you've finished the roll of film, press the rewind button on the bottom of the camera and rewind the film into the cassette. Open the back door and take the film to get processed. In my case, take it to the dark bag and processing tank to process the film.

My Results:

I took some photos of walking through the neighborhood for the blog post. I have taken the camera to Africa, Europe, and many other places and absolutely LOVE this camera.

My Conclusion:

What else can I say that I haven't already said in the blog? This is one of my, if not my favorite film cameras. I also love shooting with my Panon, but it's a more prominent and heavier camera, although the results are terrific with the Panon.

 I made a short video on the Widelux F7 basic controls & Loading film.

 Thank you for taking a few minutes from your day to read about this wonderful and exciting camera. I hope many of you have one; if not, you're missing a superb camera.

 Until next week, please be safe.