Nagel-Kodak Pupille

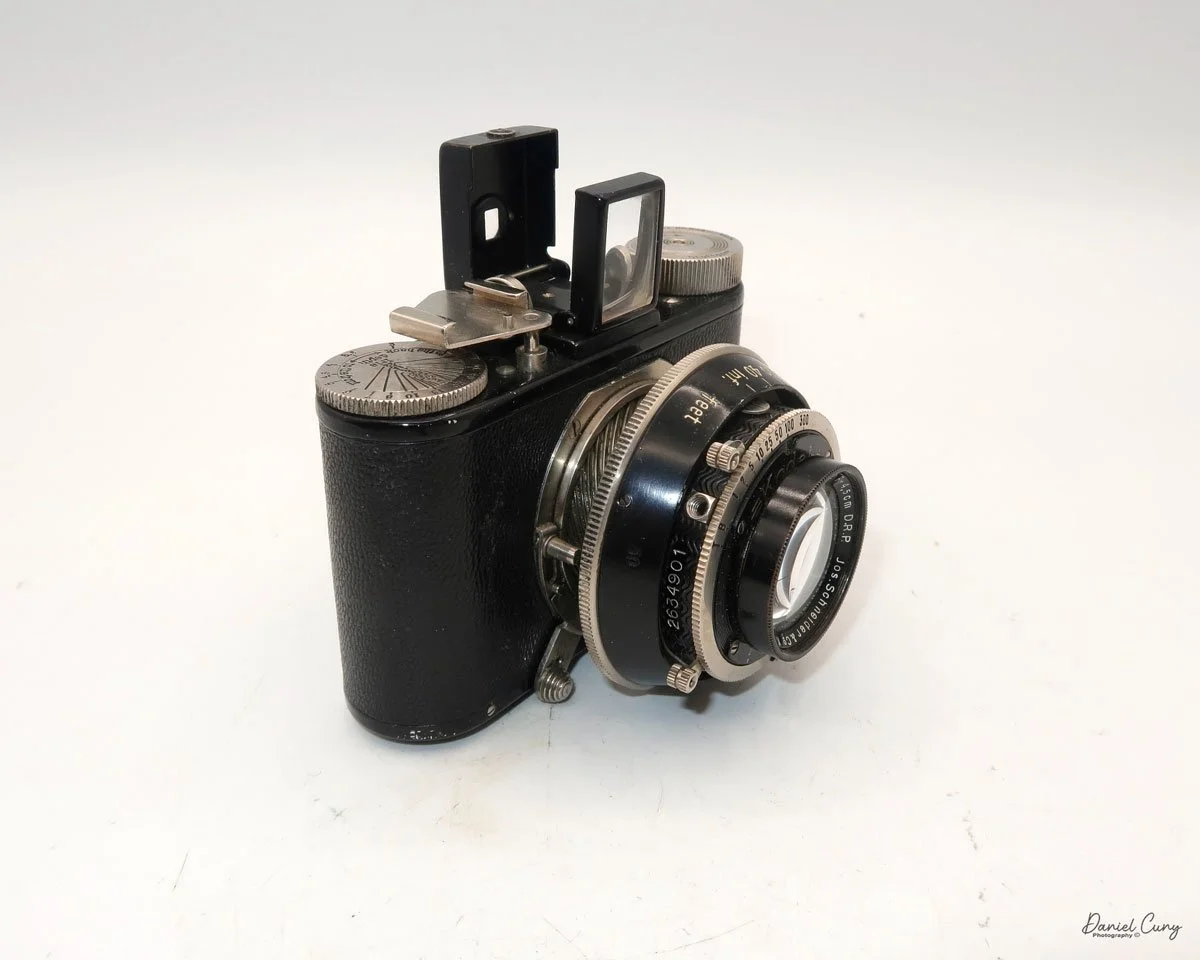
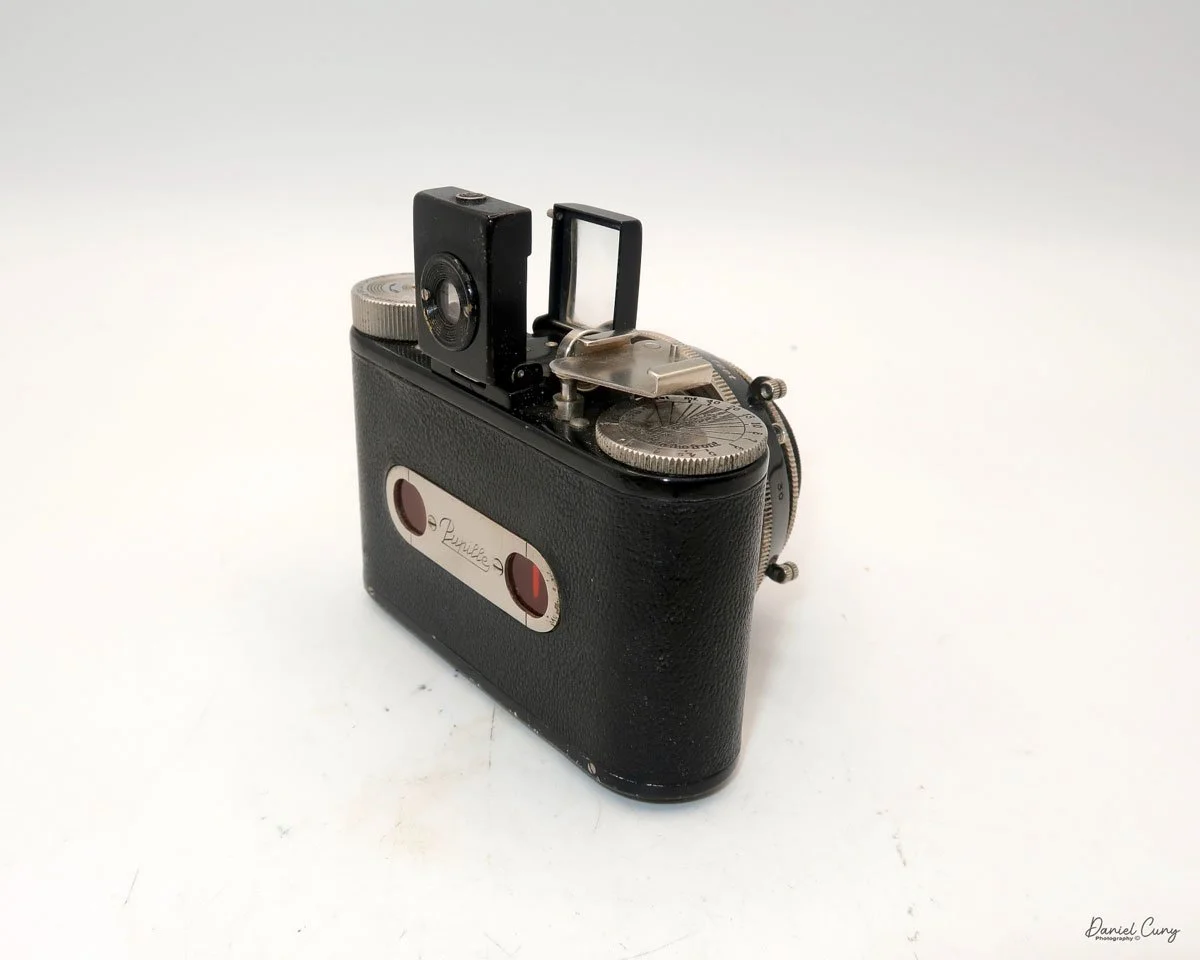
My Nagel-Kodak Pupille camera and case

Just after I finished last week's blog on the Ricoh Auto Half cameras, I was looking around the cameras on my shelf in my office, thinking which camera I'd write about this week. Nothing stood out to me, so I figured I'd let it rest for a day or two and think about it.

 Going to bed that evening, a camera popped into my head out of the blue. Having a thought or remembering something from earlier in the day is something that often happens to me, generally just as I lie down to go to sleep, something pops into my head, and that's just what happened.

 The thought that came into my head was that I remembered having a nice condition Nagel Pupille camera in a box a few months back, which I store with some of my better cameras. That's the camera I wanted to write about for this week's blog post.

 After I woke up, had my morning coffee, I settled into my office and opened the box of cameras to look for the Pupille camera I had. Right on top of other cameras was the case. I pulled out the case, and inside was the Pupille camera. Looking at the camera a bit closer, I say this was the Kodak version of the Pupille, which was introduced a year or so after its release.

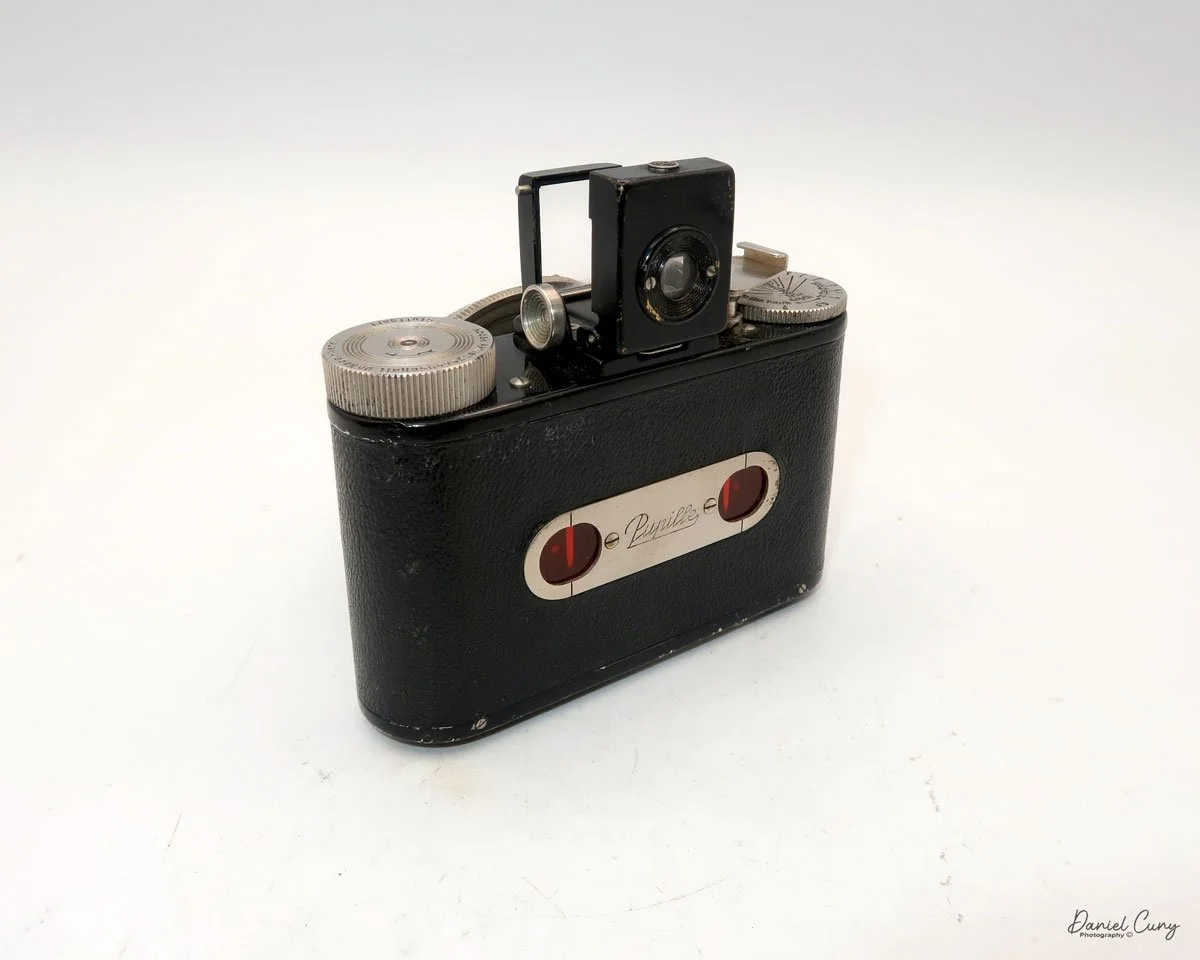
Logo on the camera’s back

 It was just as I remembered it. The camera was in excellent condition with the lens cap. The first thing I did was test the shutter, and most of the speeds seemed accurate to my ear. Some of the slower speeds were not closing, which is somewhat accurate for a shutter almost 100 years old. The upper speeds were working fine, so I figured I'd put a roll of 127 film into the camera and take it to the county fair my wife. I were planning on going to over the weekend.

 I recall purchasing the camera approximately 15 years ago at an auction I bid on. At the time, it was a lovely addition to my collection, especially since it came with the lens cap and a nice, fitted case for the camera. 

 The Nagel-Kodak Pupille was a camera I had intended to write about a few years ago when I started my blog posts, but then forgot about it for a while. When it popped into my head last week, I'm thrilled it did. 

History:

Dr. August Nagel (1882–1943) was a pioneering German camera designer and manufacturer whose innovations profoundly shaped photographic technology in the early 20th century. Born in Pfrondorf, Germany, Nagel displayed an early interest in camera construction. In 1908, at the age of 26, he co-founded his first company, Drexler & Nagel, in Stuttgart. This company quickly evolved into Contessa-Camerawerke, and by 1910, it had produced a broad range of camera models, which were distributed globally. Nagel's innovations during World War I included specialized aerial and balloon cameras, and his achievements earned him an honorary doctorate from the University of Freiburg in 1918.

 Seeking further growth, Nagel's company merged with Nettel Kamera-werke in 1919, becoming Contessa-Nettel, which became one of Germany's most significant camera producers. In 1926, in response to market pressures and Zeiss Stiftung's interest, Contessa-Nettel was merged with other major German camera makers to form Zeiss Ikon, with Nagel as director of manufacturing. However, management frustrations and a loss of control led him to leave Zeiss Ikon in 1928, after which he established his factory, Dr. August Nagel Werke, in Stuttgart.

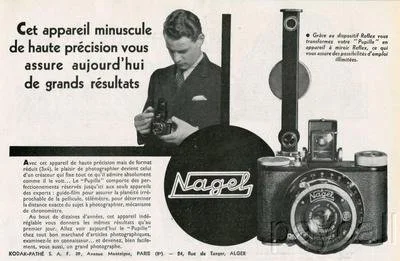
French ad for Nagel Pupille camera

 Nagel Werke quickly gained a reputation for producing affordable, high-quality folding plate and roll film cameras, notably the Vollenda models, introduced in 1929, and the more expensive Pupille, introduced in 1930. This success attracted Eastman Kodak, which sought to compete in the European precision camera market. In 1931, Kodak acquired Nagel Werke, making Dr. Nagel the general manager of the rebranded Kodak AG. 

 With Kodak's backing, Nagel devised the Retina 35mm camera and, critically, introduced the Kodak 135 film cartridge in 1934—a pre-rolled 35mm film format compatible with both Leica and Contax cameras. This cartridge would become the global industry standard for 35mm photography, marking Nagel's most enduring legacy.

 Under Nagel's leadership, Kodak AG's Stuttgart plant became known for its Retina cameras and innovations throughout the 1930s. Almost two million cameras were produced before World War II. Dr. August Nagel died in 1943, but his influence continued; camera production resumed post-war and flourished into the 1960s under his son, Helmut Nagel. Dr. Nagel's career typifies the innovative spirit of early photographic engineering and established many of the standards still recognized in the industry today.

My Camera:

My Kodak Pupille camera is a tiny, compact camera that measures 4" wide, by 2.5" tall with the viewfinder retracted and 3.5" with the viewfinder opened. The camera is 2" deep with the lens retracted and 2.75" deep when the lens is in the regular taking position. The camera weighs 14.5 ounces when empty, excluding film.

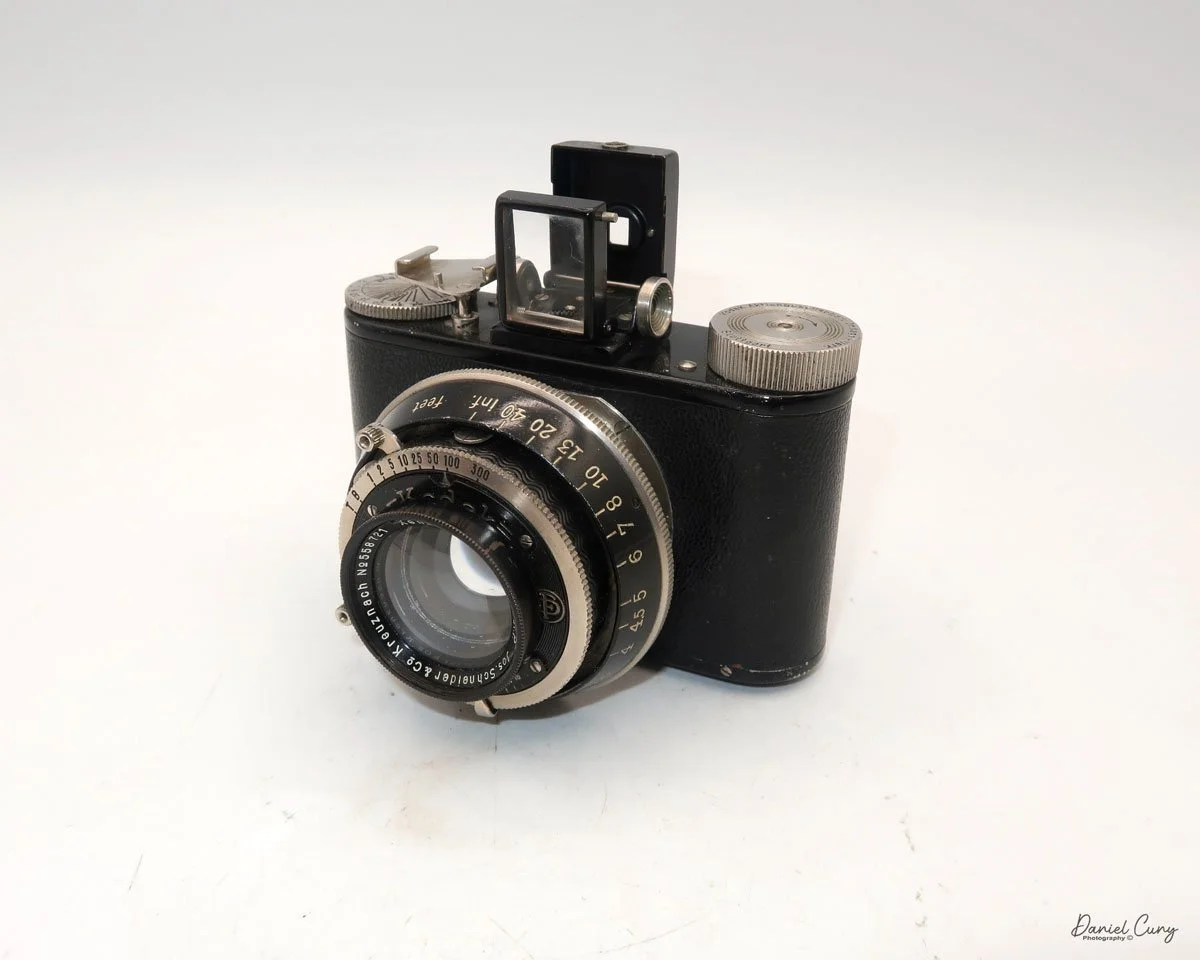
The camera captures a 3x4cm image on 127mm film. My Pupille camera has a Jos. Schneider & Co. Xenon 4.5 cm f/2.0 lens. The camera also had the option of Leitz Elmar 5cm F/3.5, a Schneider Xenon 5cm F/3.5, or a Cook Anastigmat 2" F/3.5 lens, all in a Fr. Deckel Compur shutter.

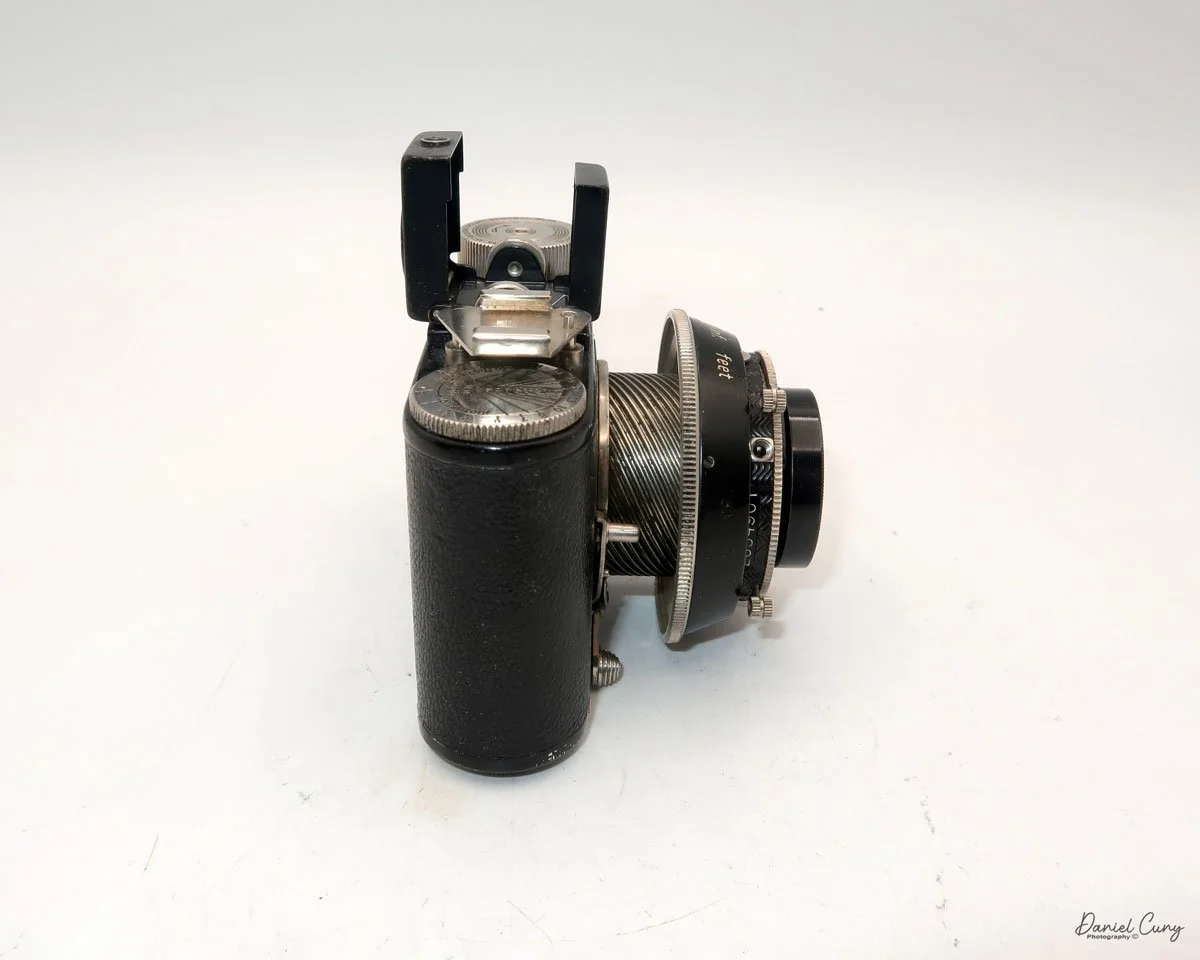
 On top of the camera, there is an optical finder that pops up, displaying a vertical image. If you want to photograph a horizontal subject, you'll need to turn the camera 90 degrees to photograph in landscape mode. Looking from left to right at the top of the camera, there is the film winding knob, the optical pop-up viewfinder, a removable accessory shoe for a separate rangefinder, and under the accessory shoe, the depth of field scale.

To take a photograph, you first need to slide the lens into the "taking" position. This is done by sliding the lever, located under the lens, to the left when facing the camera. Moving the bar slides the lens out from the camera body. The lens is mounted on a beautifully constructed helicoid, which becomes visible once the lever is moved and the lens is in the "taking" position. Around the shutter is a large black ring that focuses the lens. The focus range on the lens goes from approximately 30" or 2.5' to infinity. The numbers on the focusing ring are big and easy to read, and the focusing on this camera is smooth.

When you look at the back of this camera and many other cameras that take 127 size film, you'll notice the camera has two red windows on the back. This will become relevant once you read the loading and winding procedure for this style of camera, which will be explained over the following few paragraphs.

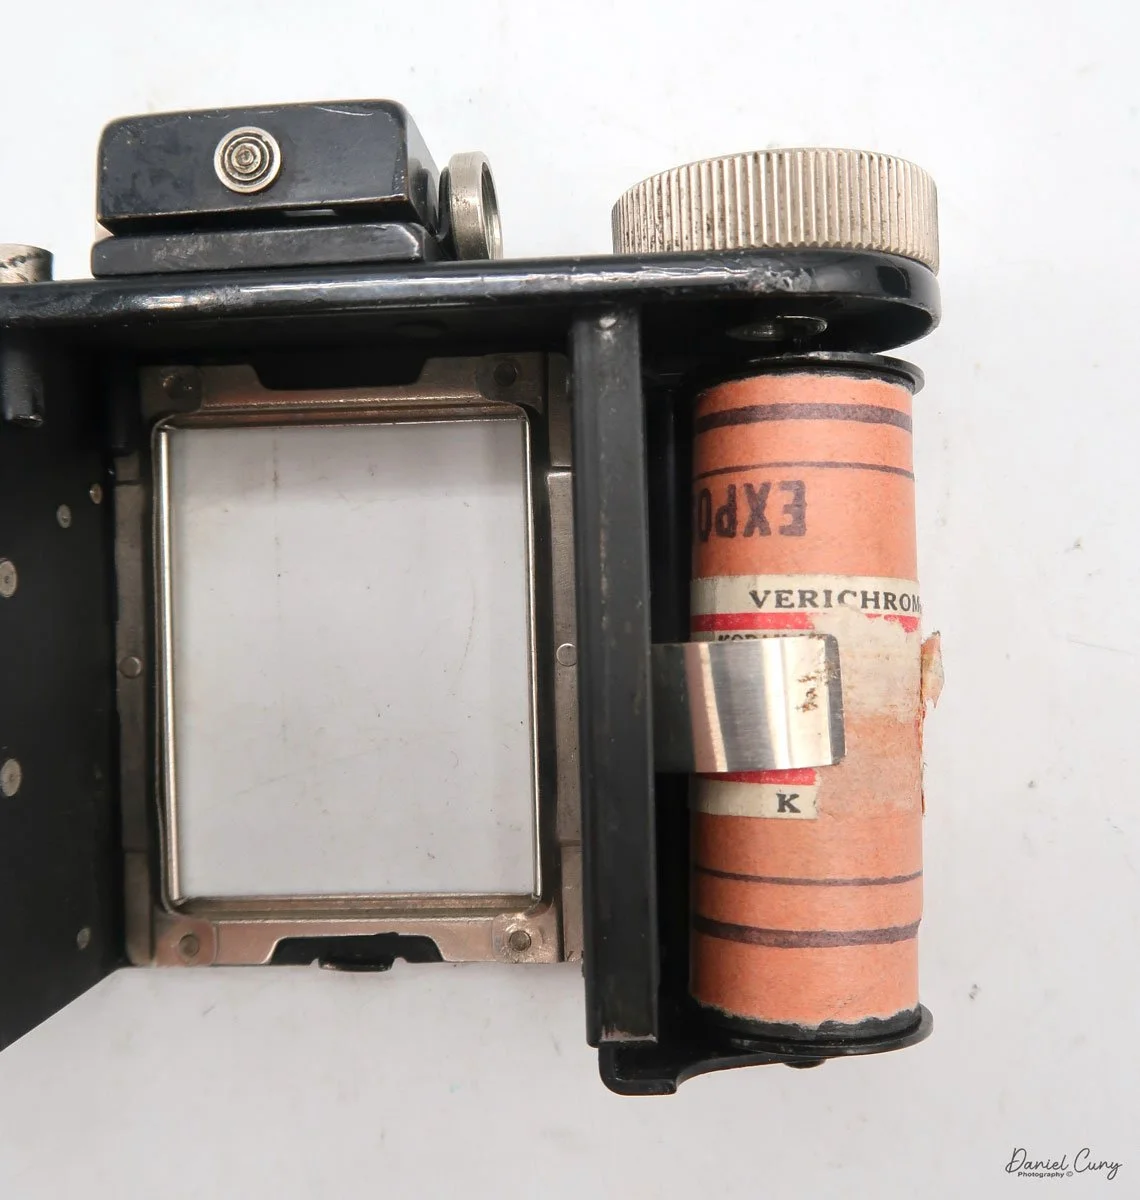
 To load film into the camera, first you need to unlock the body of the camera from the film chamber. You do this on the bottom of the camera by sliding the lever to the "O" position. You'll see a small line on the tripod socket that aligns the "C" (closed) setting with the "O" (open) setting. Once you have the film chamber unlocked, the top portion of the camera slides out of the camera body, exposing the area where the film is loaded into the camera.

 Take the empty spool from the right side by sliding the spool down. The holding mechanism is on a spring, and the spool will come out. Place the empty spool on the left side and ensure it's engaged in the take-up winding knob. Place the fresh roll of film on the right side and tear the tape so that you can bring the film leader over to the take-up spool, ensuring it is positioned over the rollers on either side of the opening where the film is exposed. Insert the film tab into the slot on the take-up spool and wind the winding knob until the word "start" appears on the paper backing. Once you see the word "start", slide the film chamber back into the camera body, ensuring it's fully inserted. Then, slide the lever at the bottom from "O" to "C" for closed.

 Now, look at the back of the camera and start winding the film winding knob in a clockwise direction until you see arrows in the window. This is the indication that you're approaching your first frame, so you should start to slow down on winding the camera. Stop winding when you see the number 1 in the right side window. This is the indication you're at your first image. Once you've taken the first frame, wind the film advance lever until you see the number 1 in the window on the left, and stop. This is the indication you're at your second image. Once that frame is taken, then wind until you see the number 2 in the right window. You follow these steps until you see the number 8 on the left side window, which means you've taken sixteen images on the roll of film. This operation is standard for 127 size film, which takes 3x4cm size negatives on a camera with two windows on the back.

 The standard operating sequence when using this camera is to have the separate rangefinder, which is slid onto the accessory shoe when the camera is in use. 


  1. Meter for your subject with a separate light meter.

  2. Look through the rangefinder and focus on your subject.

  3. Find the distance to your subject and focus the lens to that distance on the camera.

  4. Set the shutter speed and aperture setting on the lens. Shutter speed is located at the top, and aperture is positioned under the lens.

  5. Cock the shutter lever on top of the lens at the 11 o'clock position.

  6. Trip the shutter, which is below at the 7 o'clock position on the lens.

Retracting the lens back into the camera body is a little tricky and something I had to figure out, as I had done it wrong once. The first thing you need to do is focus the lens to infinity. Then, slide the bar at the bottom of the camera from left to right, and the lens retracts into the camera's body. If you don't focus the lens to infinity, the bar won't fit into a small cutout on the focusing ring. The bar will protrude from the bottom of the camera, rather than being tucked away neatly as it should be. Once the bar is back in the camera, you can remove the rangefinder, put the lens cap on, and tuck the camera away in its case, if you have one.


Something I've seen for the camera is an accessory reflex finder, which was made by Kodak, that turned the Pupille into a TLR camera. 

Results:

My wife and I attended our local county fair, where I loaded a roll of 400-speed 127 film into the Pupille and brought it with me to take some photos. I don't have the rangefinder for the camera, so all of the focusing I did was purely by guesstimation.

 Bringing my trusty Sekonic L-308 meter for accurate exposures, we walked around the fair looking for nice images to take.

 Once I got home, I processed the film, and here are some of the results taken at the fair. I generally only do light spotting on the images, so please excuse the excess dust on them.


I posted a video review of this camera. Just click on the image. I’m new to videos, so any constructive feedback is appreciated.

Conclusion:

One of the first things I noticed when using the Pupille was how sturdy the camera felt. It's small and compact, fitting into my pocket, especially when the lens is retracted.

 The camera was easy to use, and the shutter worked well. There were a few frames when I didn't focus properly, but for the most part, the camera did a good job, and it was great fun to shoot with. 

 Thank you for taking a few minutes to read about this almost 100-year-old camera that still works fabulously.

 Here's a link to some of the other camera reviews.

 Visit Cuny's Camera and Photo for some of the items seen on my blog, along with other interesting photo items I have for sale.

 Until next week, please be safe.

Welta Perfekta

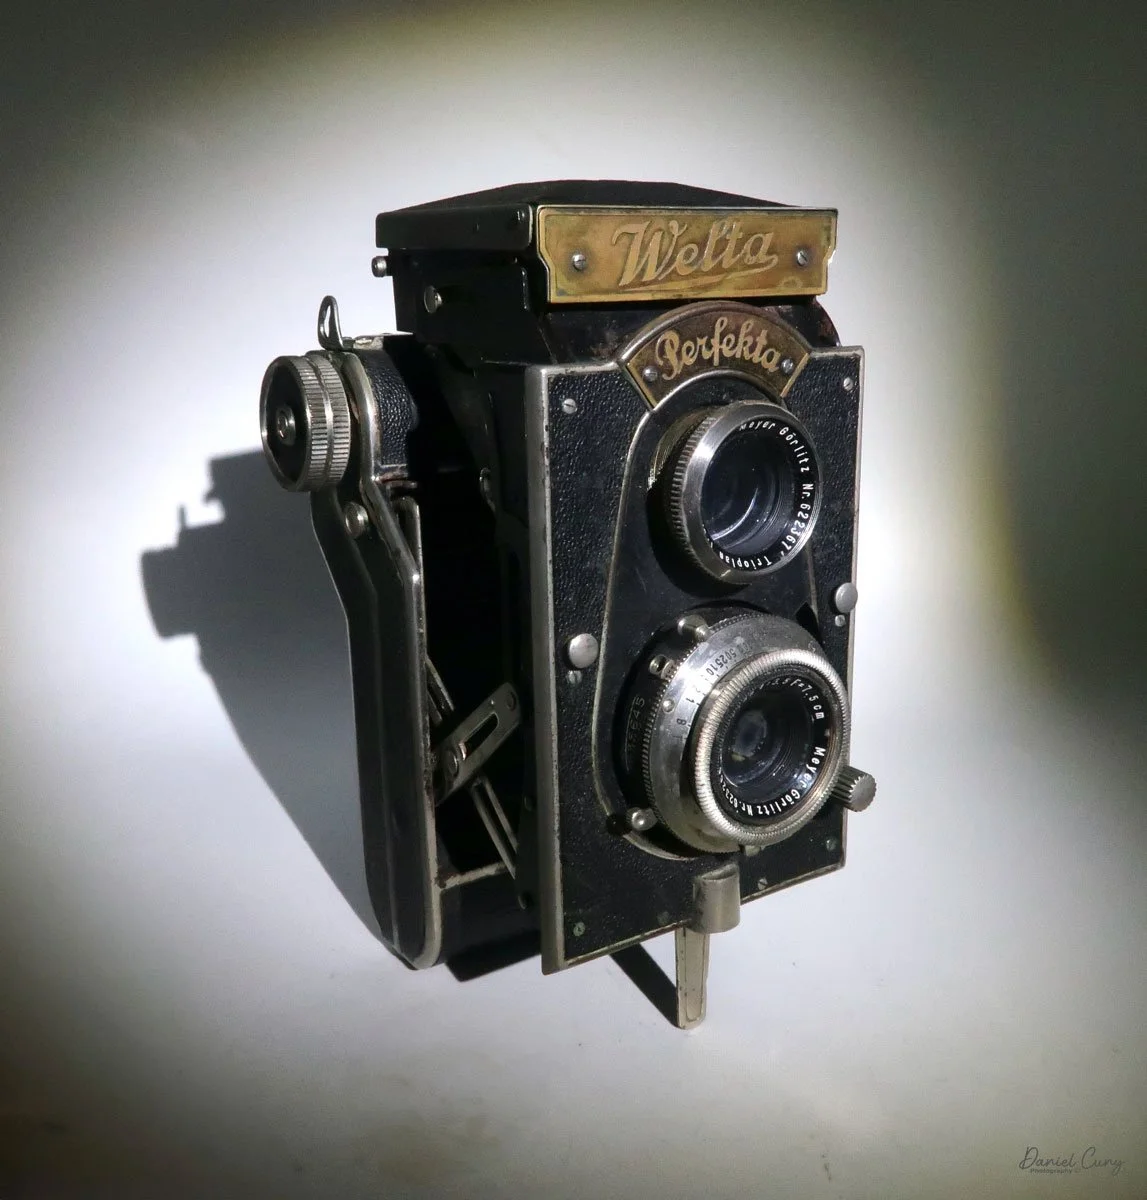
My Welta Perfekta camera

As I've mentioned in the past, I'm always drawn to the colorful, or odd and unusual cameras. As a camera collector for over 50 years, and having spent countless hours poring over many of McKeown's price guides to cameras, there are cameras that I'm always intrigued by and would love to own. Cameras like an original daguerreotype camera, the Rectaflex Rotor, a three-lens camera, or a beautiful Compass camera made by Swiss watchmakers Le Coultre et Cie for Compass Cameras Ltd., London, England. All of these cameras are out of my league in terms of pricing, unless I win the lottery and have a few hundred dollars burning a hole in my pocket.

 To me, the most enjoyable aspect of collecting cameras is the hunt to find a rare or somewhat rare camera, lens, or other photographic item. Every once in a while in this collecting game, you come across a hidden bargain.  It could be something at the bottom of a box, or just that the person selling the item isn't fully aware of the value of items, and (to me), that is a highly satisfying feeling.

 Having had that same feeling about a year ago when I was at a garage sale in one of the neighboring towns, and I saw a Welta Perfekta camera. As I picked up the camera, it appeared to be in good condition. The shutter worked, the viewfinder seemed clean for being nearly 100 years old, and all the leather was intact. It was a nice camera, and one I'd love to have in my collection. When I asked about the price for the camera, the person selling it said it was her grandfather's. 

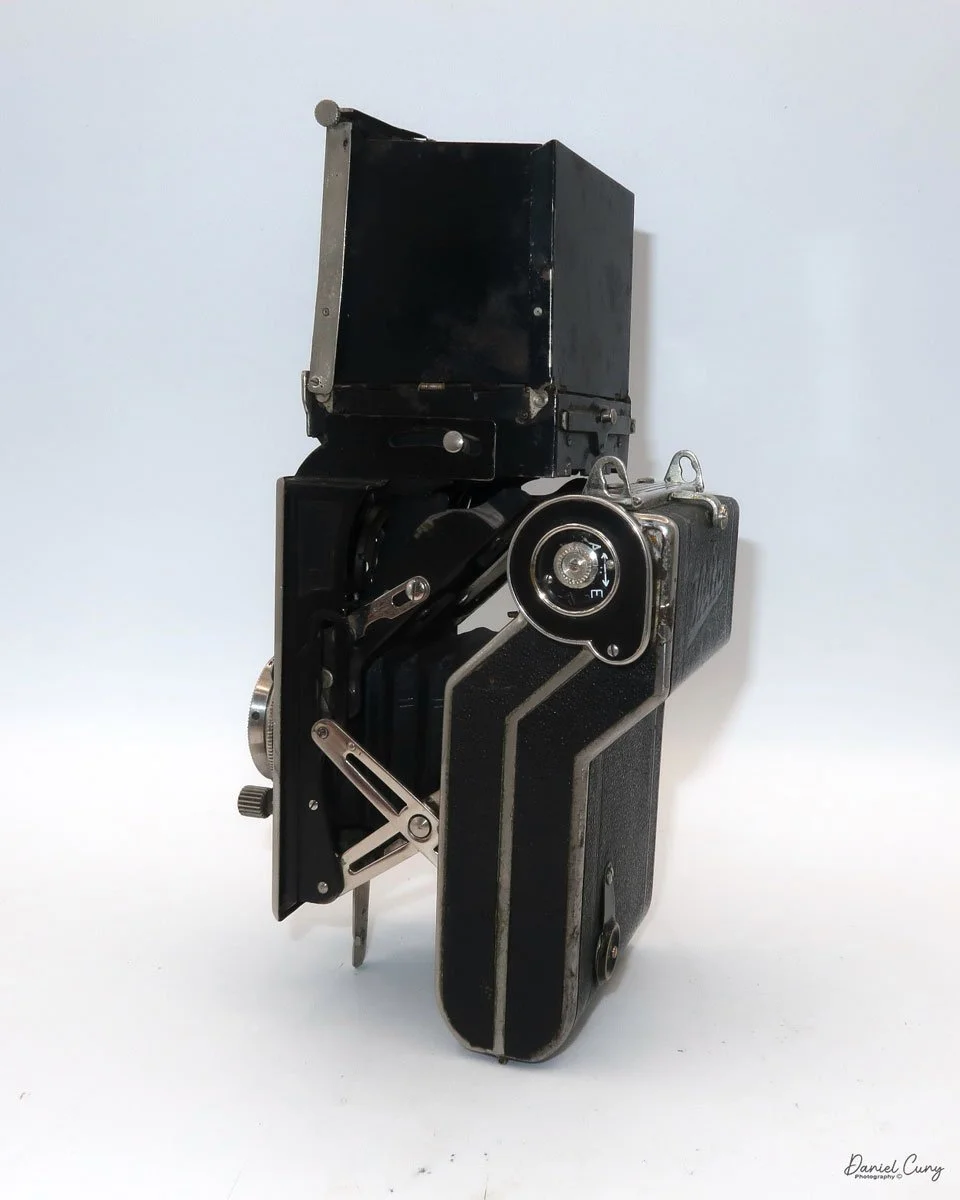
Odd shaped camera body

 Letting the seller know that the camera was in good condition and nice shape. I provided the seller with some information on the camera's age and a brief overview of the company. I let them know that I had collected the camera, written a weekly blog about it, and would love to have it in my collection. The seller said that, since I was a collector, it was important to them that the camera go to a good home, and they offered me the price of $50.00. I was happy to pay that price for such a nice example, and at that point, we were both pleased that the camera had a new home.

 I was familiar with the camera because I had written about the Zeca-Flex camera a while ago, and its shape had intrigued me. The Perfekta has a very similar shape to the Zeca-Flex as they are both folding Twin Lens cameras. These are twin-lens cameras with a large viewfinder that opens and closes, comparable to other twin-lens reflex cameras. The body of the camera folds into the film area, making the camera much smaller and more portable. 

History:

Since I just wrote about the history of Welta in last week's review of their Penti camera, I thought I would spend this review focusing on the history of the Reflekta camera, along with its older brother, the Superflekta camera.

 Both the Superflekta and Reflekta cameras are folding twin-lens cameras. As I previously mentioned, they are considered pocket cameras, which means they are smaller cameras intended to be easily transported in your coat pocket. They are a mix of pocket cameras introduced by Kodak in 1912 with their Vest Pocket cameras, and a Twin Lens Reflex camera introduced by Rolleiflex in 1929.

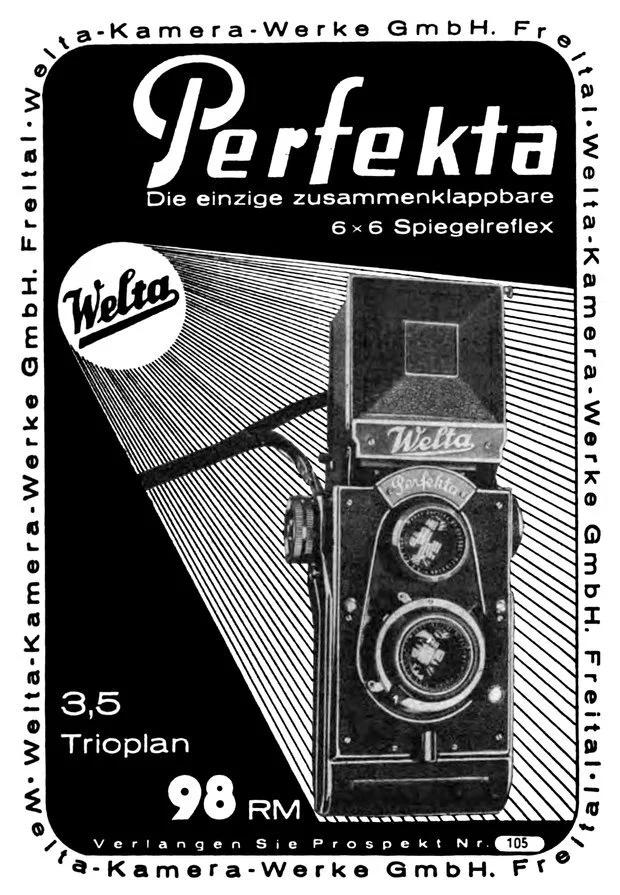
 The Perfekta camera was introduced in 1934. It's a medium-format camera that takes 6x6cm images on 120mm film. It features a large viewfinder that opens like the Rolleiflex and other Twin Lens Reflex cameras of its time. The body of the camera pops away from the film chamber, utilizing a bellows system that separates the lens from the film chamber, and forms an oddly shaped camera. There is a tripod socket and arm on the bottom of the lens area that allows the camera to stand upright on a flat surface, such as a table, if needed.

 The Perfekta could be purchased with one of three different lenses they sold. You had your choice of either a Meyer Trioplan 75mm f/3.5, Schneider Xenar, or Carl Zeiss Tessar 75mm f/3.8 lenses.

 The Superflekta was the first of this style of camera introduced by Welta in 1932. It's a larger camera that takes 6x9cm images on 120 film. The most intriguing feature of the Superflekta camera is that the film chamber rotates from a vertical position to a horizontal one for landscape-style images. This is very similar to how the Cornu Ontoflex operates. The photographer doesn't rotate the camera; instead, they rotate the film to achieve a horizontal image. 

 Rotating the film's back makes sense, as the camera features a ground-glass viewfinder to focus on the image. If you rotated the whole camera, the viewfinder would be on the side, which would affect composition. Turning the film chamber is a remarkable achievement in that camera. I can see where the Perfekta came into play as it's a bit smaller than the Superfekta. With the square format, Welta could cut down the size of the camera and make it even more "pocketable".

 The difference between the Zeca-Flex and both the Superfekta and Perfekta cameras is that the Zeca-Flex is more linear in design, and doesn't have the almost "S" shape that the Welta cameras incorporate. Only the bottom portion of the Zeca-Flex pops out to take the photo, then can be slid back into the camera's body for transport. 

 While Welta wasn't the first to introduce this style of camera, that honor goes to the Pilot 34 or Pilot Reflex camera made by Kamera-Werkstätten Guthe & Thorsch, another great camera manufacturer in Dresden. This camera was introduced in 1931 and was also a twin-lens camera with a bellows system.

 Both the Welta Superflekta and Perfekta cameras were only produced for a few years due to the complexity of their manufacturing. Another factor that contributed to the downfall of the Superfekta and Perfekta was the larger size of the viewfinder, which prevented it from folding into the camera body, thereby making the camera less compact.

My Camera:

My Welta Perfekta camera is 6.5" tall, by 4" wide including the film advance knob and frame counter, by 3.5" deep. These measurements are with the camera completely closed and in it's most compact state. When the camera is fully open, the camera measures 8.5" tall by 4" wide by  5" deep, and the camera weighs 2 lbs—2.2 oz. My camera has the Meyer Trioplan 7.5cm F/3.5 lens.

 To open the camera and pop the lens area from the film area., There is a round button on the right side of the camera, under the film advance knob, that you press. Once pressed, the body pops away from the film area, exposing the camera's bellows, along with the angled mirror area of the viewfinder system.

On the back, to the right of the viewfinder, is a small button that you slide to the left to open the light chimney of the viewfinder. The light chimney should pop up, exposing the ground glass for focusing. On the inside of the front wall of the light chimney is a magnifying glass that helps with focusing, a feature common in twin lens reflex cameras. On the left side of the chimney is a knurled knob that flips up the magnifying glass when turned, and flips down when turned in the opposite direction. 

Closing the light chimney, fold the sides in first, then the back, and finally, fold the chimney down into the camera's body. It will then lock into place.

 To focus the camera, a knob located just to the left of the lens/shutter assembly slides up and down, allowing you to adjust the focus on your subject. The lens moves in and out on a helicoid from the camera's faceplate. There is no focus distance written on the side of the camera, so you can't set the distance and shoot. All the focusing is done through the viewfinder, which I find somewhat dark and difficult to view on darker days.

 To close the body of the camera for transport, press the two buttons located on either side of the front plate. Once pressed, the body will push into the film chamber area and click into place. Just be sure to flip up the leg under the camera; otherwise, the leg keeps the camera from fully closing. I learned that when I tried to close the camera, I noticed the lever sticking out, ops!!

Taking the photo is pretty basic. The shutter speeds on my camera go from 1/300 to 1 sec. along with "B" and "T" for timed exposures and are set via a ring around the lens. The aperture ranges from F/3.5 to F/22 and is set by a slider arm located under the lens. The shutter cocking lever is located at the top of the lens, and the shutter release is positioned on the right side of the lens.

Loading the film is similar to that of many other medium-format cameras. On the back of the film door is a button that you slide to the left and pull down; the film's back will then open. I first noticed that where you put the fresh roll of film, along with the take-up spool, are hinged guards that both of these items fit into. The winding knob pulls out to make it easier to insert the empty spool into the chamber. Then, flip the small guard down to keep the spool in place. Similar to where you insert the fresh roll of film, once the film is in place, flip the guard down to keep it in position.

While the camera features a covered red window on the back, it also has a unique frame counter. On the inside of the film's door is a slotted rod that rolls on the film's paper backing, and it is equipped with a gearing system attached to a round frame counter, which tells the photographer which frame they are on. 

Here's how it works. Once you load the film, use the red window to access frame number one. On the inside of the frame counter, you slide the knurled wheel from A (Aus=Off) to E (Ein=On). Doing this sets the frame counter to number one, and after you take a photo, the ribbed wheel advances the frame counter every time you advance the film from one frame to the next.


Results:

I loaded the camera with an older roll of T-Max 100, the fastest 120 film I had available, and went for a walk with my sister, Laura, and her dog, Sally, taking photos along the way.

 Unfortunately, the day was overcast, and I had forgotten to bring my light meter with me, so I was forced to use a light meter app on my phone, which I dislike doing, as it always seems to get it wrong. However, it didn't fail me again, and the negatives I processed were underexposed.

 Here are some of the better ones from the walk.

Conclusion:

I must say that this camera was delightful to shoot with, and for the price paid, it was well worth every penny. The only drawback would be the darker viewfinder and difficulty I had focusing on the subject.

 I liked the size of the camera; I enjoyed how compact the camera is to use. The shutter and aperture worked well, and the odd shape of the camera was certainly a conversation piece when I talked to some of the neighbors I met along the walk to take photos. The camera is less bulky to transport and carry around than a traditional twin-lens camera, and the optics are excellent—an enjoyable camera that I plan on using regularly.

 Thank you for taking a few minutes from your day to read about this unusual, yet jewel-like, camera. 

 Click on the link for some of the other cameras reviewed.

 I also run an online eBay store, Cuny's Camera and Photo. If you're interested in older cameras and other camera oddities, I have for sale.

 Until next week, please be safe.

Bolsey 8 Camera

My Bolsey 8 camera

Being a big fan of Bolsey cameras, I was thrilled when a Bolsey 8 camera showed up unexpectedly with a "lot" of cameras purchased online. It was buried in the photo, and all you could see was part of the case, so to my surprise, I picked up the camera and unzipped the case to find a somewhat rare Bolsey 8.

 I've owned several different Bolsey cameras and even written about a couple in my weekly camera blogs. One is the Bolsey Flex-Trio, which I had in the original box with the flash. Just a year or so ago, I wrote about the unusual Boley Model C twin-lens camera. Both cameras are very well made, and I've always enjoyed shooting with them and having them in my collection.

 In 1956, the Bolsey 8 camera was marketed and sold as the only miniature 8mm movie and still camera made. There was even a "Lady Bolsey 8" camera sold in the United Kingdom, which I'll need to keep my eye out for a possible future purchase.

 There are many movie cameras that have single-frame capability, which is used in animation. Still, none of them that I'm aware of can change to different shutter speeds when using the camera in the single frame mode. The Bolsey 8 has just that capability and is extremely small and compact. There's an excellent website for subminiature cameras at www.submini.com, and if interested, they have a copy of the Bolsey Manual.

History:

The Bolsey Camera Company was established in 1947 in the United States by Jacques Bolsey, born Yakov Bogopolsky in Kyiv, Ukraine, in 1895. Bolsey's journey into camera design began in Switzerland, where he initially studied medicine but soon shifted to mechanical engineering and photography. 

 In the 1920s, he designed the Cinegraphe Bol, a 35mm cine camera, and later developed the renowned Bolex line of movie cameras, which became highly regarded for their precision and durability. After selling the rights to Bolex to Paillard in Switzerland, Bolsey contributed to developing the Alpa camera before immigrating to the United States in 1939.

 In America, Bolsey worked for the government during World War II, designing aerial and ground photography cameras. He then founded the Bolsey Camera Company to produce user-friendly, affordable, and durable cameras for the consumer market. The company's most iconic products were compact 35mm rangefinder cameras, such as the Bolsey B series (B, B2, B22, Jubilee), which featured cast aluminum bodies, coupled rangefinders, and built-in flash synchronization—a rare feature at the time. 

 The Bolsey C series combined twin-lens reflex (TLR) and rangefinder designs. The company also produced subminiature cameras using 8mm film and pseudo-TLR models like the Bolsey-Flex.

 Bolsey cameras gained popularity in postwar America for their accessibility and portability, appealing to amateur photographers and families. However, by the late 1950s, the company struggled to compete with the influx of advanced, competitively priced cameras from Japanese manufacturers. 

 Although the Bolsey Camera Company ceased operations in the early 1960s, its innovative designs and commitment to democratizing photography left a lasting legacy. Today, Bolsey cameras are prized by collectors for their unique blend of engineering, aesthetics, and historical significance.

My Camera

My Bolsey 8 camera is 3.25" tall by 2.5" deep by 1.25" wide and weighs 12.3oz. The camera is tiny yet easy to hold and extremely well-built. The Bolsey 8 has a clock drive spring motor that advances the film cartridge in the camera. My Bolsey 8 camera has a Bolsey Elgeet Navitar 10mm f1.8 lens. A wide-angle lens (6.5mm) and a telephoto lens (20mm) were also available for the camera. The serial number on my camera is 08823, stamped on the back of the camera just under the viewfinder.

The Bolsey 8 camera has variable shutter speeds, which include 1/600, 1/300, 1/200, 1/100 & 1/50. These are set on a small dial just above the lens. The Bolsey 8 also has an aperture range from F1.8 to F22. A large wheel sets the aperture on the side of the camera body, showing what aperture the user has the camera's lens set to. In between the lens and the aperture settings are the focus marks for the distance you are from your subject. The focus on the lens needs to be set from one foot to infinity, with another setting in between, for landscape, group, or portrait. You cannot miss this in front of the camera. 

Also, on the front of the camera, below the lens, is a wheel that turns with "M" on the top, "L" in the middle, and "S" on the bottom. To use the camera as a movie camera, turn the wheel to "M," and for still photography, turn the wheel to "S." Press the button to activate the shutter on the camera in either the "M" or "S" modes. "L" locks the camera's shutter so you can't accidentally run the camera while the camera is in your pocket or fitted camera case.

 On the right side of the camera is the large winding key, which you turn clockwise to wind the motor. In the back, in the top corner, is the footage counter, which tells you how many feet of film are still available to use on the roll.

On the left side of the camera is nothing more than the Bolsey logo on a metal label on the top left front of the camera, and on the bottom right back of the camera is a window that allows you to see the recommended exposure settings information imprinted on the special Bolsey 8 film cartridge. To take the side of the camera to load the film, you pull the side off the camera by pulling from the small knob on the top of the camera. The back will come off, and you can insert the film magazine into the camera body. Then, just snap back on the side of the camera for shooting.

 The film used in the Bolsey 8 camera is a single 8mm magazine of 25 feet. The roll of film that was still in my camera was Kodachrome 25, which is a fantastic still film and one used extensively in the late 1950s and early 1960s. I can remember it's a film my dad used in our family movie cameras.

Results:

The camera wasn't used because the film in it is very old and Kodachrome, a type of film for which processing is no longer available, is not available. 


Conclusion:

I can tell you the camera was in good working condition. All the shutter speeds worked, and the lens was clean, so it would have been fun to try it out and see what results you could expect.

 Thank you for taking a few minutes from your day to read about this two-in-one camera. It is an excellent still and movie camera built into one small, dynamic package.

 I'd love to hear from you about this or any other cameras I've written about. Click on the link to read other camera reviews I've done.

 I also have an online store called Cuny's Camera, where I sell old, vintage cameras, lenses, and other knickknacks.

 Until next week, please be safe.