Futura-S Camera

My Futura-S camera.

As a camera collector for over 50 years, I was unaware of the Futura cameras for almost 45 years. It wasn't until a friend and fellow collector mentioned the Futura camera that it stuck in the back of my mind, as I haven't come across one in all these years of collecting.

 After hearing about the Futura cameras, I did some research and had many questions: How well were they built? How many lenses were available? How many different models did they offer? What lens mount did the camera offer? So I pulled out my trusty camera bible, McKeown's camera guide, and started to learn about the little-known (to me) brand of Futura cameras.

Futura Logo on the camera

Having purchased my Futura-S camera in a "lot" of cameras purchased, and it wasn't until I received the box of cameras that I noticed one of the cameras was the Futura-S. The only thing in the photo of the camera "lot" was the back of the brown case. The top of the case was missing, so I figured it was some random or very common camera that I've owned in the past, but when I took the camera out of the case, the Futura was in surprisingly good condition and seemed to be working, too.

 Picking up the camera, I set the shutter speeds to higher speeds to see if the shutter fired, and it did. The transport moved and cocked the shutter. The lens looked clean, and then I tried some of the slower speeds on the camera. That's where I ran into some difficulty. The slower speeds locked up the shutter, and it wasn't until I reset the shutter speeds to a higher speed that the shutter closed, and I was able to cock the shutter again.

 One of my first thoughts was I wanted to run some film through the camera to see how it handled it. Then, I felt compelled to write about my experience with the camera and how it was handled, knowing I couldn't use any shutter speed lower than 1/50 in my testing experience.

History:

Fritz Kuhnert founded Optische Anstalt in Freiburg, Germany in 1942. The company initially manufactured optical equipment for the German military during World War II. The factory was bombed and destroyed during the war. In 1946, Fritz rebuilt the company in Gundelfingen, a nearby town, and concentrated his efforts on producing consumer cameras due to the growing photography market.

 1947, the company introduced its first camera at Photokina, the Efka 24. It was a simple scale-focus camera that used 35mm film to produce 24x24mm images. The name "Efka" was derived from the phonetic spelling of Kuhnert's initials, "FK." In 1950, the company introduced the Futura, a more advanced 35mm rangefinder camera with interchangeable lenses and a proprietary screw mount. The lenses were named after Kuhnert's family members: Elor (his wife Elenore), Evar (his daughter Eva), and Petar (his son Peter). 

 In 1951, due to financial difficulties, Kuhnert sold the company Hamburg ship-line owners Ernst and Eduard Komorowski, who renamed it Futura Kamerawerk GmbH. Under their ownership, the company produced four different 35mm rangefinder cameras, including the Futura S, which was introduced in 1952. This model featured a Synchro-Compur shutter and maintained its predecessor's distinctive design and lens mount. They also produced two of the fastest standard 50mm and portrait 70mm lenses of the time with a maximum aperture of F1.5, named Futura Frilon.

 Futura Kamerawerk struggled to compete with established German brands like Leica and the emerging Japanese camera industry despite producing high-quality cameras. The company ceased operations in 1957 and closed the factory in 1958. Today, Futura cameras are valued by collectors for their unique design and historical significance.

My Camera:

My Futura-S is 5" wide by 3" tall by 2.5" deep with my Futura Elor 50mm f2.8 lens. Without the fitted leather case, my camera weighs 1 lb. 9.4 oz. The Futura-S is a very well-made camera but a bit heavy due to its solid cast metal body. I prefer heavier cameras because they fit my hands better. Cameras like the Nikon F body, the Robot Royal, and now the Futura cameras feel comfortable.

The "S" in the Futura line stands for Syncro-Compur, or the shutter system used on this camera. All of the exposure controls are located around or on the lens. The shutter speed dial is located on the outside of the lens area and is moved by two knobs on opposite ends of the dial. The shutter speeds go from 1/500 to 1 sec. along with "B". Also, on the bottom of the shutter speed ring is "Futura Freiburg."

 The focus is controlled by the ring just inside the shutter speed control. This ring has a larger knob sticking out to change the focus as needed to create a sharp focus. The aperture ring is on the lens barrel itself. The aperture range is f/2.8 to f/22. There is an even larger knob located on the outside of the shutter speed ring, which sets the flash sync for "X," electronic flash, or "M," bulb flash.

To remove the lens, you unthread it from the body. The lens has a proprietary thread mount of 33.8mm, so it's not your usual Leica or Pentax thread mount system. I must say, the lens has a very fluid and lean look to it. On the back of the camera is the rangefinder viewing eyepiece. The rangefinder on my camera is exceptionally bright and accurate. We'll see when I test the camera with film in it.

On top of the camera going from left to right, is the rewind knob, which has an arrow on top to show the direction to turn to rewind the film into the cassette. Next is a cold shoe used for a mounted meter or flash attachment.  Behind the cold shoe is a pointer switch, which you can point to either  SW, 'Schwartz/Weiss' (Black & White); C, 'Color'; CN, 'Color Negative.', which is a reminder to the photographer to the film in the camera. Thank you, David Babsky and Mike Eckman, for this information. 

 Next to the cold shoe is a lever which on my camera is a non working on my camera self-timer. Above that and slightly to the right is an additive frame counter. Twist the dial to "0" when you load the film, and the frame counter increases. Just below the frame counter is the cable release threaded shutter release. An interesting item about the shutter release is you can "lock" it down for longer exposures by turning it to the right after depressing it, which locks it in the open position until you turn it to the left to release it. 

Having the locking shutter release is good if you don't have a cable release, but the bad thing is you're still moving the camera a bit during exposure, which might create blur in the image. On the far right is the film advance knob. This turns counterclockwise to advance the film.

 Four nubs on the bottom of the camera lift it and give it stability when placed on a flat surface. Also, there are two knurled buttons, one on the left, to release the drive gear and allow the film to be rewound into the film cassette. The larger one in the center of the camera opens the back of the camera to load film. Slide the larger button toward the arrow pointing to "O," and the back will come off by pulling it down.

Once the back is off the camera, the take-up spool comes out for more effortless film loading. The camera's serial number is imprinted on the metal plate under the frame window. My serial number is S11244. When you put the back onto the camera and slide it up, it automatically locks onto the camera.

 My Results:

Now that I have put a roll of T-Max 400, 24-exposure film into the camera, which I purchased out of date a few months back, I want to walk around the neighborhood to take photos. Unfortunately, my wife was taking a nap, so I needed to keep my eye on our two dogs, who have a tendency to bark when out of sight. So, I just stayed mainly in my backyard to take the photos.

 I have to say the camera was extremely fun to shoot with, but the one thing that kept bugging me was the camera advance knob. I'm just not used to turning the knob counterclockwise to advance the film. It's not that big of a deal, but I kept turning it clockwise for the first few frames to advance the frame. Once I had it in my head that the winding knob was "backward," it went smoothly, and the camera did a fantastic job. 

 Here are a few of the frames from my backyard.

Conclusion:

I don't know how I didn't know about the Futura-S for so many years. It's a fantastic German rangefinder camera with excellent optics. While my camera could use a complete CLA to bring it up to excellent condition, I have to say that for its condition, it did great.

 I can see why this is a desirable camera, especially for the discounted price from top brands like Leica or Alpa. The camera is compact and easy to use, and the rangefinder produces fantastic results.

 Thank you for taking a few minutes from your day to read about this underappreciated German rangefinder built in the 1950s.

 I'd love to hear from you if you have any questions or comments about this camera.

 Until next week, please be safe. 

Kodak Retina Model 117

My Kodak Retina 117 camera

I purchased this original Kodak Retina 117 with a group of various Kodak and other branded cameras from the daughter of a Kodak engineer several years ago. She mentioned that the Retina was in his office in Rochester and was one of his favorite cameras, and she could remember him using it to take family photos. She didn't know what this model was other than it was the camera that Dad used to take family photos with.

 These stories bring a human element to purchasing items from family members. The cameras are not just mechanical items, which I happen to enjoy, but they are objects that evoke memories of dad, mom, aunt, or uncle holding the camera and taking photos at family Bar-B-Ques, birthday parties, Christmas morning, and so many other memories families have together.

Kodak Retina 117 Front View

 When the group of cameras arrived, I knew there was an early Retina in the group. Still, I didn't realize that it was the first Retinas model to be made. During the unwrapping of the camera, I first noticed how worn the camera's leatherette was. The was smooth in many locations, which gave the first indication that the camera was well used and most likely loved by the person using it. The front door was a bit sticky to open, but that's not unusual for a camera made 90 years ago. I'm sure the spring has lost some of its pulling power with age. Once opened, I wanted first to check the shutter. That seemed in great shape; even the 1 second seemed accurate to the ear. The transport was working, and I didn't see any real issues with the camera. I put it on my shelf with many of the other cameras I have.

 This week, while thinking about what camera to write about, I started to look over one of the shelves with cameras, and the Retina popped out to me. I know it was in good working condition, at least when I put it on my shelf a year or so ago. Opening the camera was as good as the day I put it on the shelf, so I decided to put a roll of film into the camera and see what a 90-year-old, German-made 35mm camera could offer. 

Retina History

The Kodak Retina series is a fantastic camera design, blending American ingenuity with German precision. Introduced by Kodak in 1934, the Retina cameras were manufactured in Stuttgart, Germany, by Kodak AG, formerly known as Nagel Kamerawerk, which Kodak had acquired in 1931. The Retina line is celebrated for its compact design, quality construction, and innovations in photography, becoming a favorite among amateurs and professionals. The Retina series began with the Kodak Retina I (Type 117), a 35mm folding camera. The Retina was one of the first cameras to use Kodak's new 135 film cartridge, which would become the industry standard. The Retina I was compact, featuring a collapsible lens and a rugged design. The model underwent several iterations, improving lens quality, shutter speeds, and build but always retaining the folding design that defined the early Retinas.

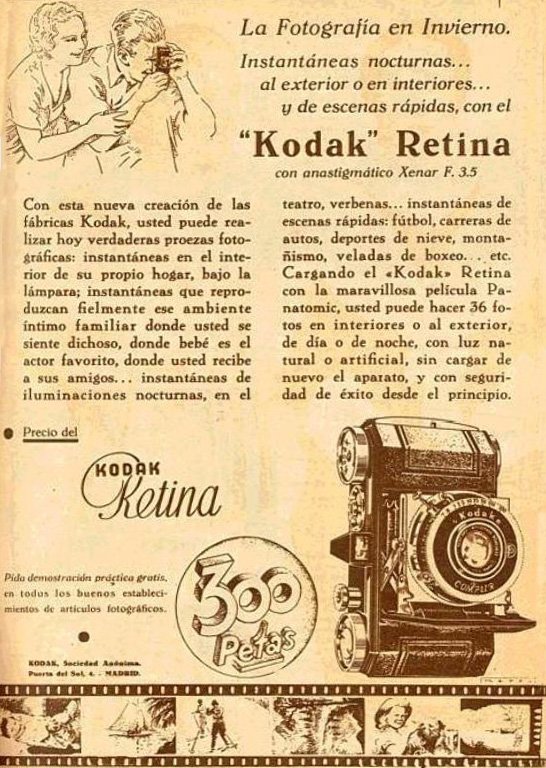
Spanish ad for Kodak Retina 117 camera

 In 1936, Kodak introduced the Retina II (Type 122), which added a coupled rangefinder, making focusing more precise. This feature positioned the Retina as a premium camera for enthusiasts. By the mid-1950s, the Retina line had evolved into non-folding models with the introduction of the Retina Reflex series. These single-lens reflex (SLR) cameras incorporated interchangeable lenses, advanced metering, and a sharp Schneider-Kreuznach or Rodenstock lens, which appealed to serious photographers.

 The post-war years saw significant advancements. The Retina IIc and IIIc, introduced in the 1950s, became icons of the series. They featured interchangeable front lens elements, making the cameras versatile while maintaining their compact, folding design. These models also integrated advancements like exposure meters and faster shutters, ensuring the Retina line kept pace with competitors.

The Retina Reflex series launched in 1957, showcasing Kodak's foray into the SLR market. While innovative, these cameras faced stiff competition from Japanese manufacturers like Nikon and Canon. Despite this, they remain a testament to Kodak's ability to innovate during an era of rapid technological change.

 By the 1960s, the Retina line gradually faded due to the rise of inexpensive, high-quality Japanese cameras. The last Retina camera, the Retina S2, was produced in 1969. Despite their discontinuation, Kodak Retina cameras remain highly collectible, admired for their craftsmanship and role in popularizing 35mm photography. Their legacy remains a reminder of Kodak's golden era in the photography industry.

My Camera:

My Kodak Retina 117 camera is a wonderfully small and compact camera that you can put into your pocket and travel with very easily. One thing I enjoy about the look of the camera is all the knobs on the outside of the camera are nickel as opposed to the shinier chrome, which can give reflections when using the camera.

 The camera is 5" wide, just under 3" tall, and 1.5" deep with the lens closed and 3.5" deep with the front door opened and the lens out, ready to take a photo, and weighs just under a pound at 15.7 oz. My camera has a Schneider-Kreuznach Xenar 5cm f3.5 lens in a Compur-Rapid shutter. The shutter has speeds from 1/500 of a second to 1 second, along with "B" and "T" settings for timed exposures. The aperture of the lens has a range of f3.5 to f16.

 To open the lens on the camera, you press a small button on the bottom of the camera. Once depressed, the front door should usually spring open, and the lens, which is on a very short bellows system, should come out into the erect position. As previously mentioned, my front door doesn't spring open, so I needed to give it a little bit of help and pull it open.

Once opened, the camera is relatively straightforward in the settings. The shutter speeds are set by turning a dial on the top of the camera if you have it in the vertical position. Like many Kodak cameras from this era, or for many folding styles of cameras, the front door has the ability to set the camera upright just by pulling out the "Kodak" logo on the front door, which will make for a leg for the camera to rest on if you want to set it down for display or to take a photo. I always do that when in a store or seeing a folding camera on display. I'll flip down the camera's leg, allowing the camera to stand upright instead of on the platform the lens pulls out onto.

Select shutter speed by turning wheel. The top lever cocks the shutter and the one on the left side trips the shutter.

A small slider sets the aperture on top of the shutter as you hold the camera horizontally. The focus on the camera is by guess only as this camera doesn't incorporate a rangefinder. This function will come in later models. There are two different sets of focus distance numbers, both on the top of the shutter, but it depends on if you have the camera either vertically, in which the numbers are black, or if you're holding the camera horizontally, then the numbers are red. To focus the lens, there is a small knob on the bottom of the lens as you hold the camera horizontally that rotates the focus collar.

To take a photo, you'll need to cock the shutter with the lever on the top of the shutter while holding the camera vertically. Once the shutter is cocked, the other lever releases the shutter making the exposure. I've seen a very small shutter release button that fits into the cable release socket on the Retina camera. Unfortunately, my camera is missing this. I wish it did have it because when I was taking photos with the camera and looking through the viewfinder on top of the camera, my finger would cover some of the viewfinder, obstructing the subject when releasing the shutter. It wasn't too bad, but the small release would have made the experience a bit better. Now, I'm hunting for a small release to put onto the camera for future use.

 To close the front door, the lens must be focused to infinity so it is in the retracted position on the camera. You'll need to depress two small buttons on the lens strut, one on top and one on the bottom, to retract the lens back into the camera body. Once this is done, the front door will click closed.

Loading the camera with film is pretty straightforward. On the side of the camera is a lever you pull down, and the back door unlocks so it can be opened. Loading the film is just like any other 35mm camera. I needed to do a couple of operational things to advance the film to the next frame. Looking on top of the camera going from left to right is the rewind wheel, the frame counter, the viewfinder, a round knurled wheel with an arrow pointing counterclockwise, and the film advance wheel. Inside the advance wheel is a second rotating wheel with a small cutout and arrows pointing in clockwise and counterclockwise directions. This inner wheel can rotate to have either an "A" showing for advancing the film forward or an "R" for rewinding the film into the film canister when all the photos have been taken. 

After making an exposure, keep the inner wheel to "A." To wind to the next frame, the knurled wheel just to the left of the advance wheel needs to be turned slightly until you feel a slight release, then you can use the larger wheel to advance to the next frame. If you don't move the knurled ring slightly, the film won't advance. This wheel is the unlocking lever that allows the camera to advance to the next frame. Also, once you load the film, be sure to set the frame counter to the number 1 to keep track of how many exposures you've taken. Once you've taken the entire roll of photos, turn the inner wheel on the advance wheel to the "R" position to rewind the film back into the film cassette. Open the back of the camera and process your film.


My Results:

I loaded the camera with a roll of T-Max 125 film, and while taking our dog, Ernie, a 15-year-old Pug, through the neighborhood, I took photos of things that caught my eye. Here are some of the results of our walk.

Conclusion:

I must be getting better at guessing distance, which has always been a problem (one of many) of mine. I also understand that the sunny day and smaller aperture helped with some of the focusing distances I would generally have with "guesstimate" focusing. Nonetheless, the camera was small, compact, accurate in the exposures, and fun to shoot.

 As I previously mentioned, if I could find one of the small shutter release items to add to the cable release socket, this would have helped and made the camera easier to use. Besides that small item, I can see why the previous owner enjoyed shooting with this camera.

 While I enjoyed this camera, I have it for sale on my eBay store. If you're interested in this or any other items in my eBay store, please email me to work out a deal.

 Thank you for taking a few minutes from your day to read about this fun and historic Eastman Kodak camera. The Retina line of cameras is often overlooked but highly collectible and usable.

 Until next week, please be safe.