Rolleiflex SL66

My Rolleiflex SL66

As a photographer and photo industry professional for well over 50 years, I've had the privilege of working with just about every kind of camera you can imagine. From everyday 35mm SLRs and rangefinders to Hasselblad systems, I've logged a lot of miles with medium‑format gear as well.

 In the late 1990s, I represented Sinar, which meant regular time behind some of the finest large‑format cameras available. Later, repping Leaf digital backs put me in front of Mamiya RBs and 645s, Hasselblad V and H systems, Fuji GX680s, and the Contax 645. With all that variety, there was still one big gap in my experience: I had never actually photographed with a Rolleiflex SL66.

 About a year before I retired—so roughly three years ago—I finally had my chance. An SL66 with 80mm, 50mm, and 250mm lenses came up for auction online. I wasn't sure about the condition, but I rolled the dice and bid anyway.

 When I won the lot at a surprisingly low price, my first reaction wasn't joy; it was suspicion. Inexpensive cameras often have a story. To my surprise, the body turned out to be mint‑to‑near‑mint, and the lenses were in equally excellent shape. The real question, of course, was whether it worked.

 I pulled off the lens cap, removed the dark slide, cocked the shutter, and pressed the release. At a fast speed, the camera rewarded me with that beautiful, crisp shutter sound. Then came the real test: I set it to 1/2 second. The shutter opened, paused, and closed exactly as it should. At that point, I had a big grin on my face—I knew I had a mechanically healthy SL66 on my hands.

 And then, like so many good intentions, the camera went on a shelf.

Background: Rollei's Leap into SLRs
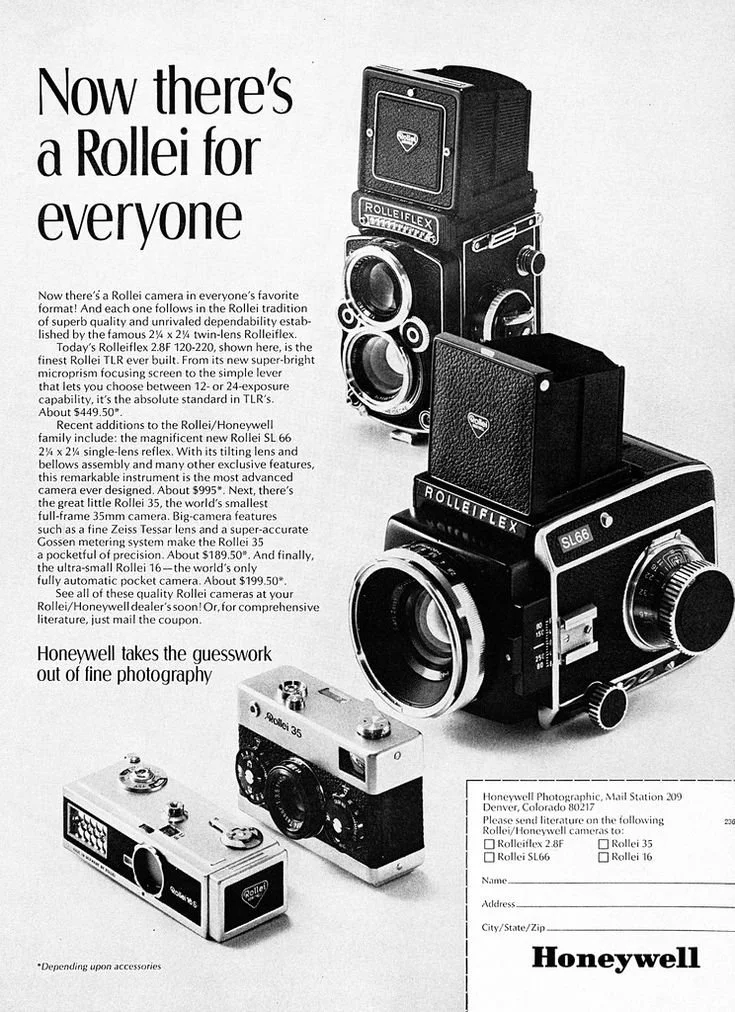
Rollei Advertisment

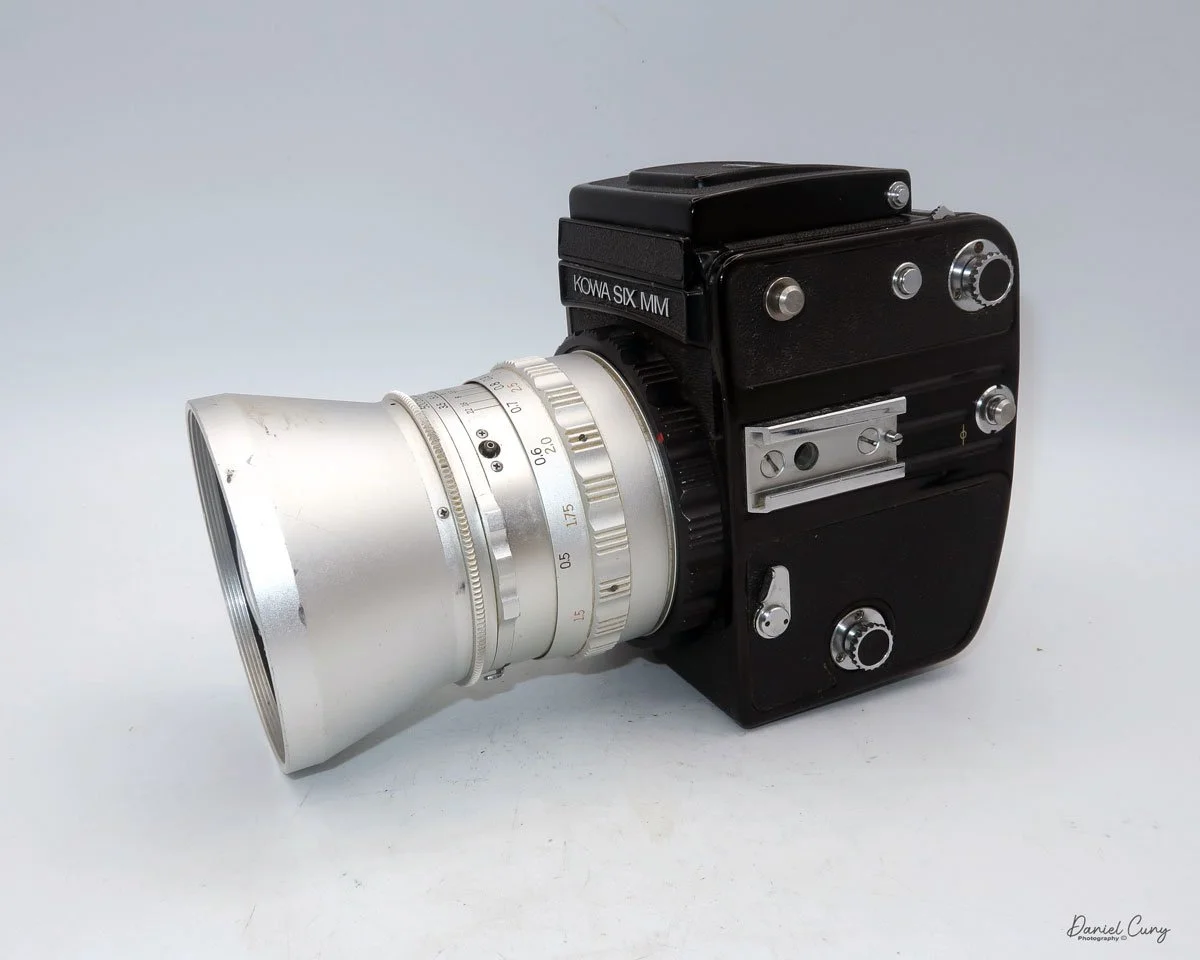
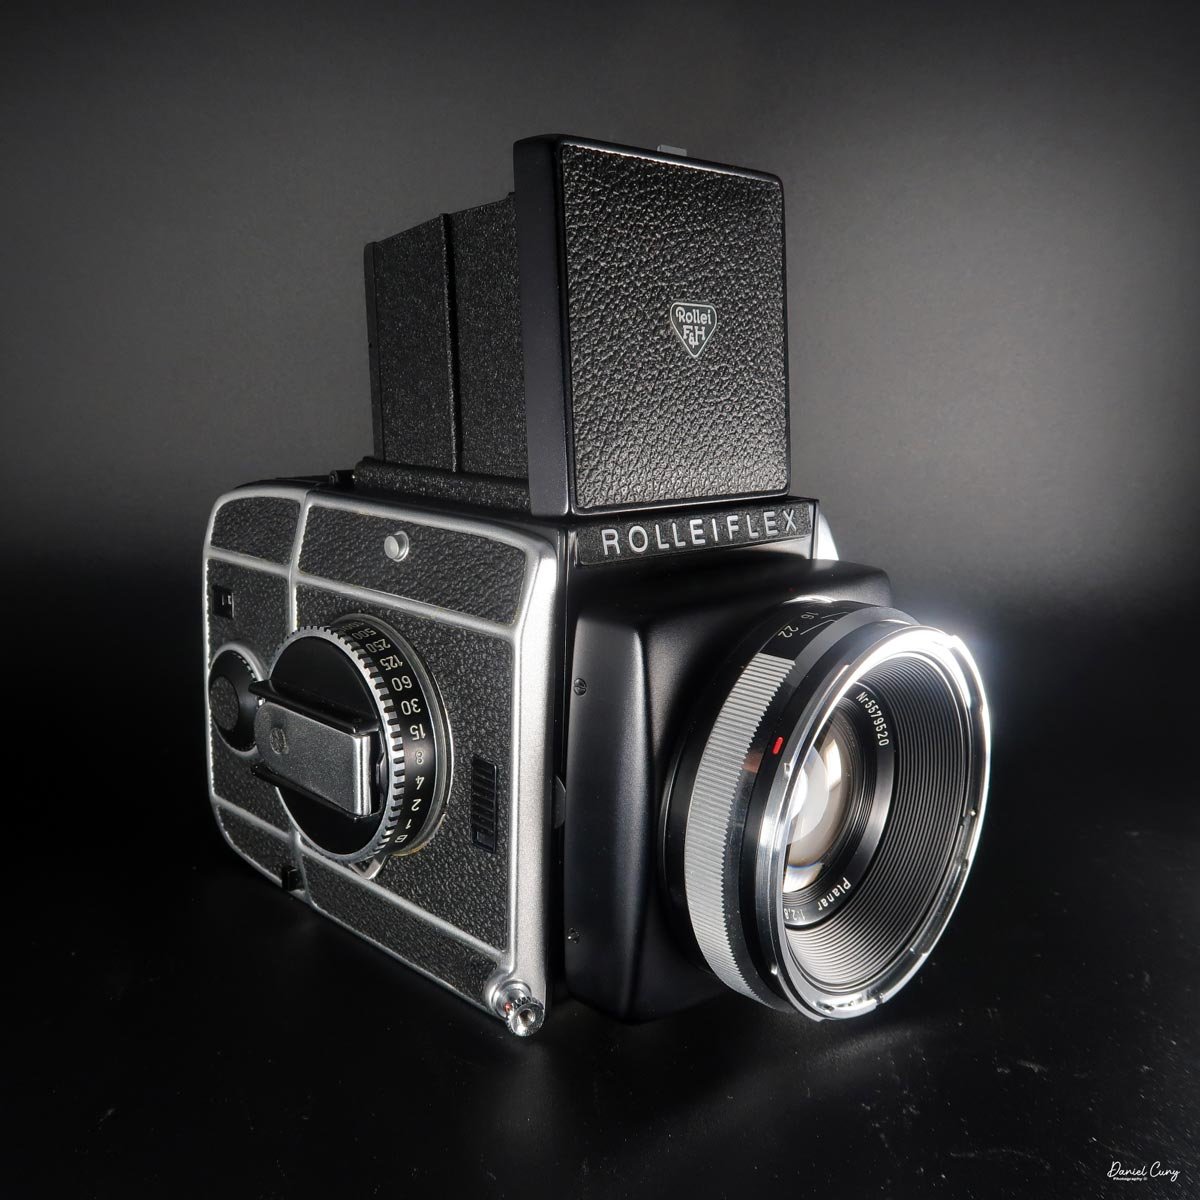
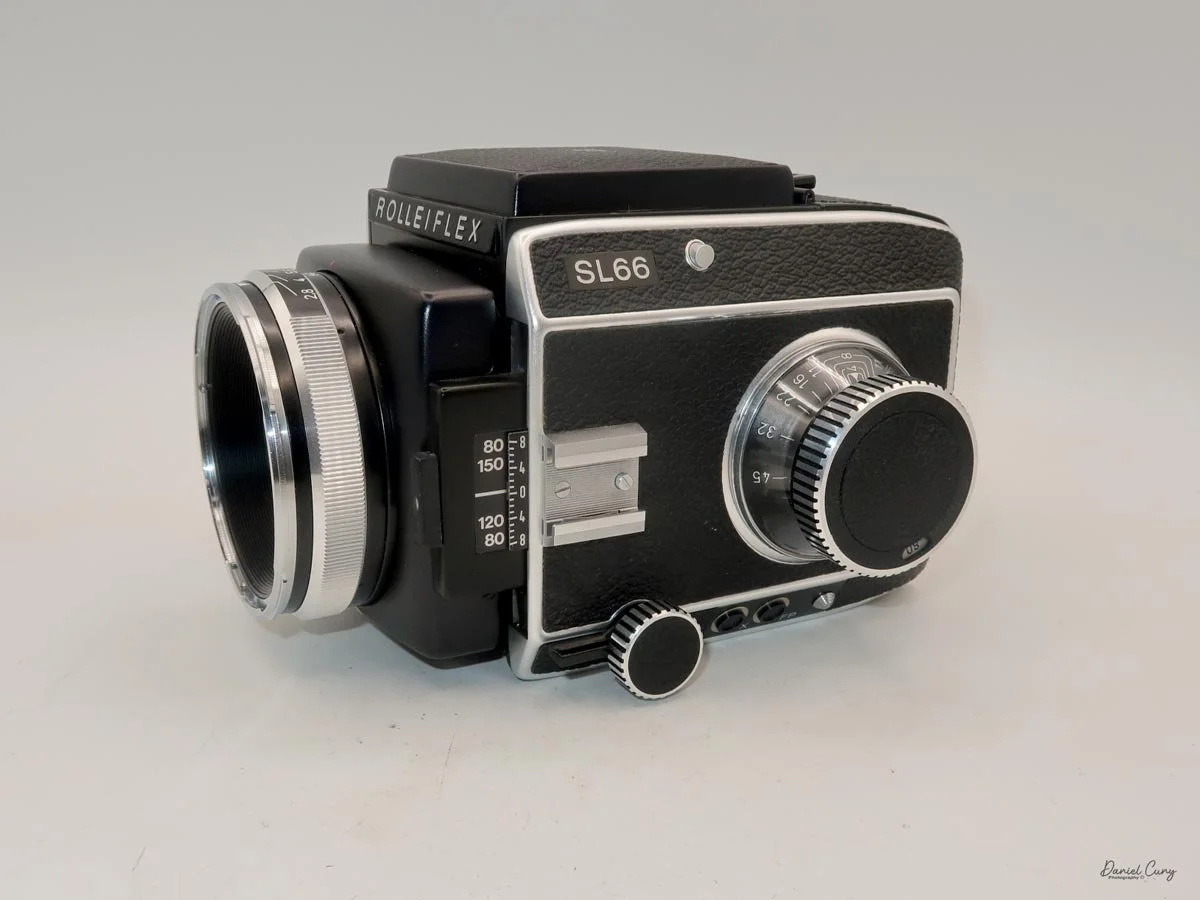
For decades, "Rolleiflex" meant twin‑lens reflex. That changed with the introduction of the Rolleiflex SL66 at Photokina 1966, Rollei's serious move into the professional 6×6 SLR world. Designed as a studio‑oriented system to challenge Hasselblad, the SL66 combined a focal‑plane shutter, modular film backs, and interchangeable finders with familiar Rollei ergonomics: left‑hand focusing and right‑hand film advance.

 Rollei had explored the idea of a medium‑format SLR as far back as the mid‑1950s, but strong TLR sales kept those projects on the shelf until demand shifted and Hasselblad began to dominate professional work. When it finally arrived, the SL66 was a true "engineer's camera": bellows focusing, the ability to reverse‑mount lenses for close‑up work, and front‑standard tilt for plane‑of‑focus control—features that gave it some of the movements you'd normally associate with a view camera.

 Built from 1966 to 1982, the SL66 used 120/220 roll film in 6×6 backs and typically wore Carl Zeiss Planar glass, firmly placing it in the high‑end studio category. Later SL66E and SL66SE models added through‑the‑lens metering and improved electronics. Still, the core concept stayed the same: a heavy, extremely capable, close‑focus‑friendly studio machine in a world increasingly moving toward lighter, more electronic medium‑format systems.
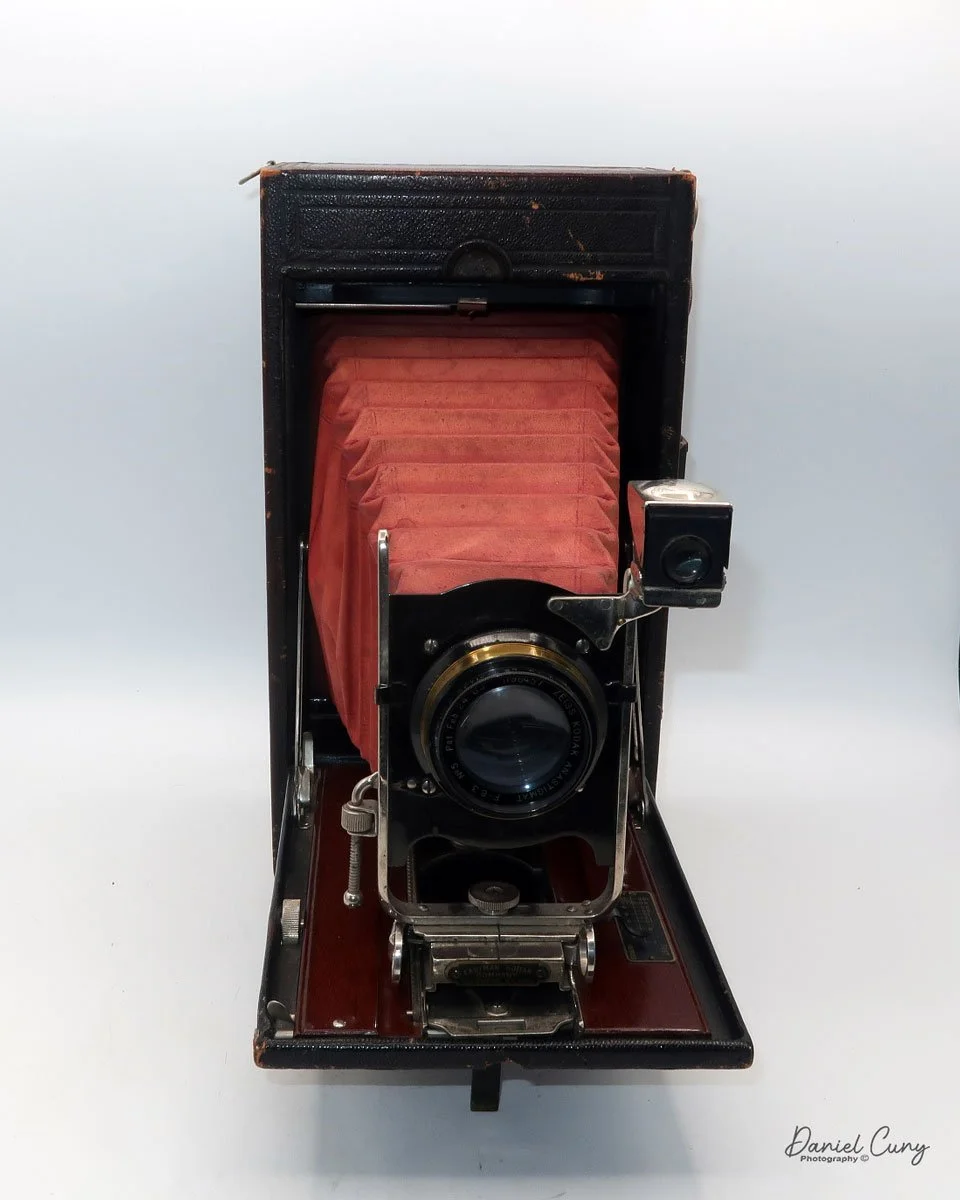
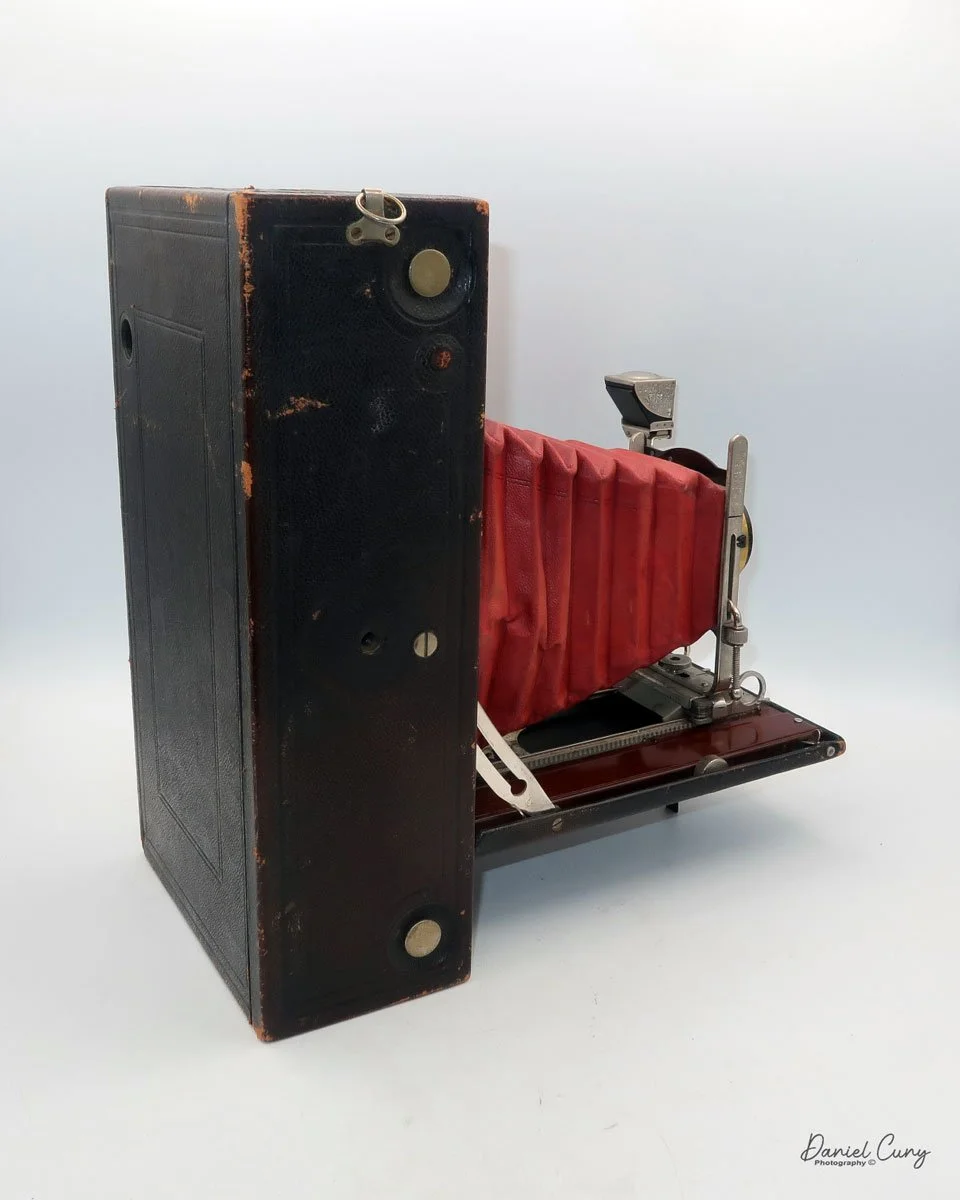
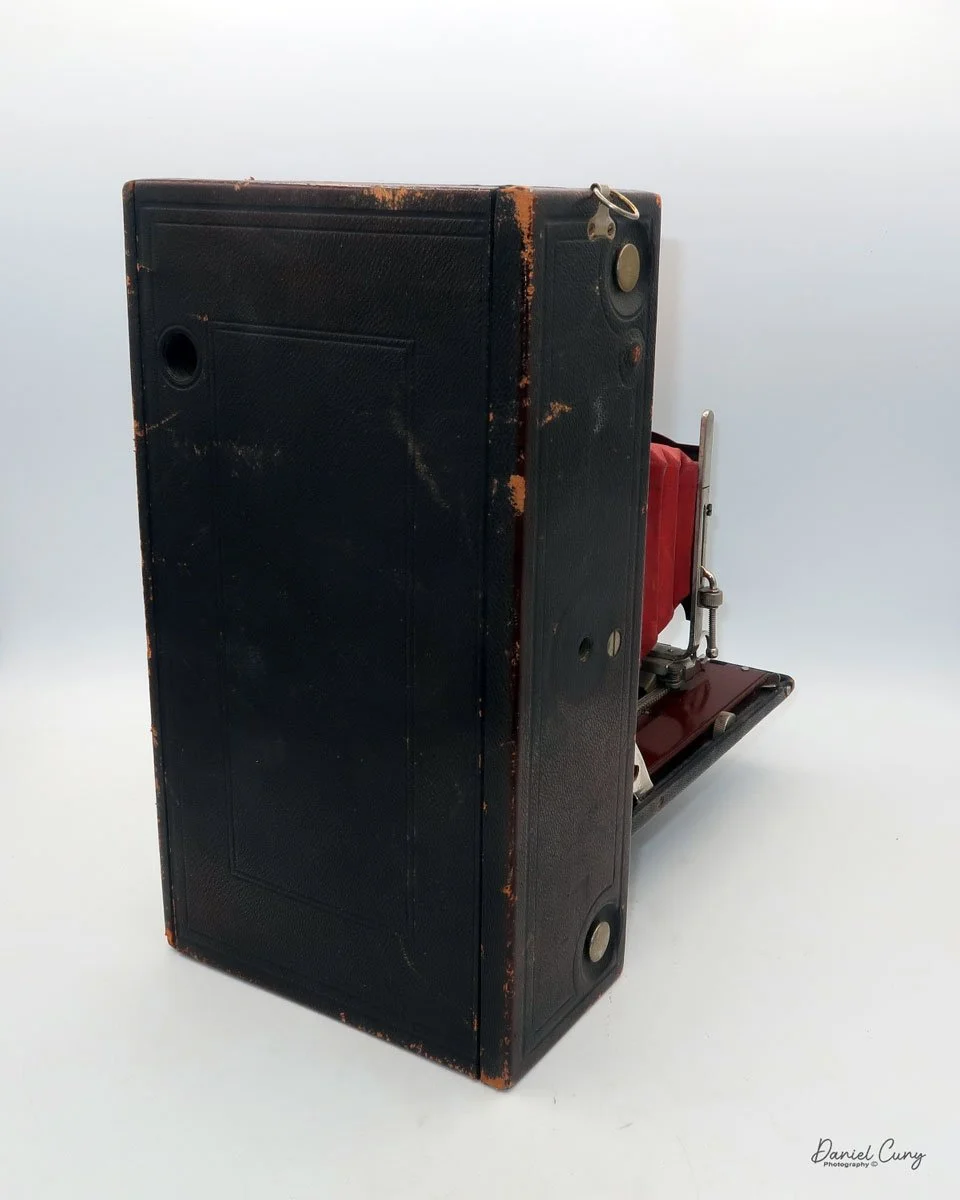
My Camera

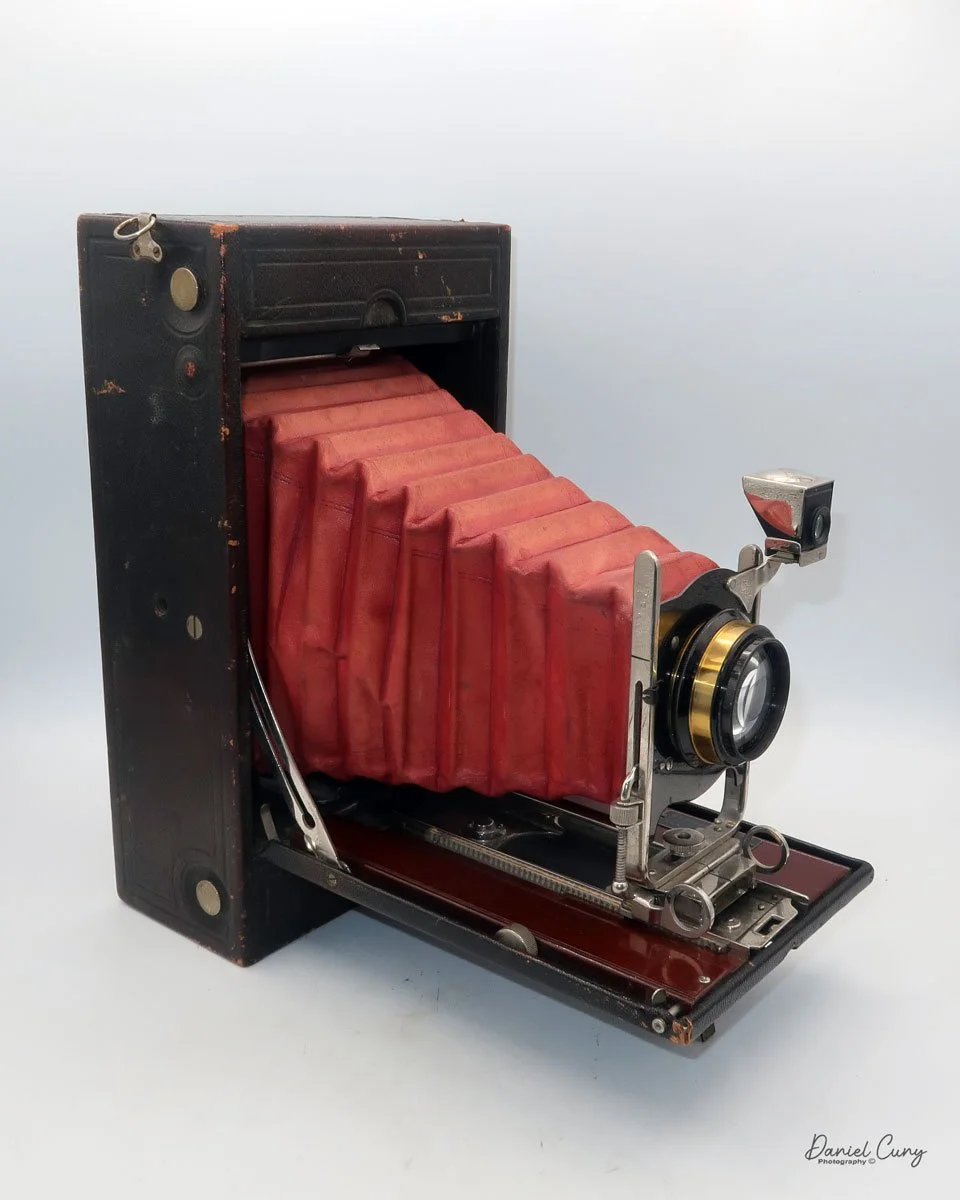
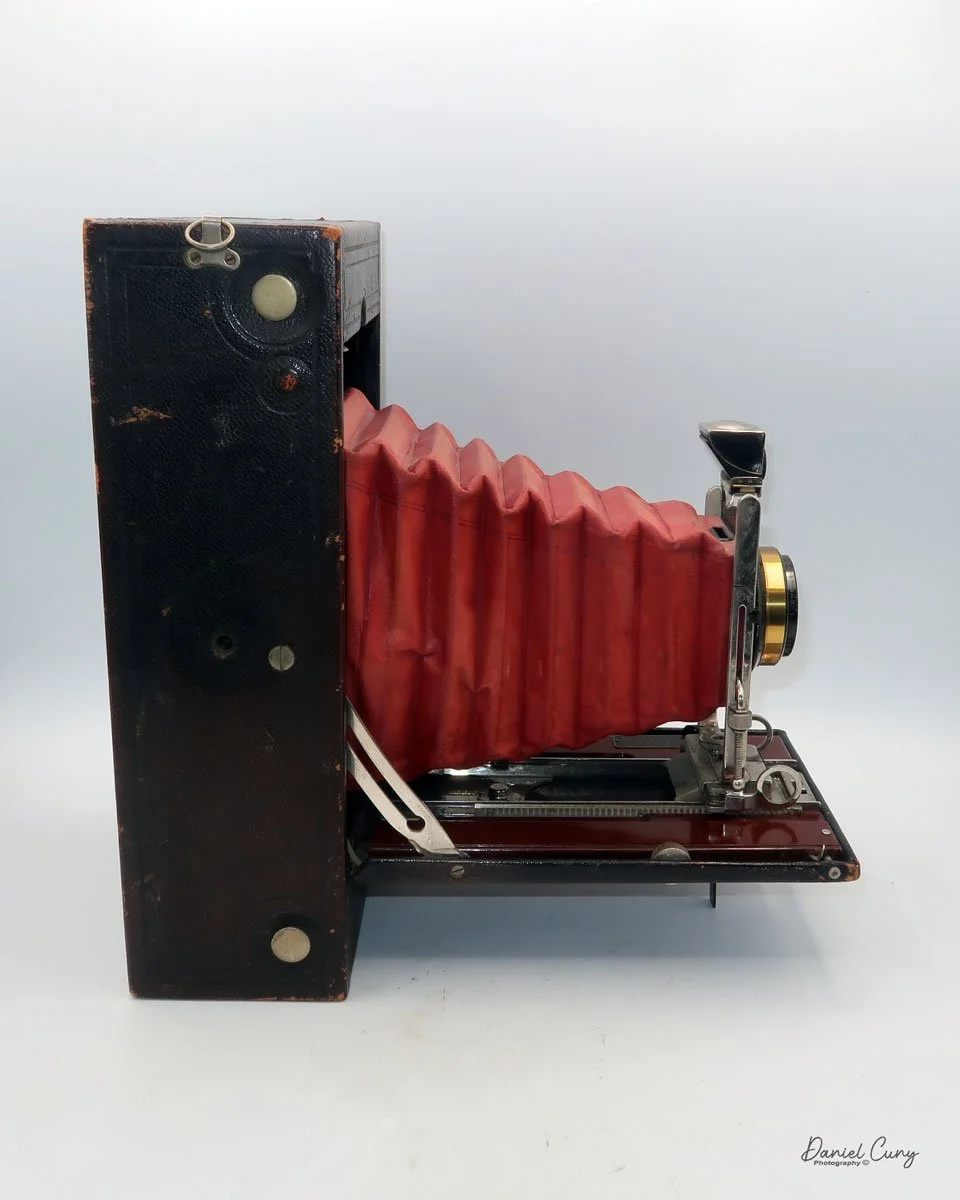
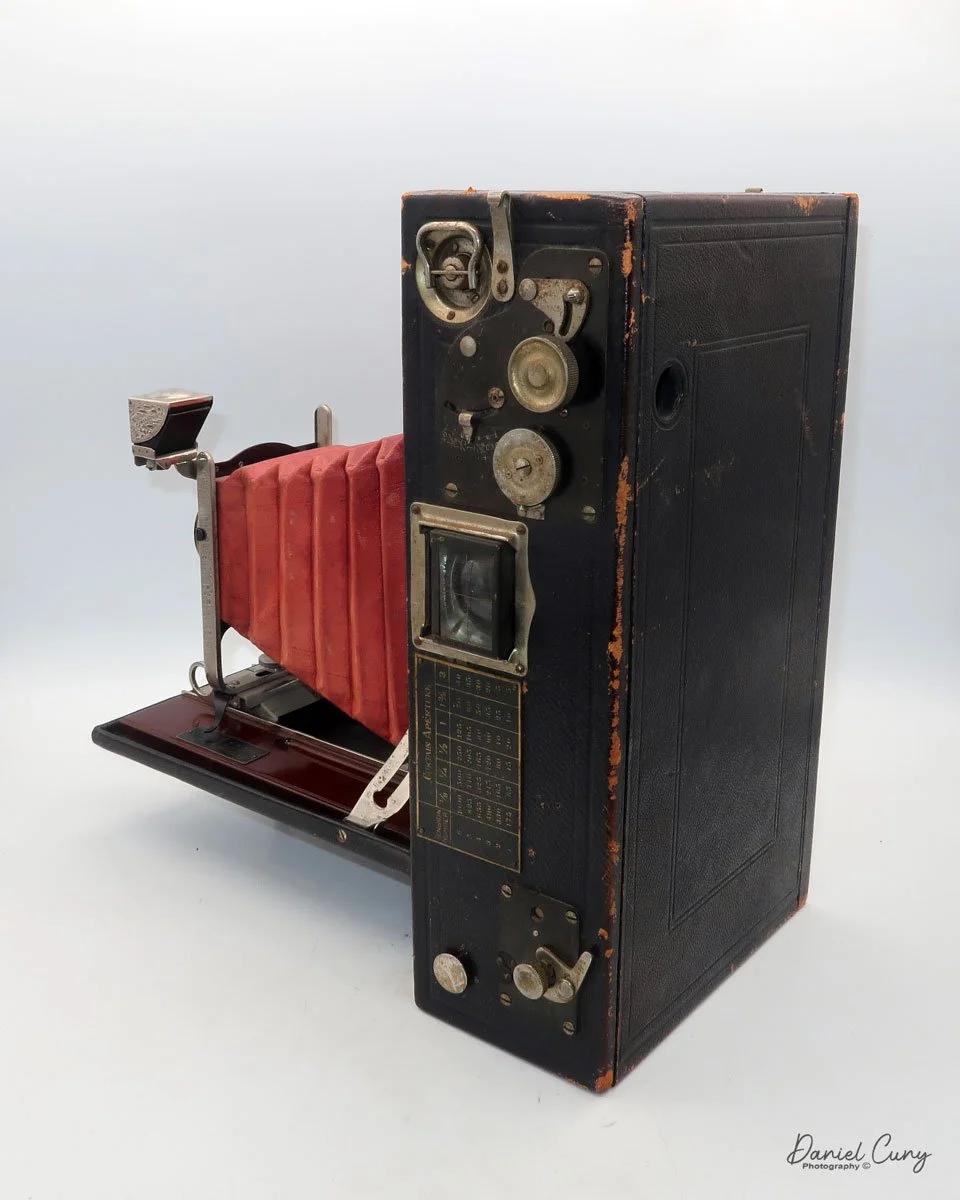
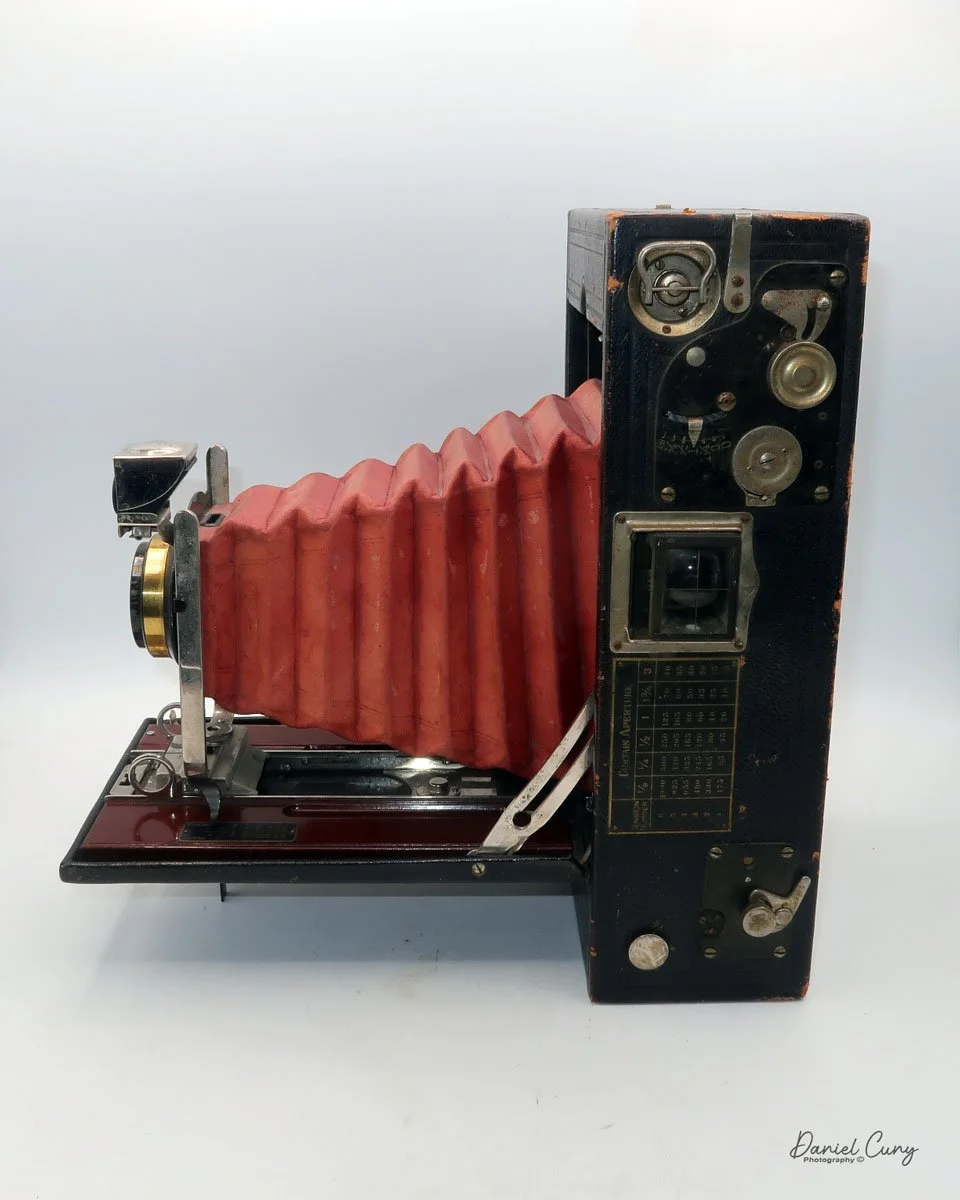
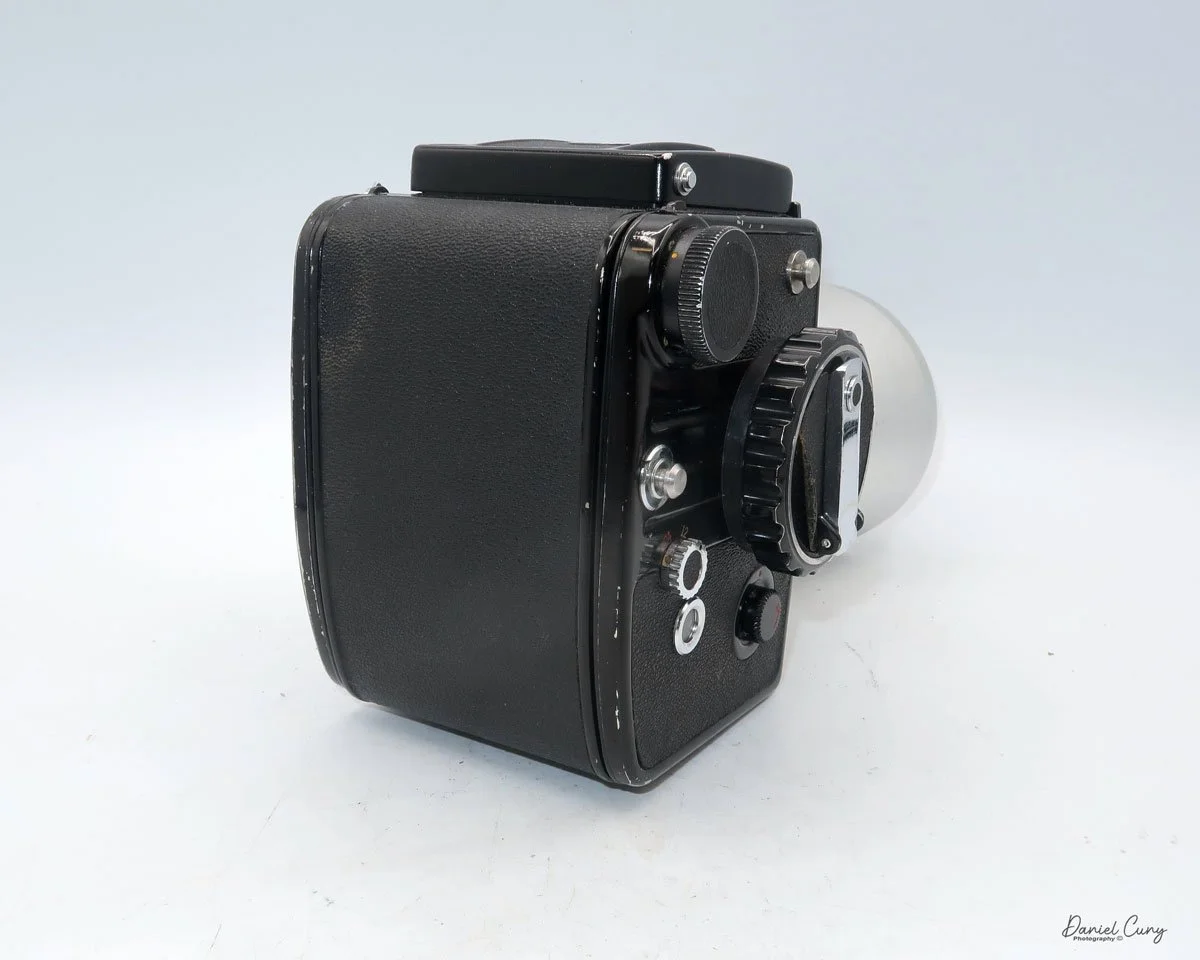
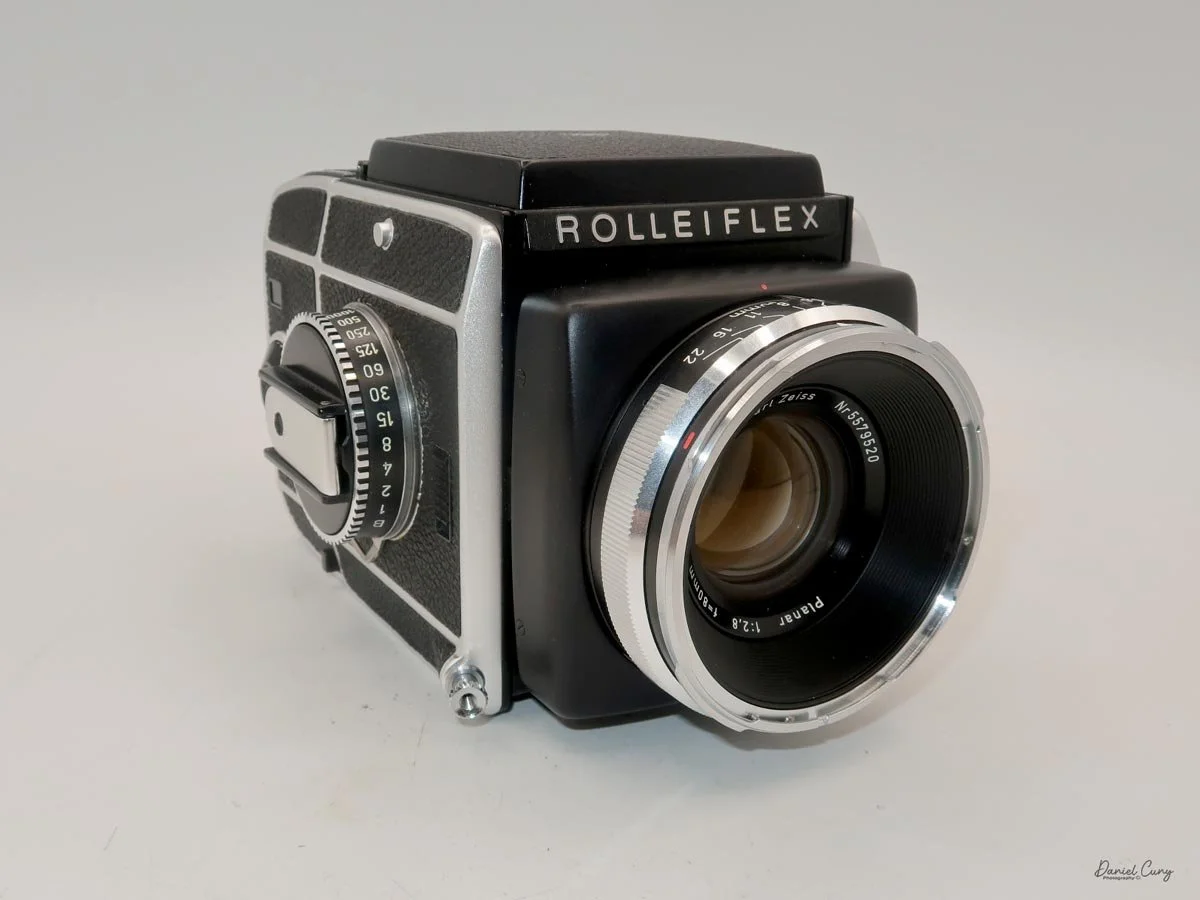
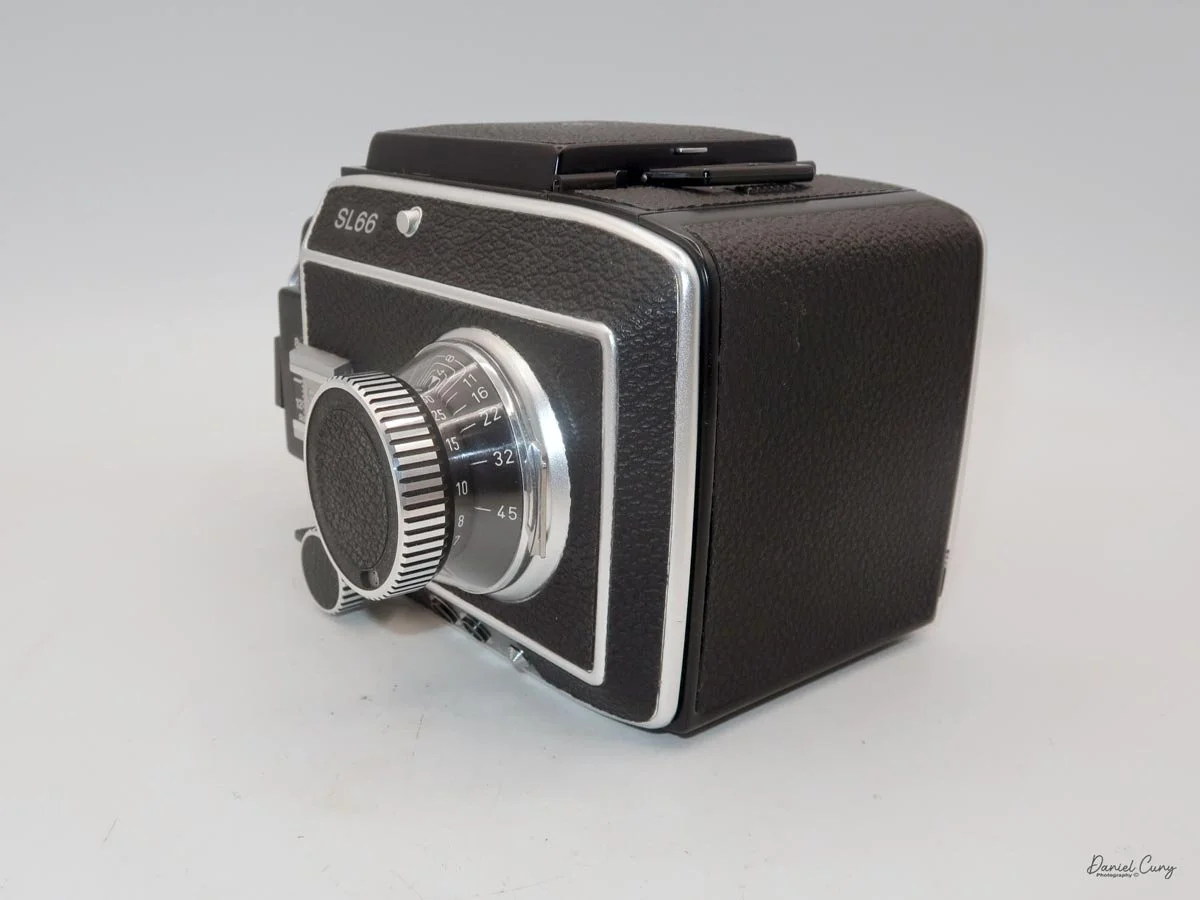
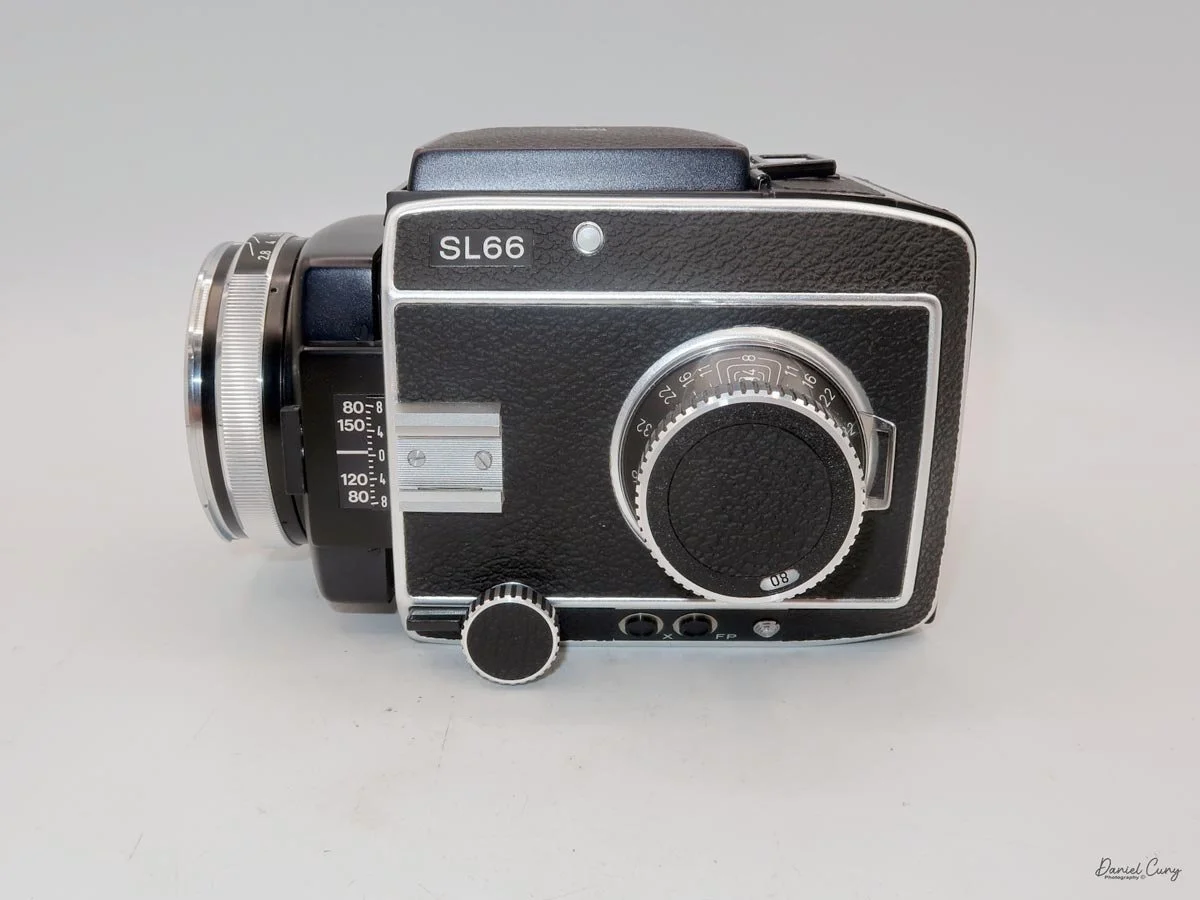
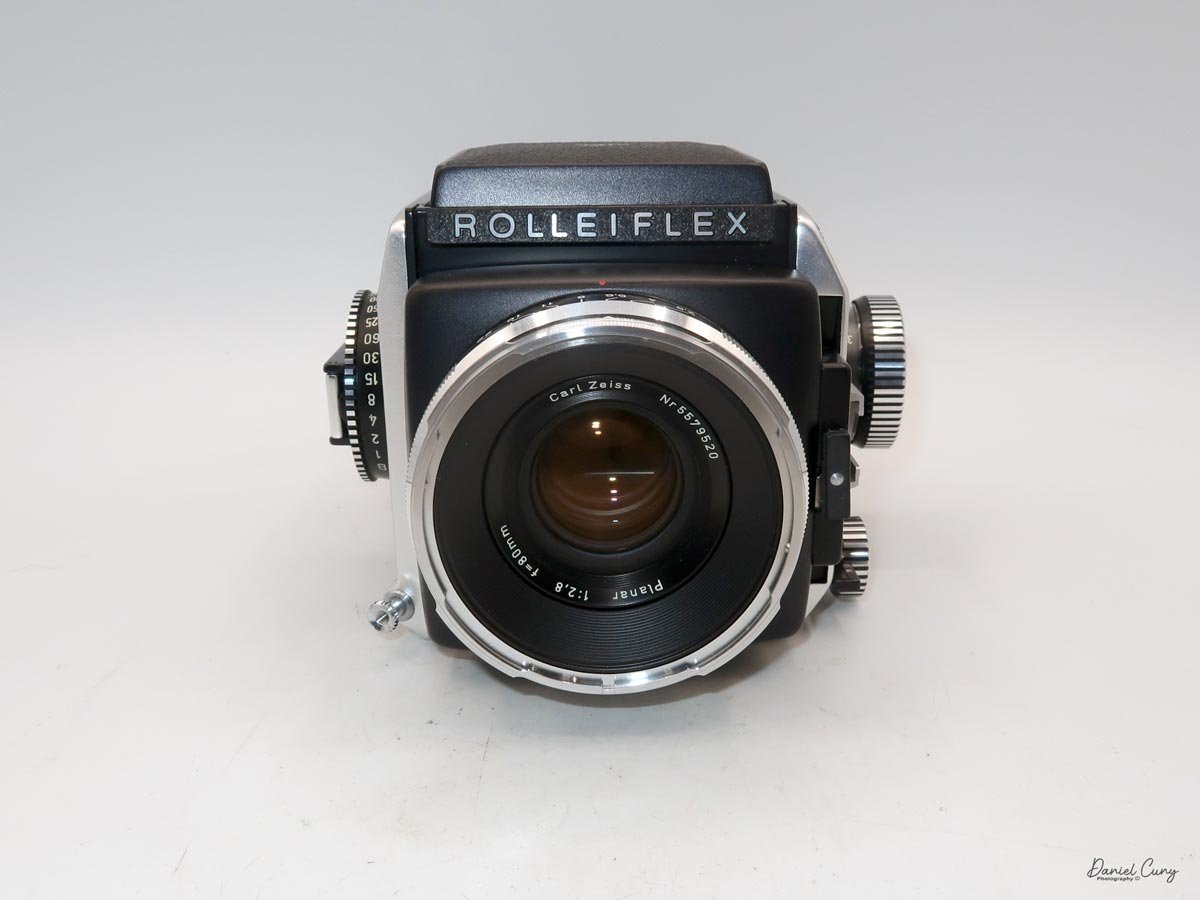
My Rolleiflex SL66 is a substantial camera. With the 80mm lens retracted, it measures about 7" front to back; with the bellows fully extended, it's closer to 9". It's roughly 6" wide thanks to the oversized focusing knob, about 4.5" tall with the waist‑level finder closed, and around 7" tall when the chimney is open. On the scale, the body with a back and an 80mm lens comes in at about 4 pounds, 4.5 ounces—this is not a casual walk‑around point‑and‑shoot.

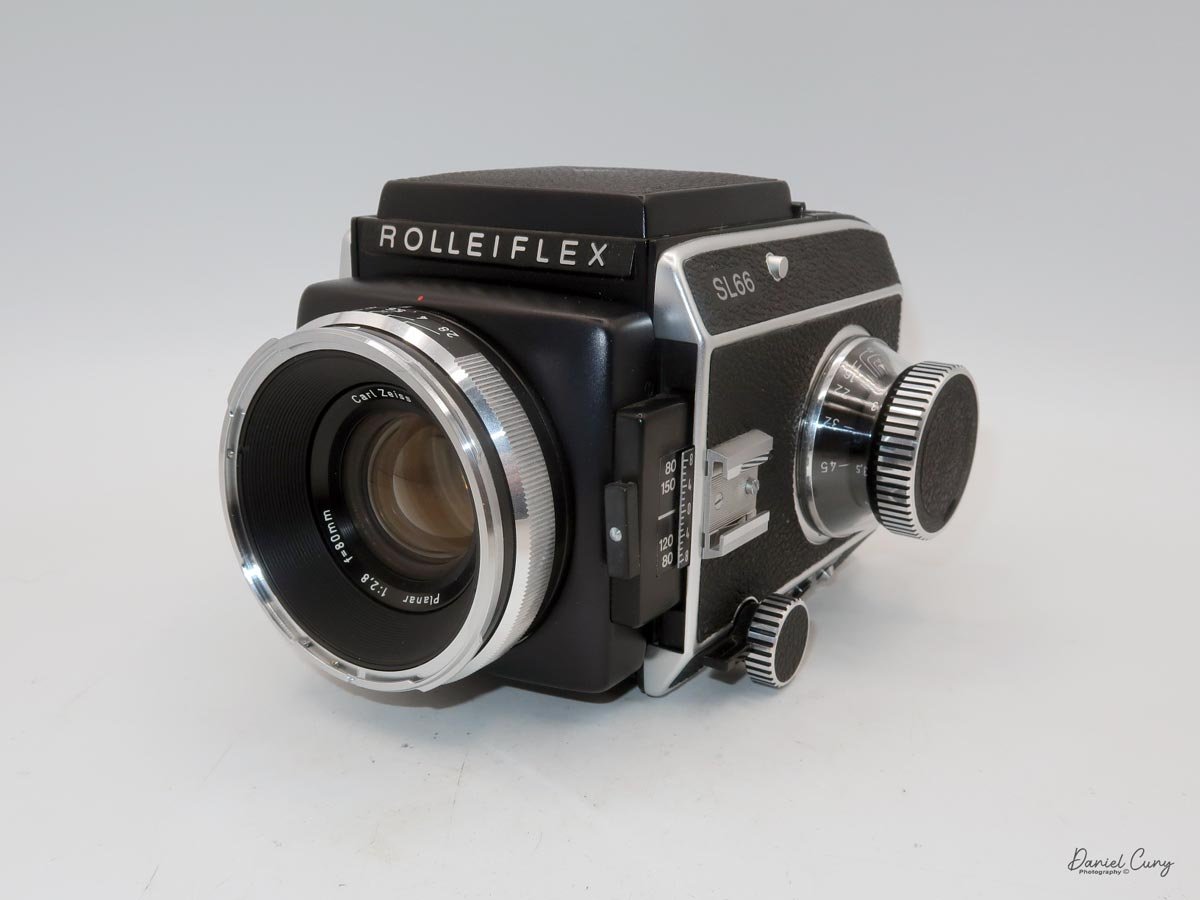
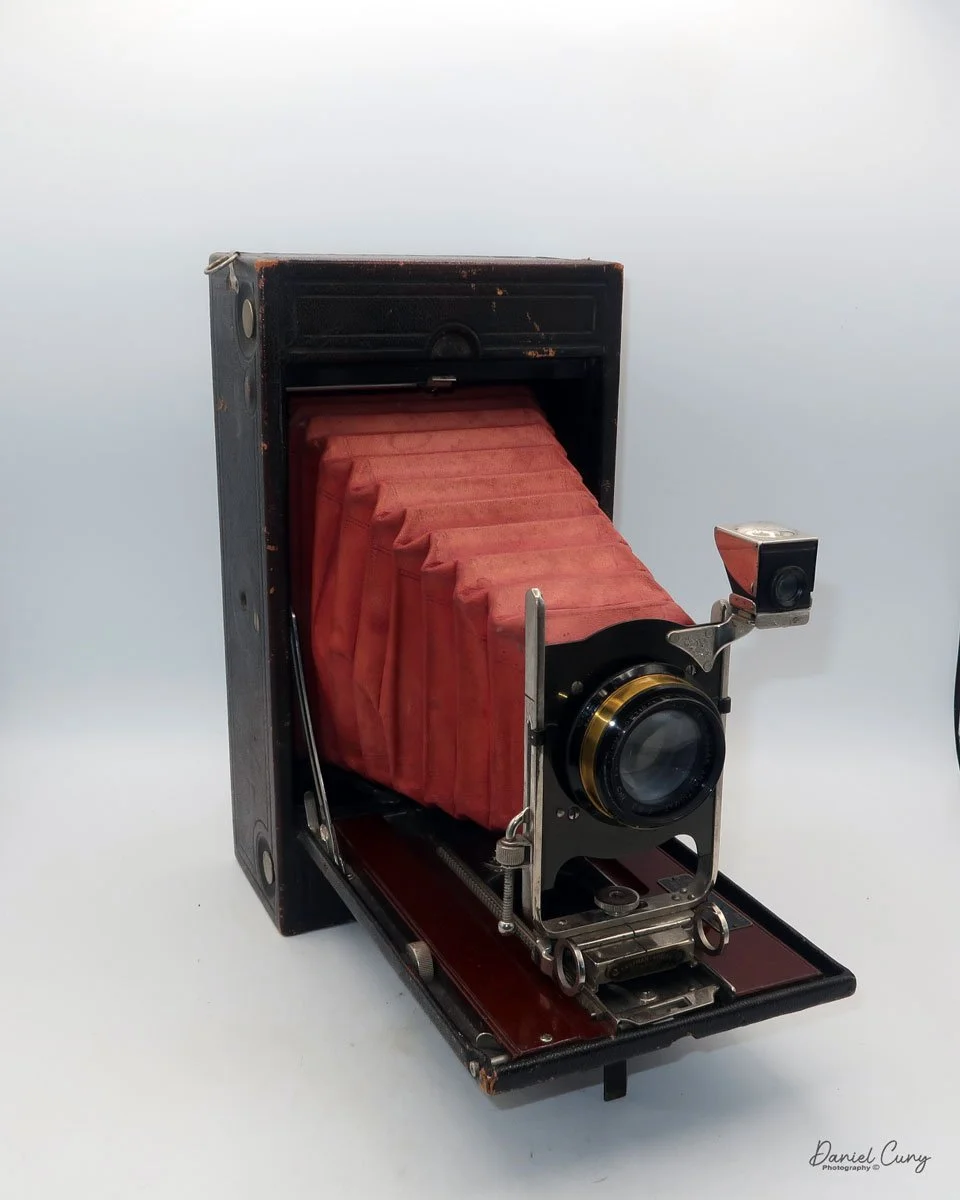
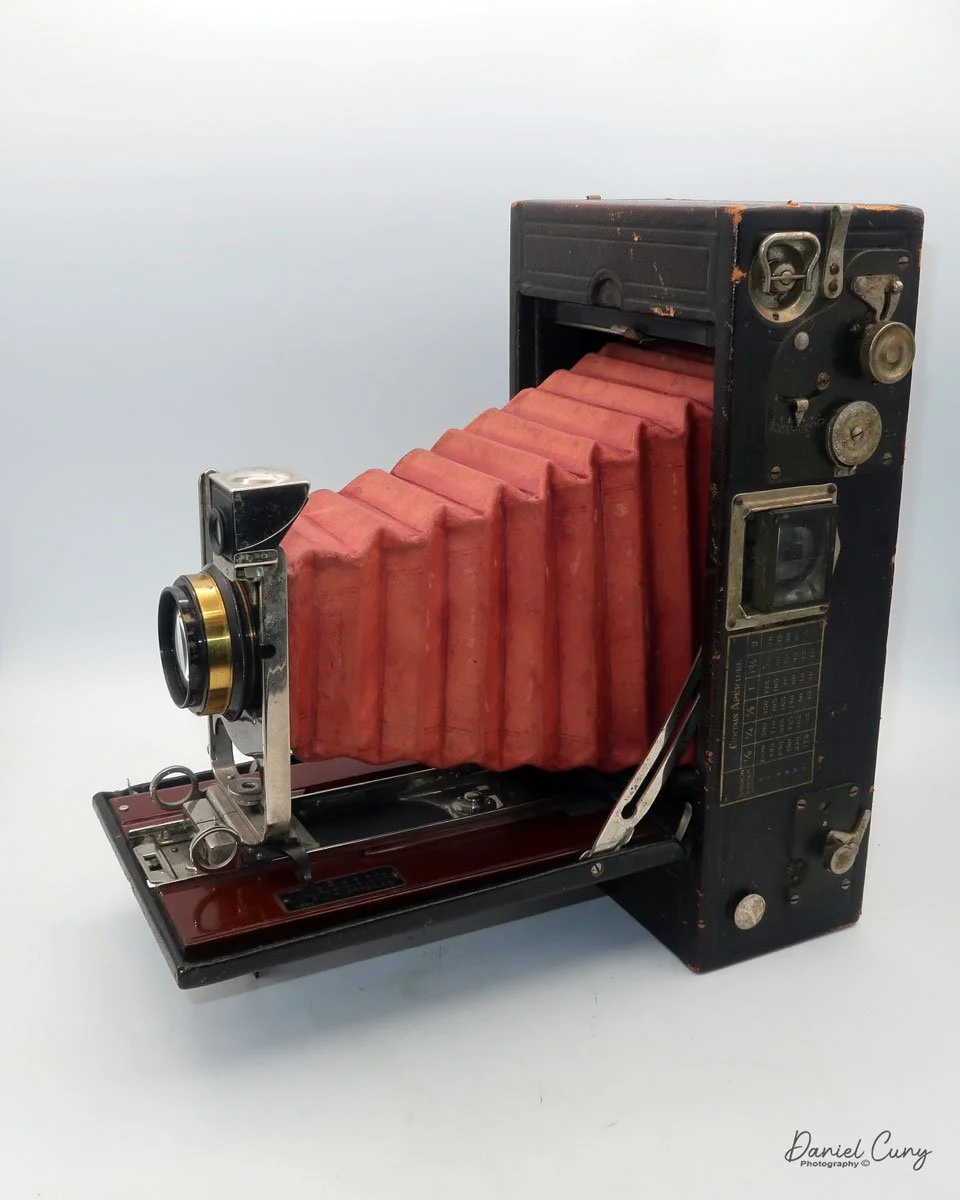
That weight buys you some very unique capabilities. The standout feature is the built‑in bellows, which allows the SL66 to focus much closer than most medium‑format SLRs I've used. Mamiya RB/RZ cameras also use bellows and can get in tight, but the SL66 manages similar close‑focus versatility in a slightly more compact, much lighter and a better‑balanced package. For anyone who loves close‑up or macro work, that alone makes the camera worth a serious look.

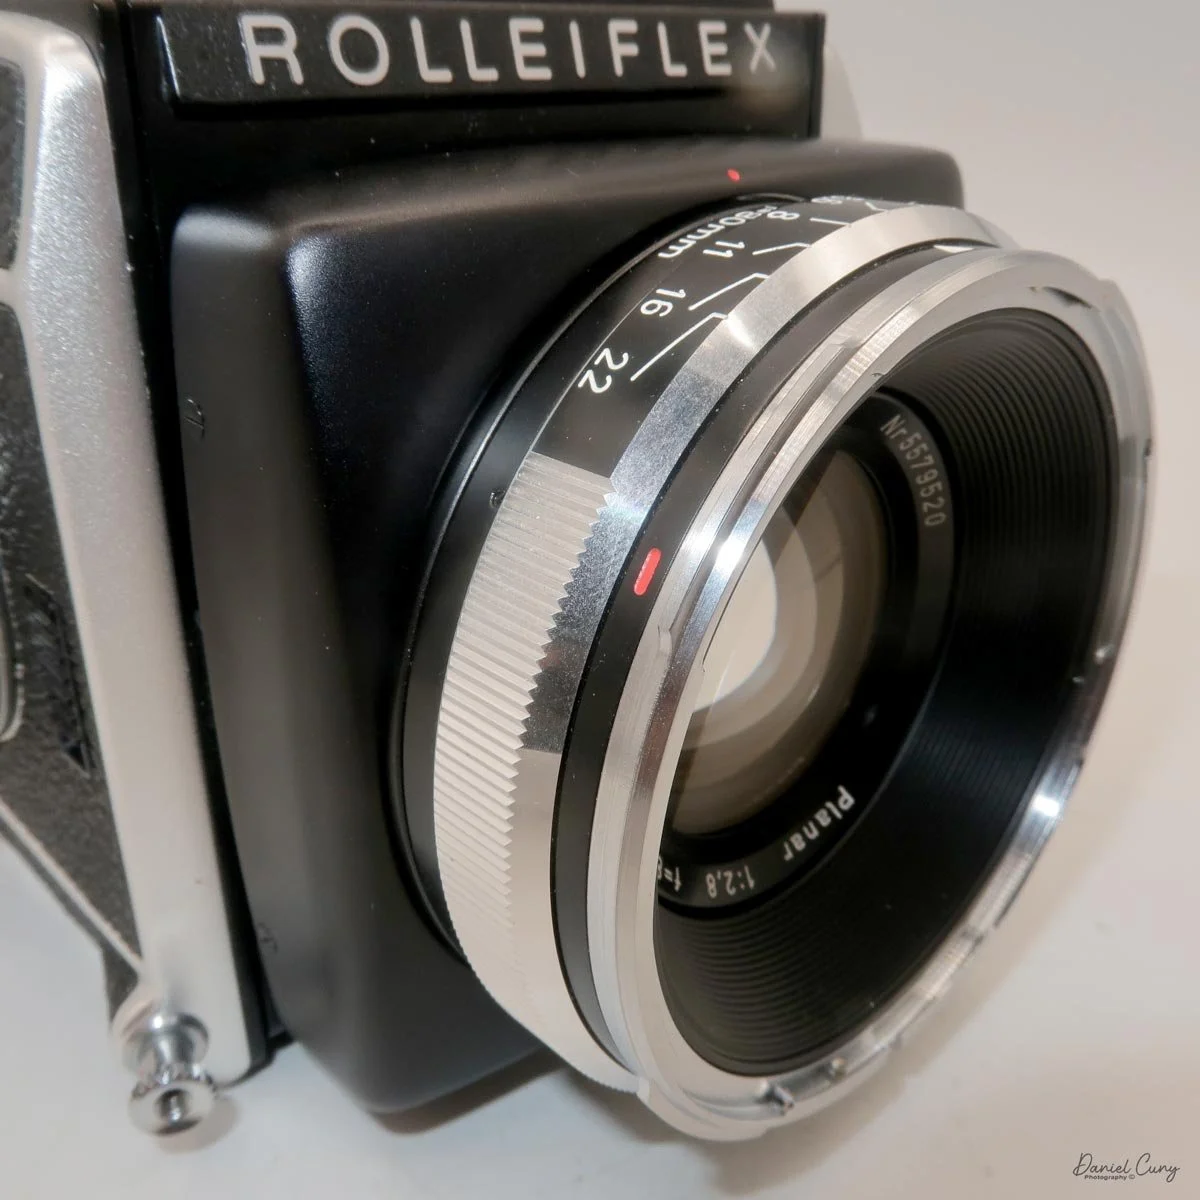
The second signature feature is the double-bayonet lens mount, primarily used with the 50mm, 80mm, and 150mm lenses. The lenses can mount in the normal way, with automatic aperture operation, or be reversed on the body for even greater magnification. In reversed mode, the aperture becomes manual: you open up to focus, then stop down to your chosen aperture for the exposure. It's slower than modern macro setups, but the flexibility it provides is excellent for tabletop and product work.

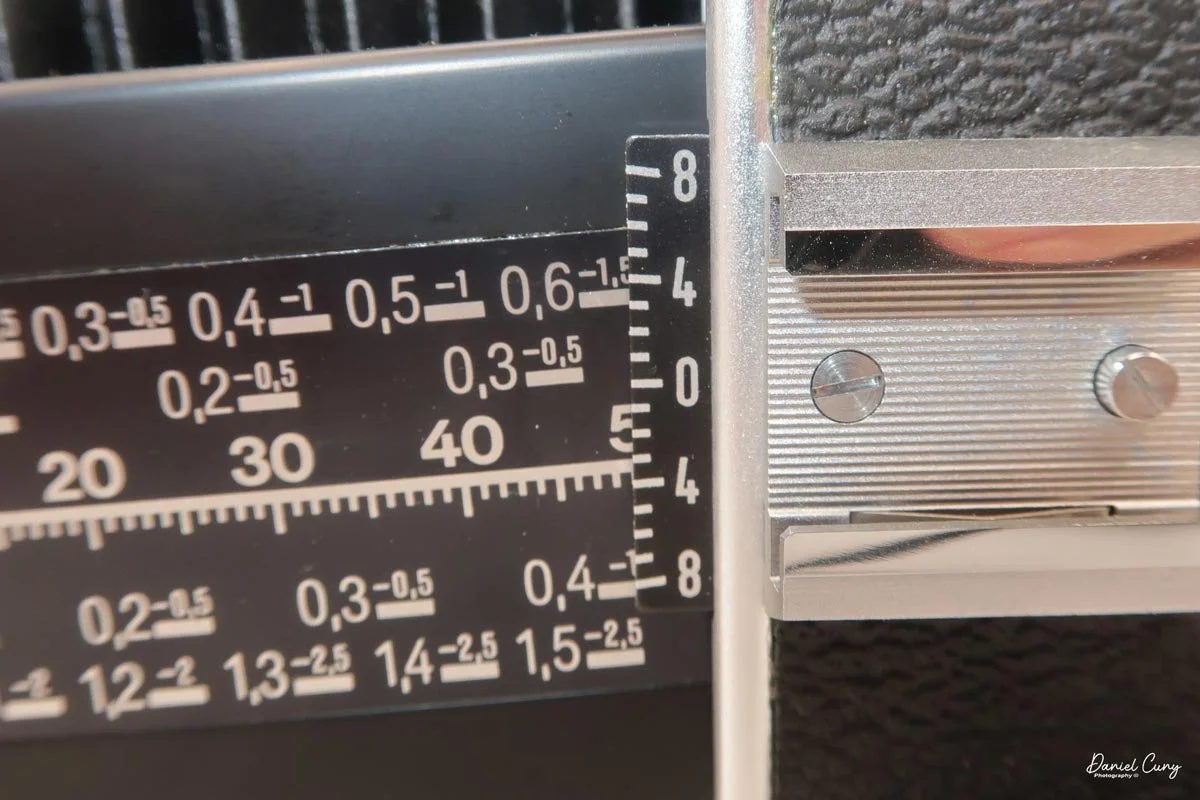
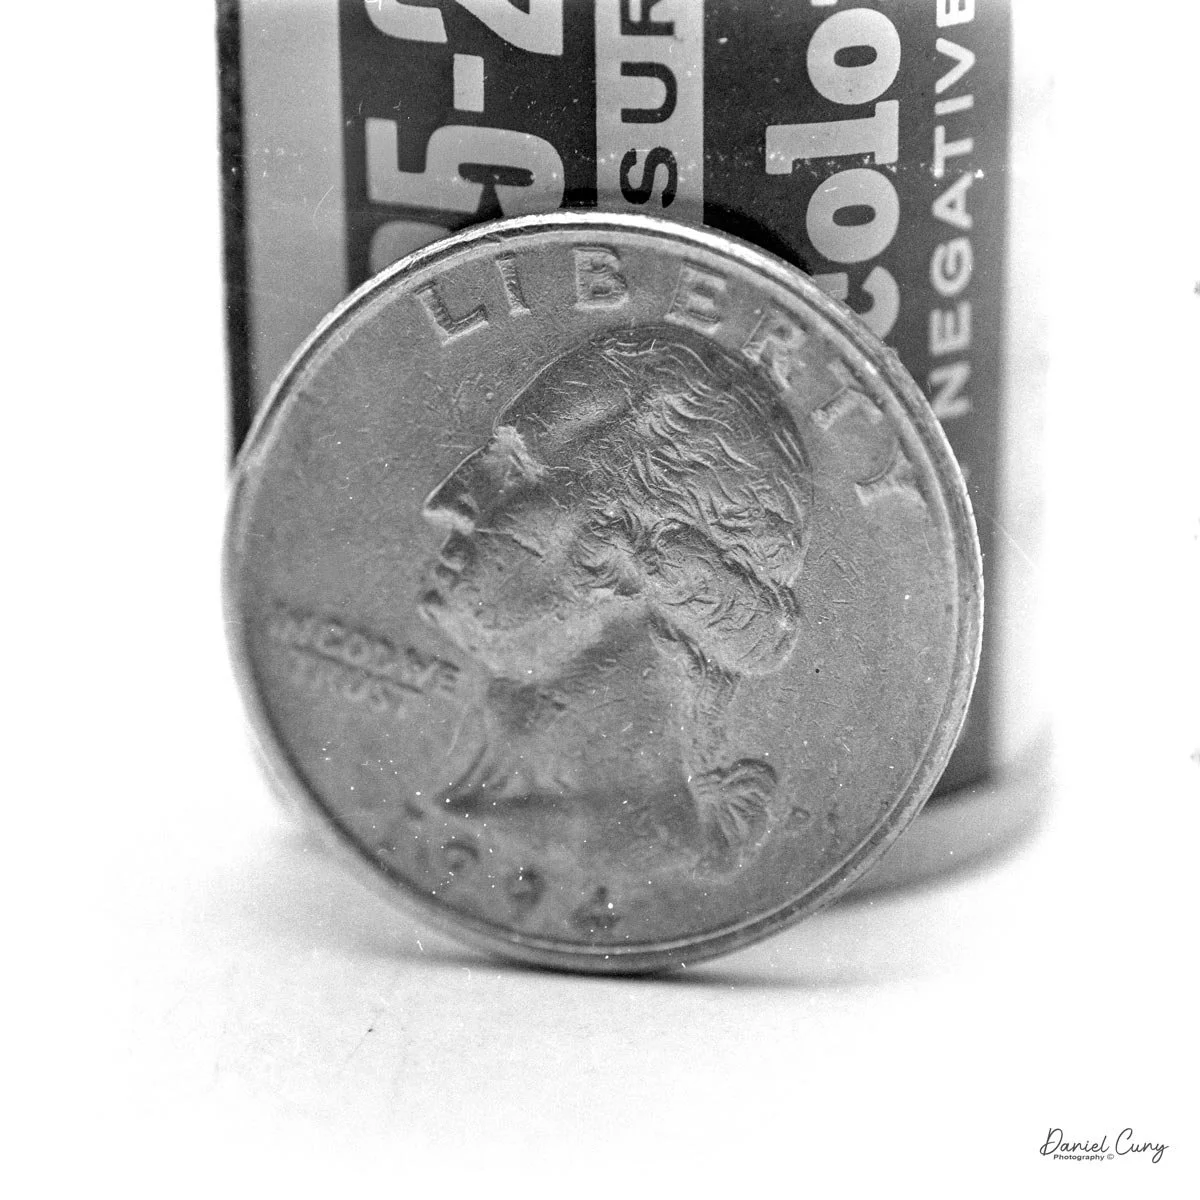
In addition to bellows and reverse mounting, the SL66 offers up to 8 degrees of lens tilt. That tilt lets you "lay down" the plane of focus, bringing more of a product or subject into sharpness at wider apertures. In practice, it means I can photograph something like a 35mm cassette and its box at close range and keep both on‑axis surfaces acceptably sharp without having to stop down to the smallest apertures.

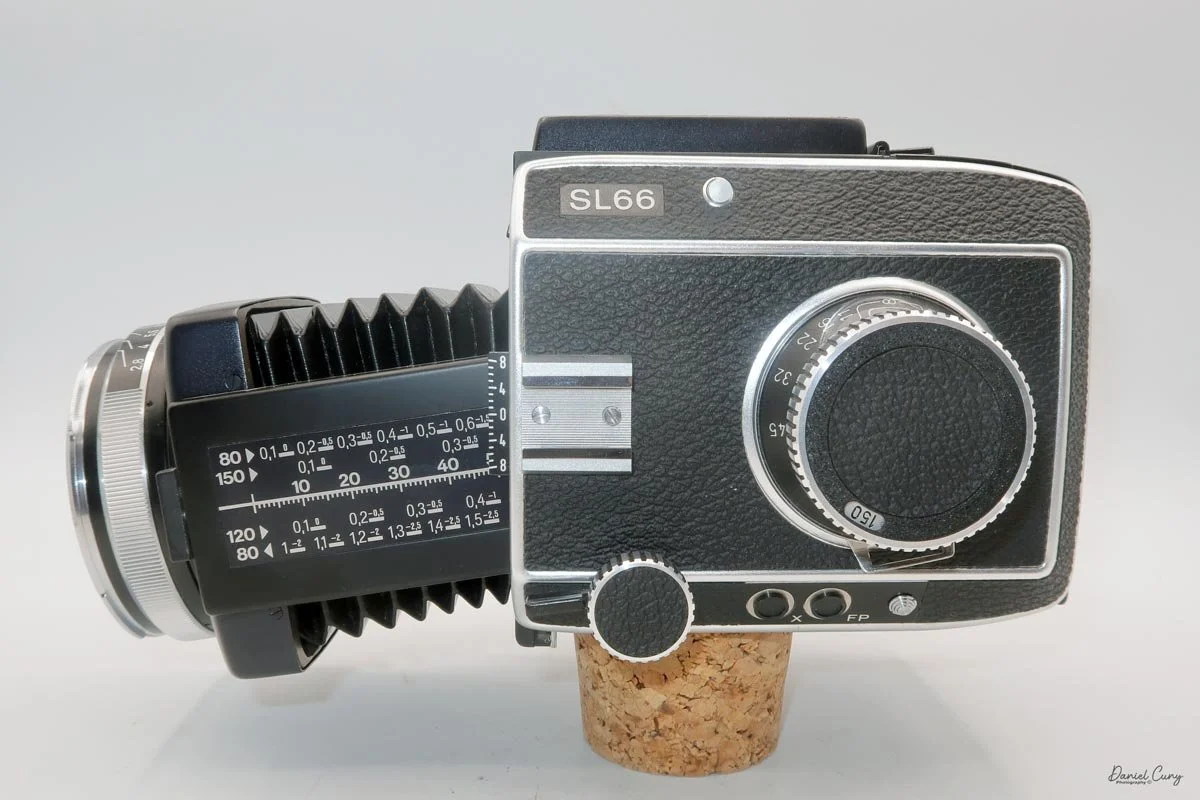
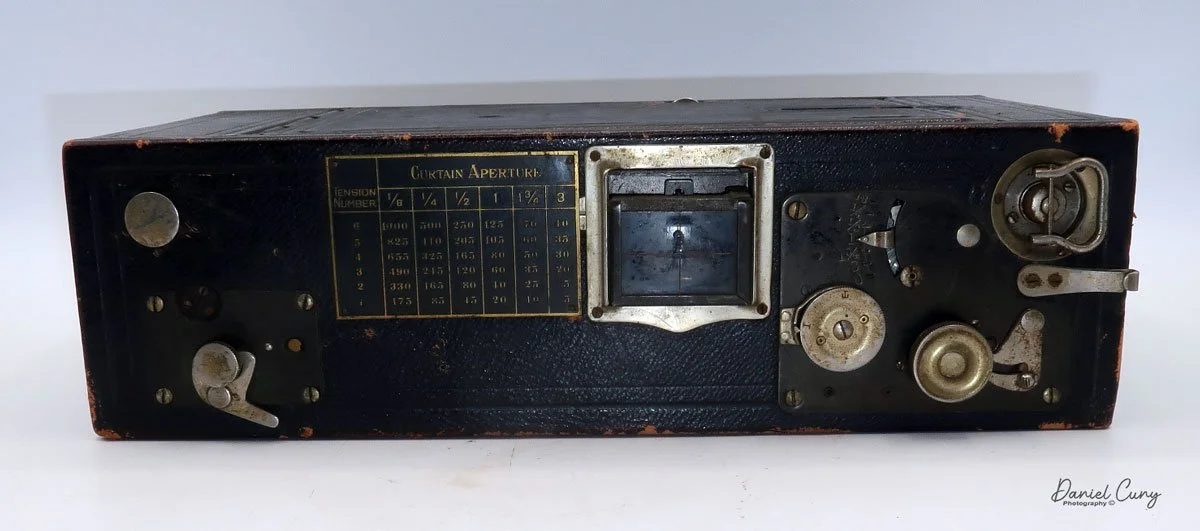
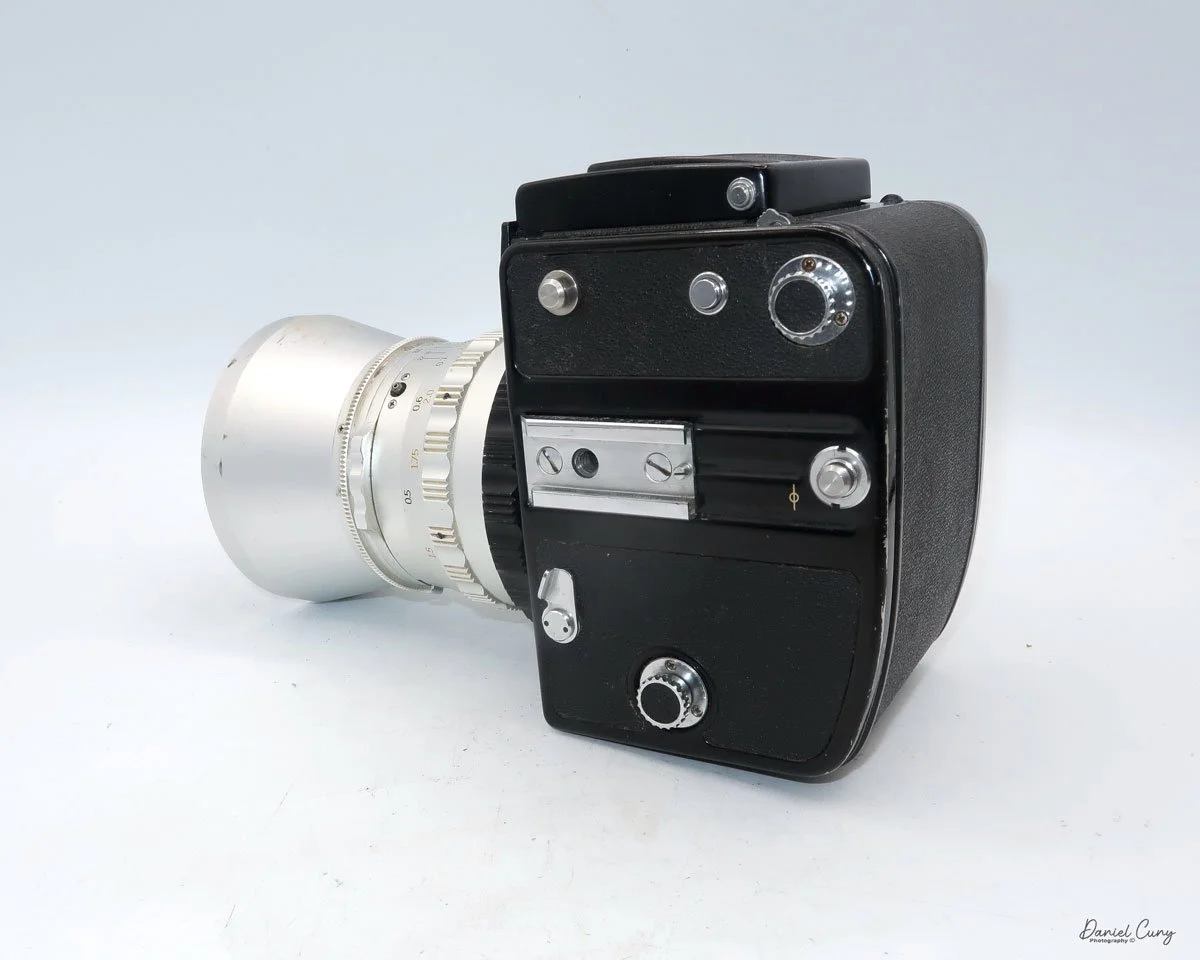
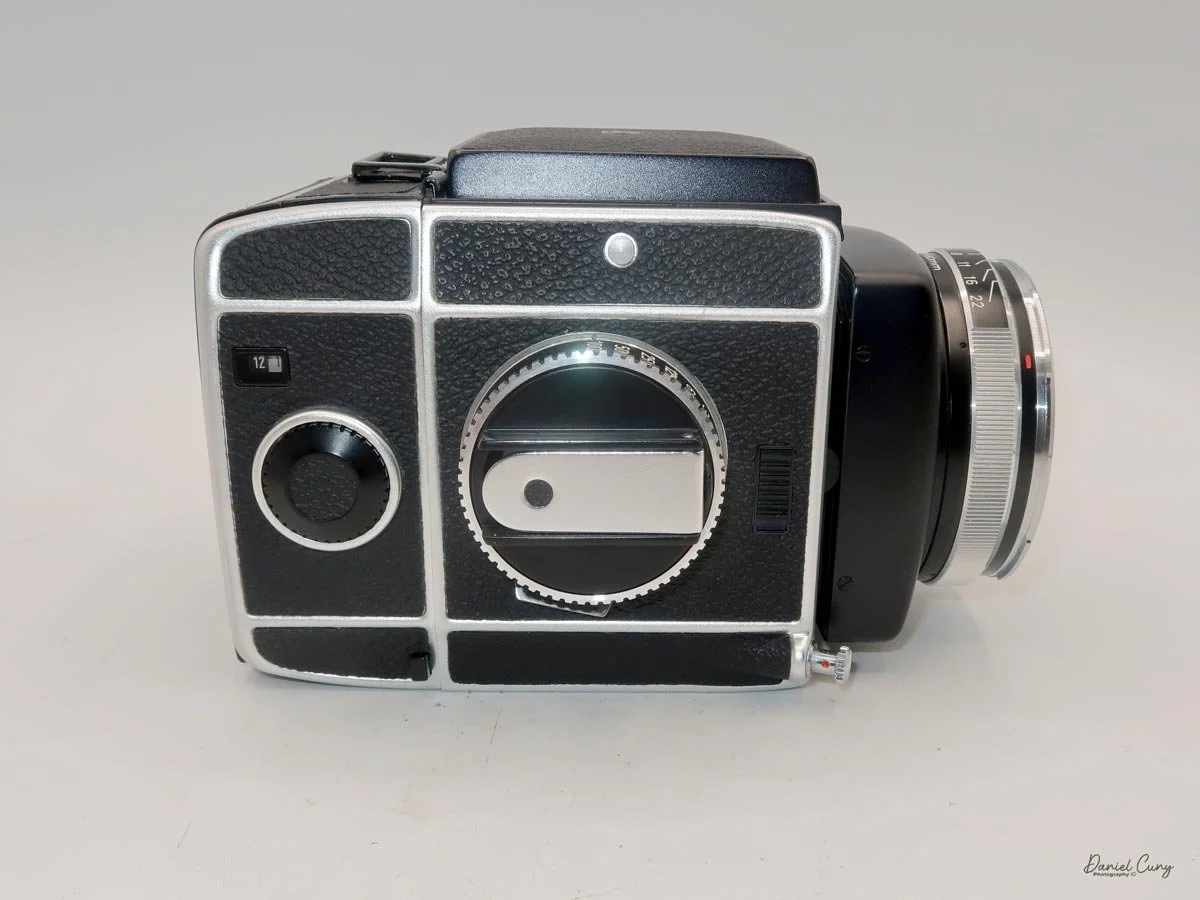
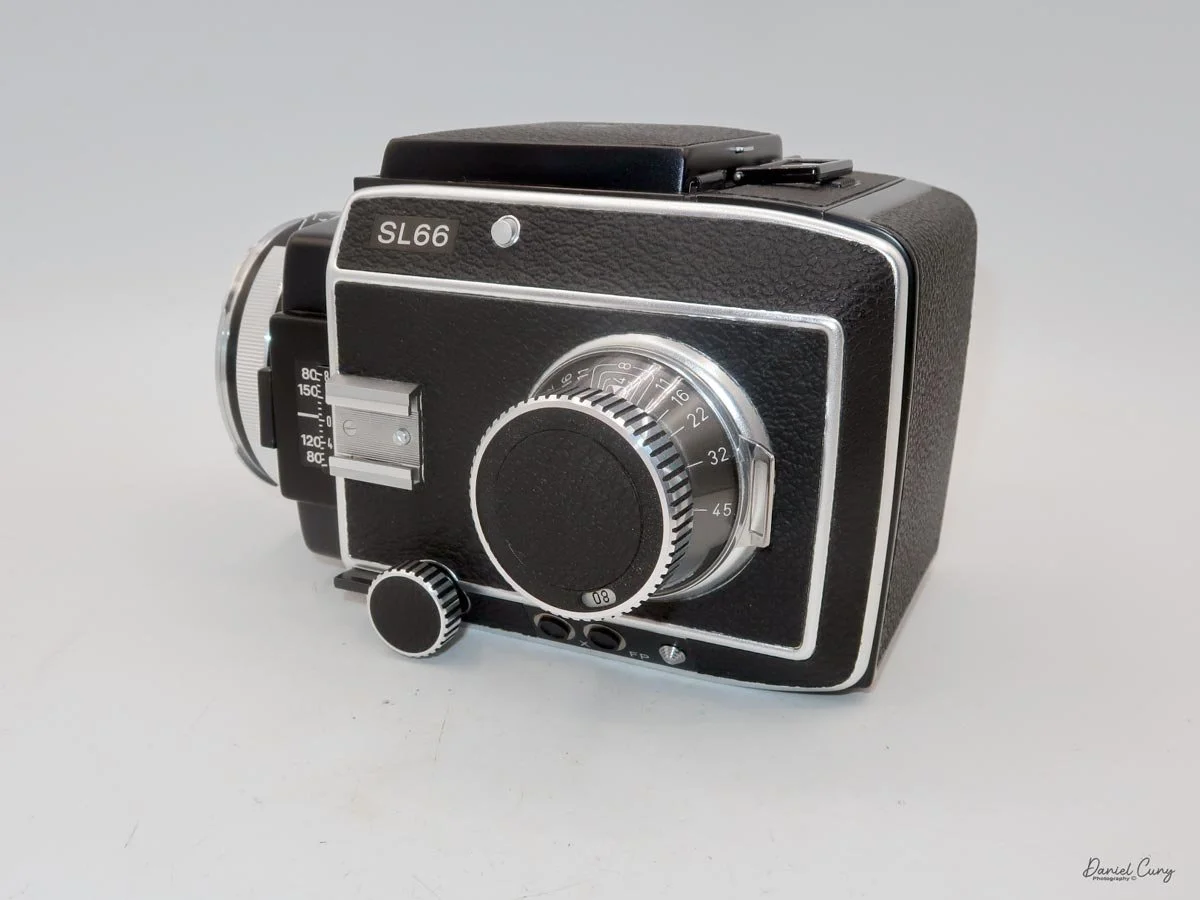
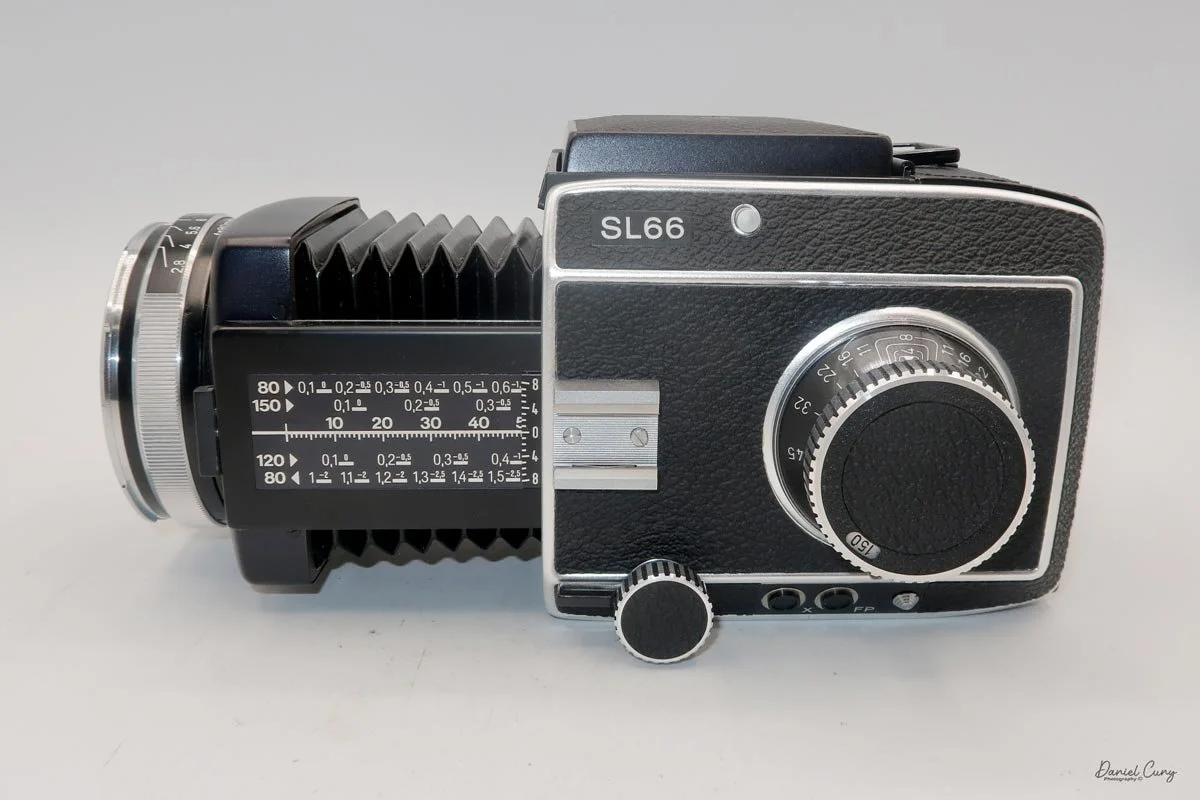
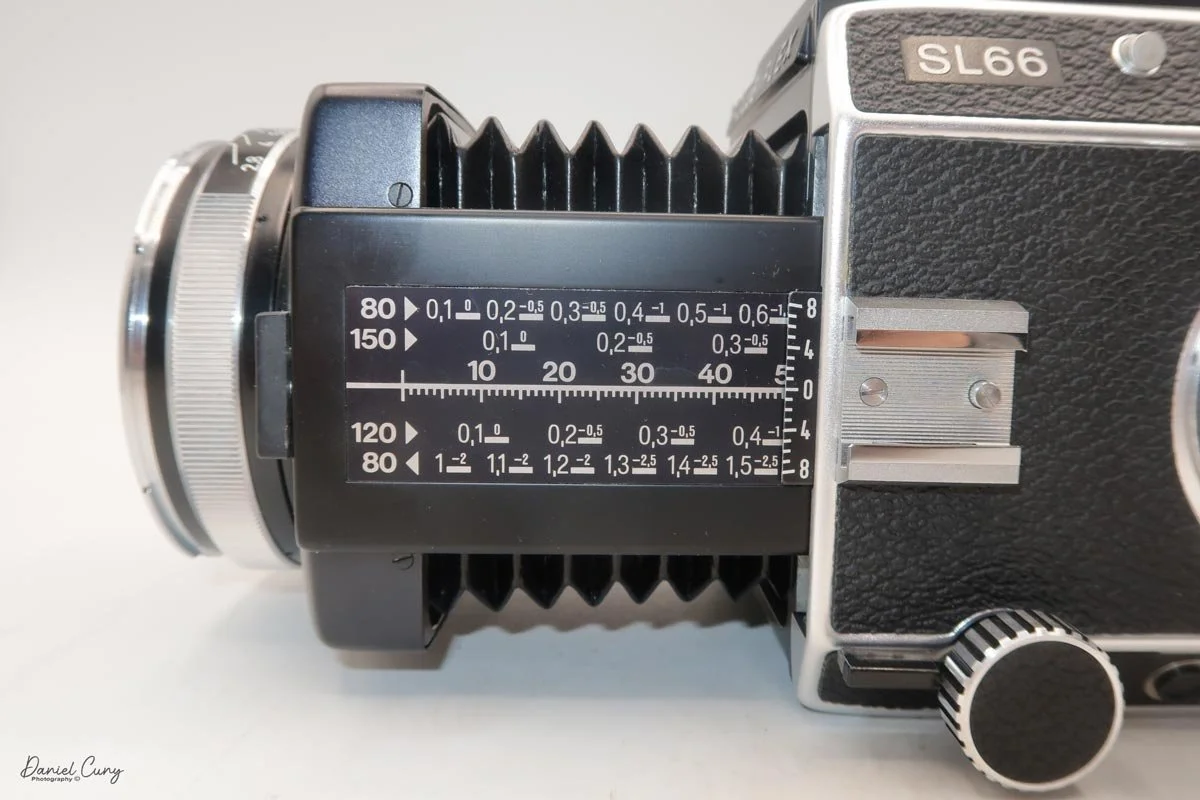
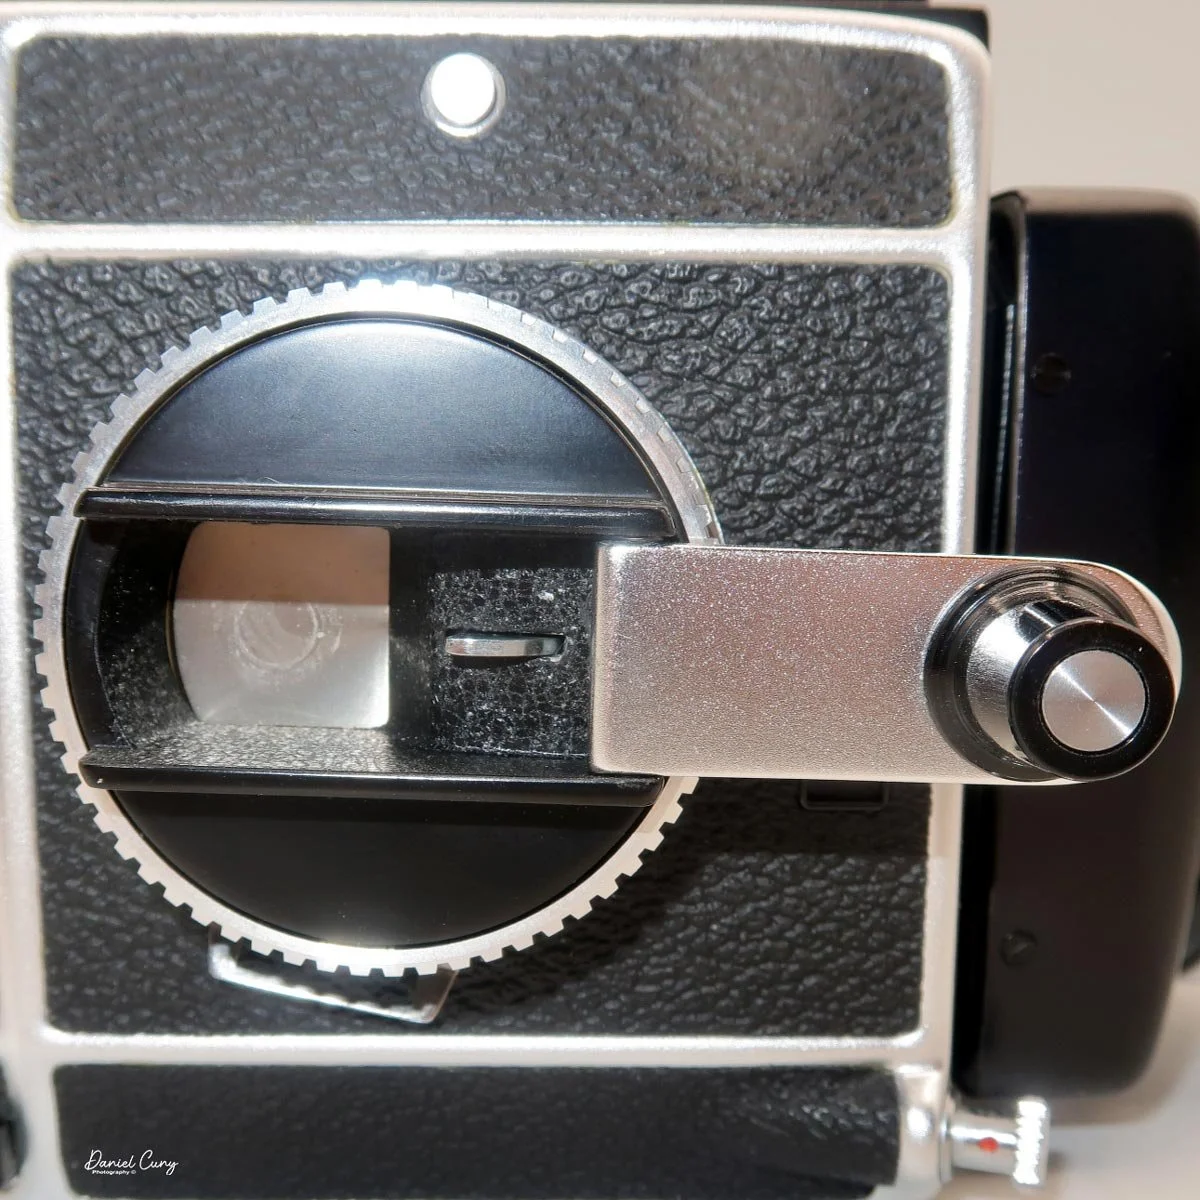
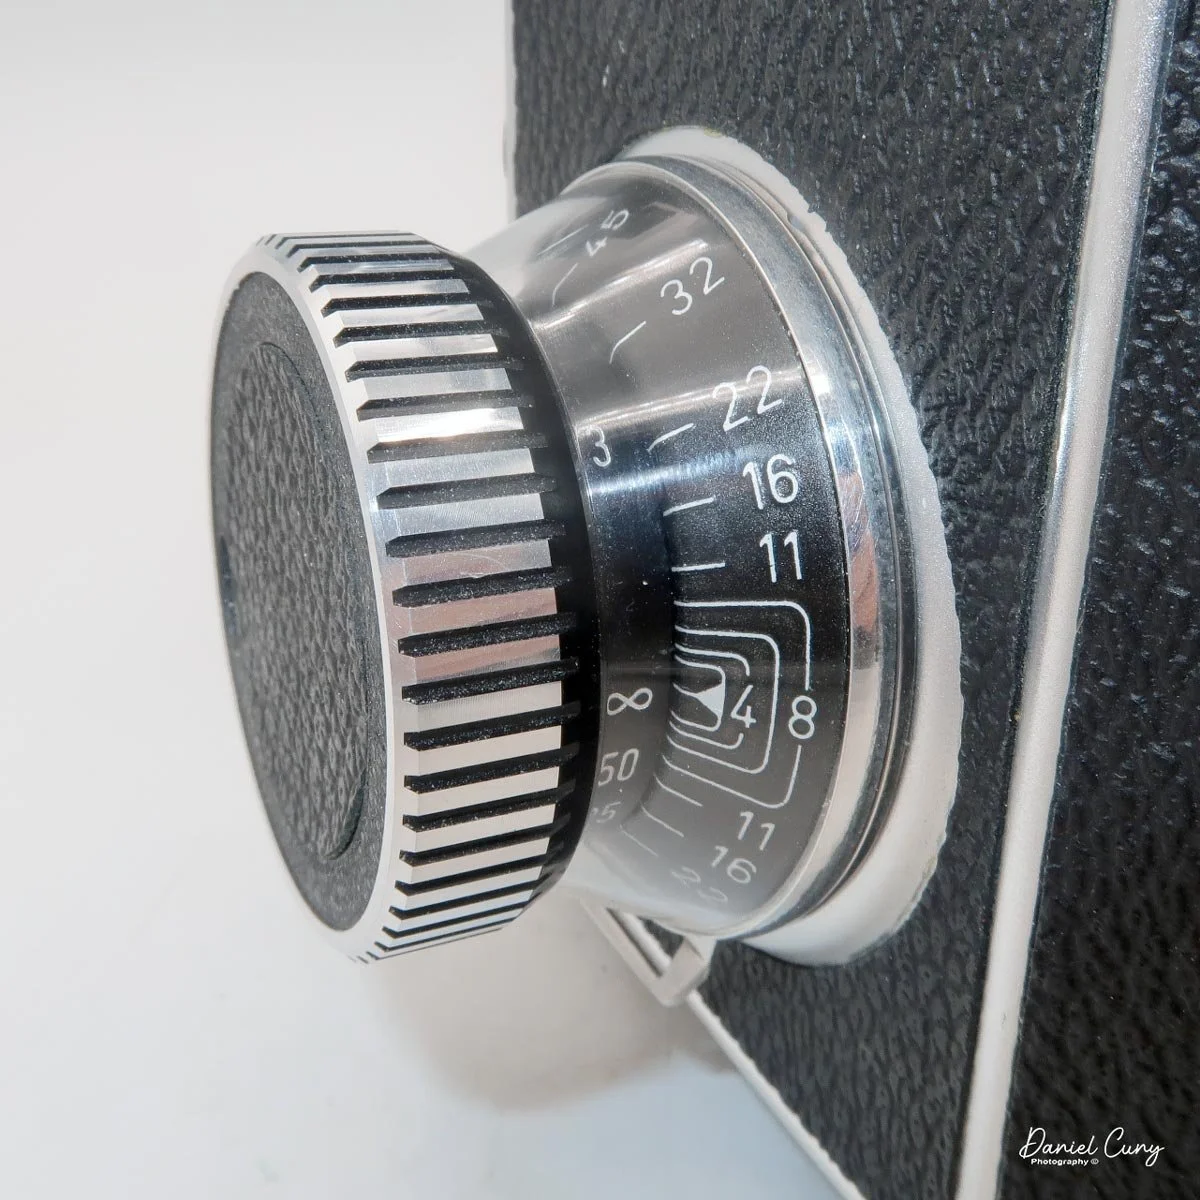
Unlike Hasselblad V‑series cameras, which use leaf shutters in the lenses, the SL66 uses a focal‑plane shutter in the body, with speeds from 1 second to 1/1000 plus "B" for long exposures. Flash sync is limited to 1/30, but for studio or location strobe work, the flash duration actually stops motion, so I haven't found the 1/30 sync speed to be a practical limitation with decent strobes. The shutter speed dial is integrated into the film advance: you pull out the handle, advance clockwise until it stops, then swing it back counterclockwise to cock the shutter for the next frame. Inside the crank is a multiple‑exposure switch, which makes stacking exposures on one frame very straightforward once you know where to find it.

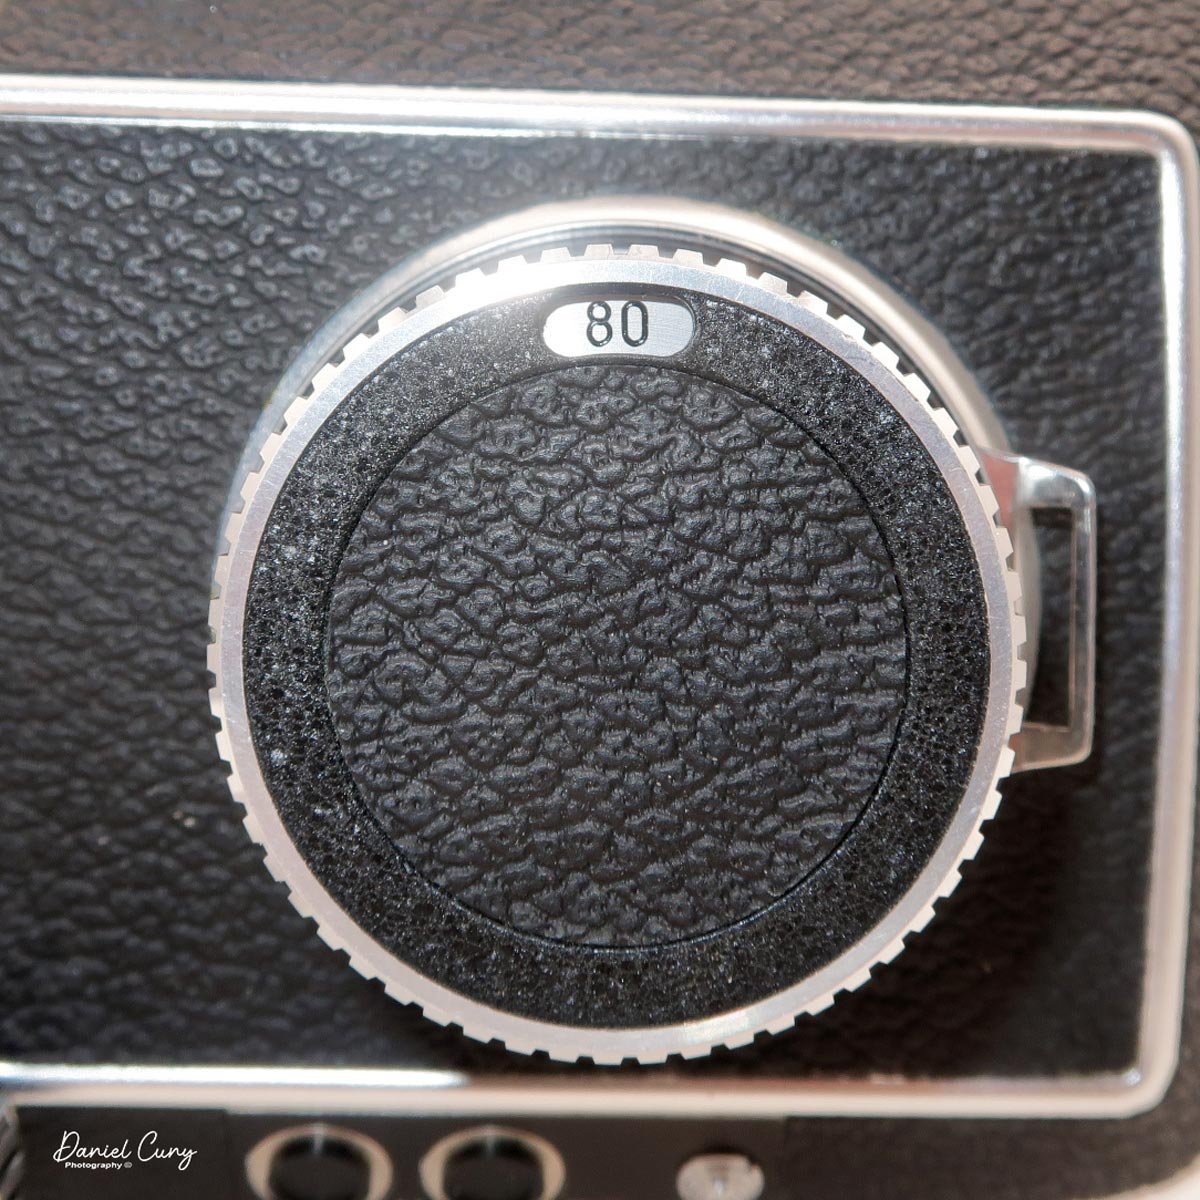
The SL66 lens lineup was designed by Carl Zeiss, and it shows. Optically, the lenses I have are excellent, with contrast and sharpness fully in the "top tier" I expect from Zeiss glass. The system spans from 30mm all the way to 1000mm, and Rollei also offered two leaf‑shutter lenses—an 80mm Distagon and a 150mm Sonnar—with flash sync up to 1/500 for shooters who need higher sync speeds. In my experience so far, the standard lenses deliver exactly the kind of image quality you want from a camera of this size and weight.

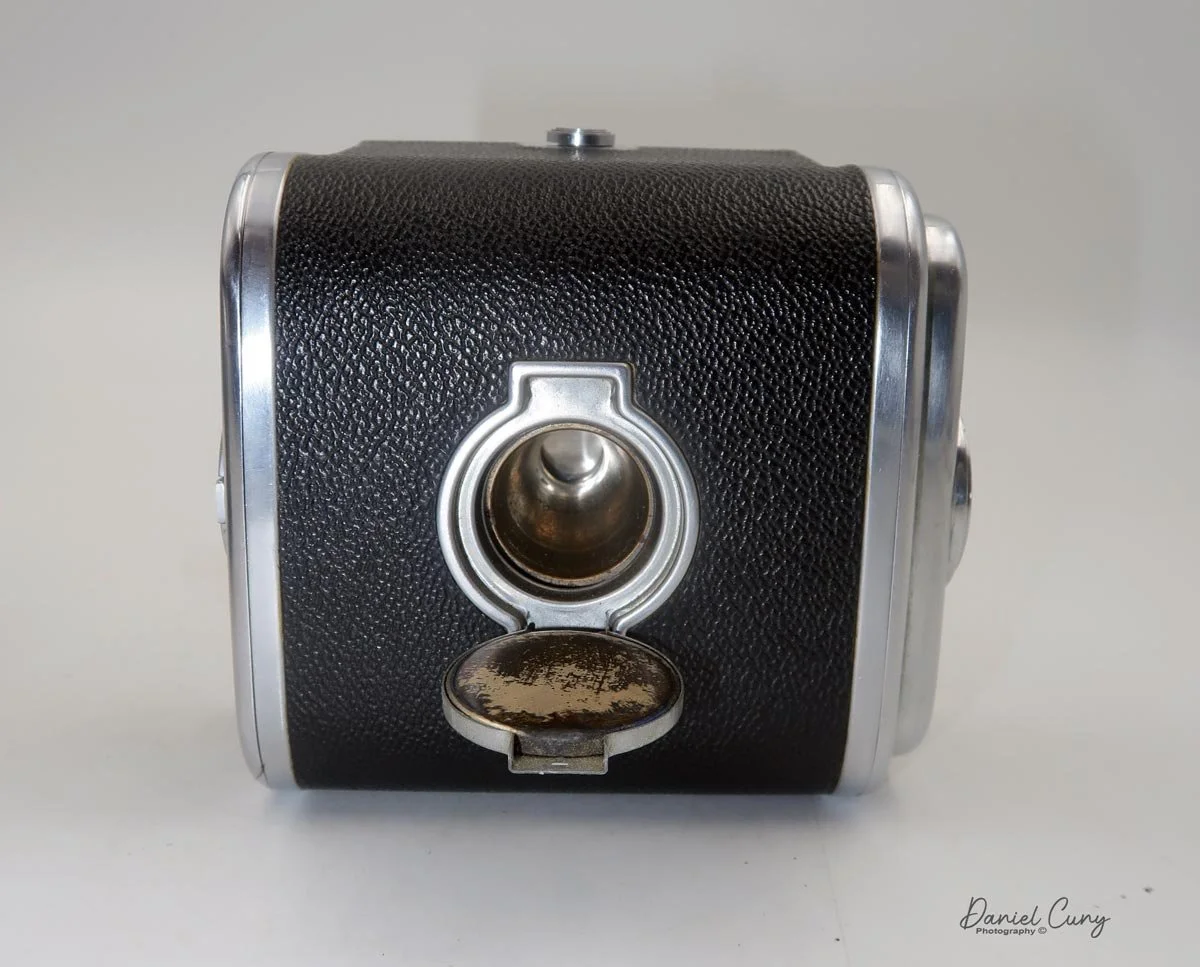
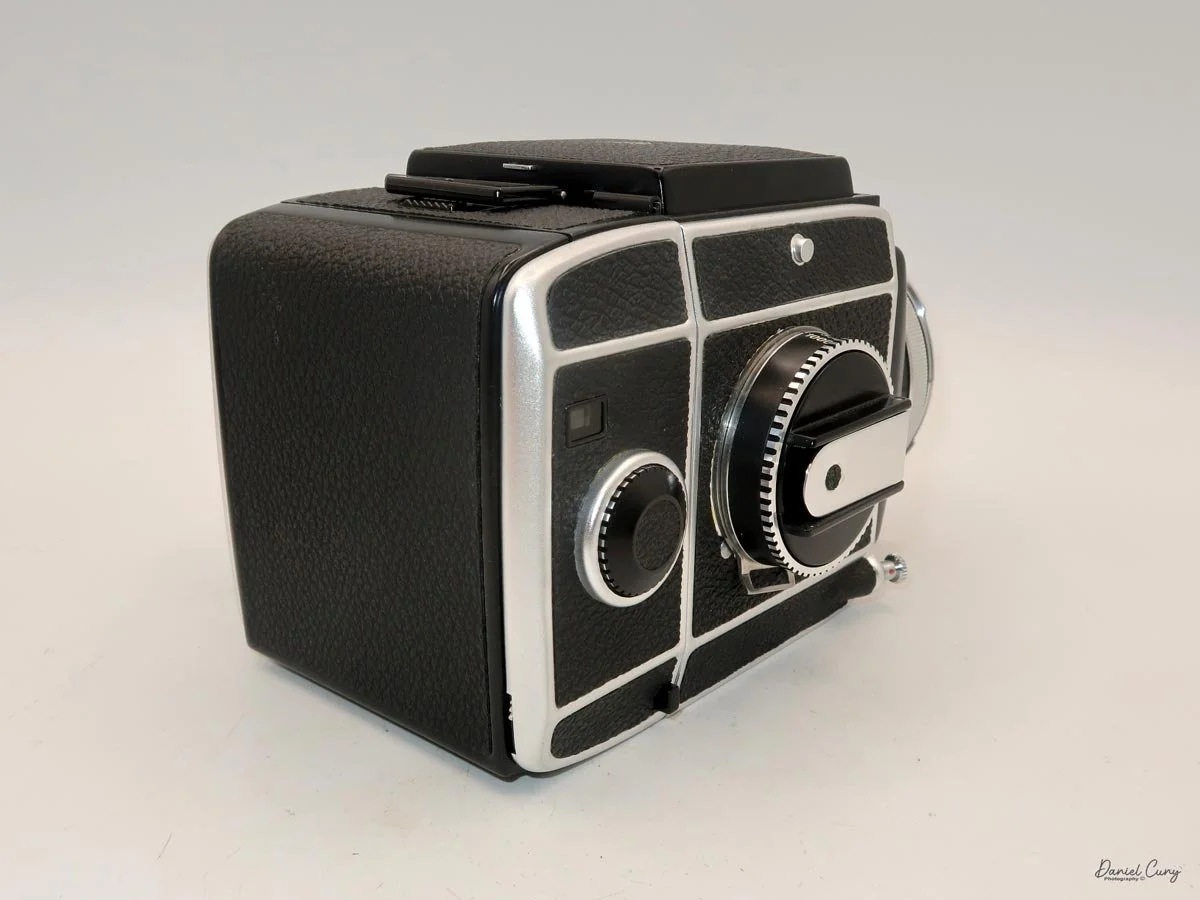
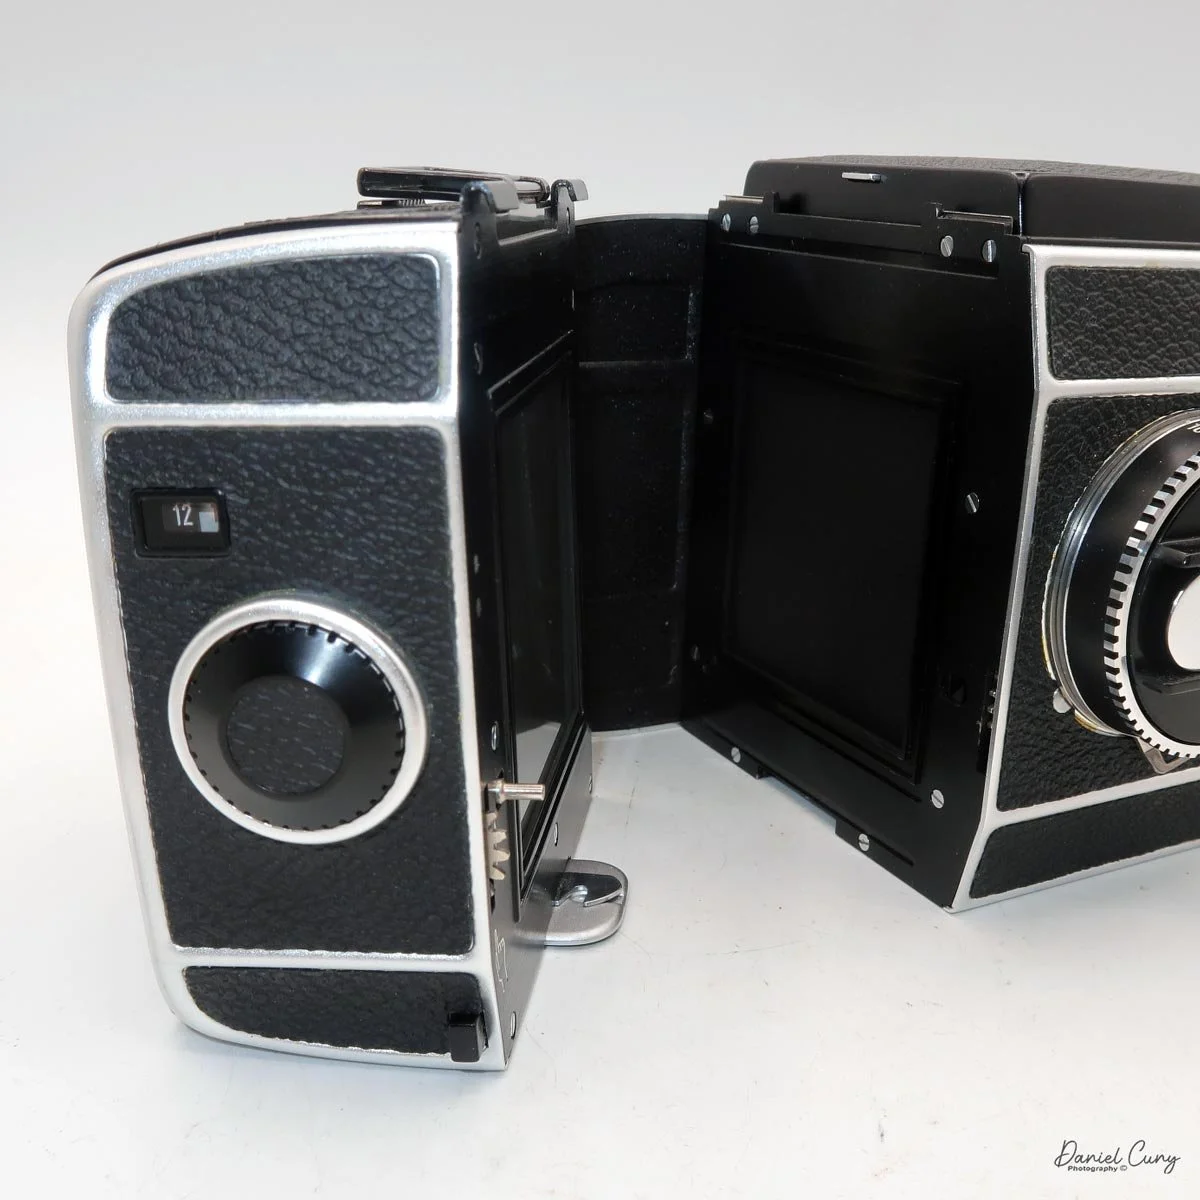
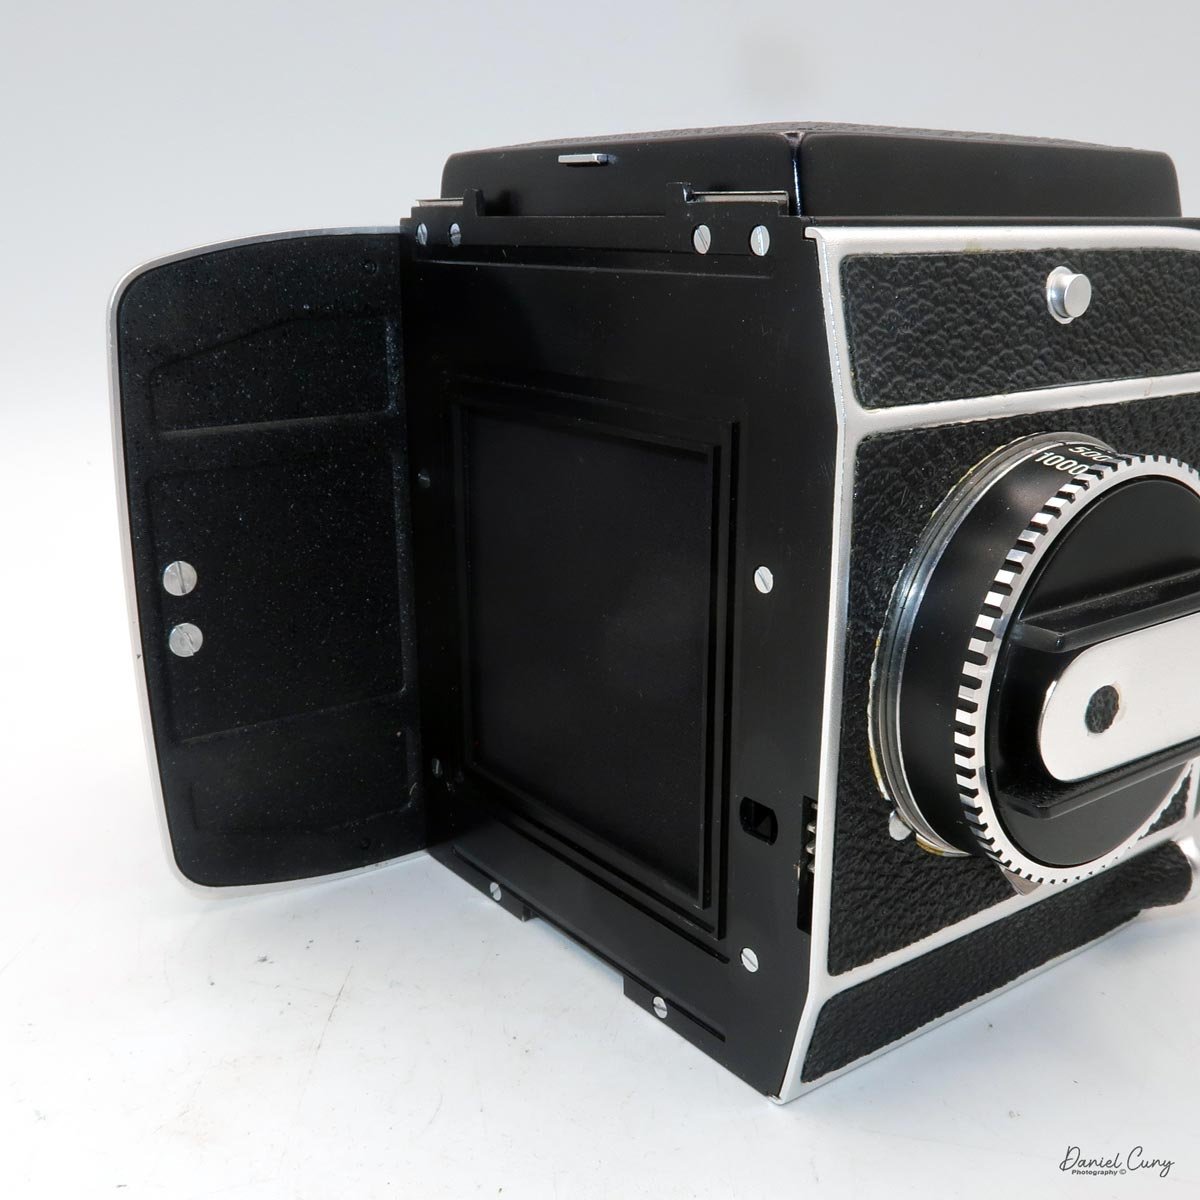
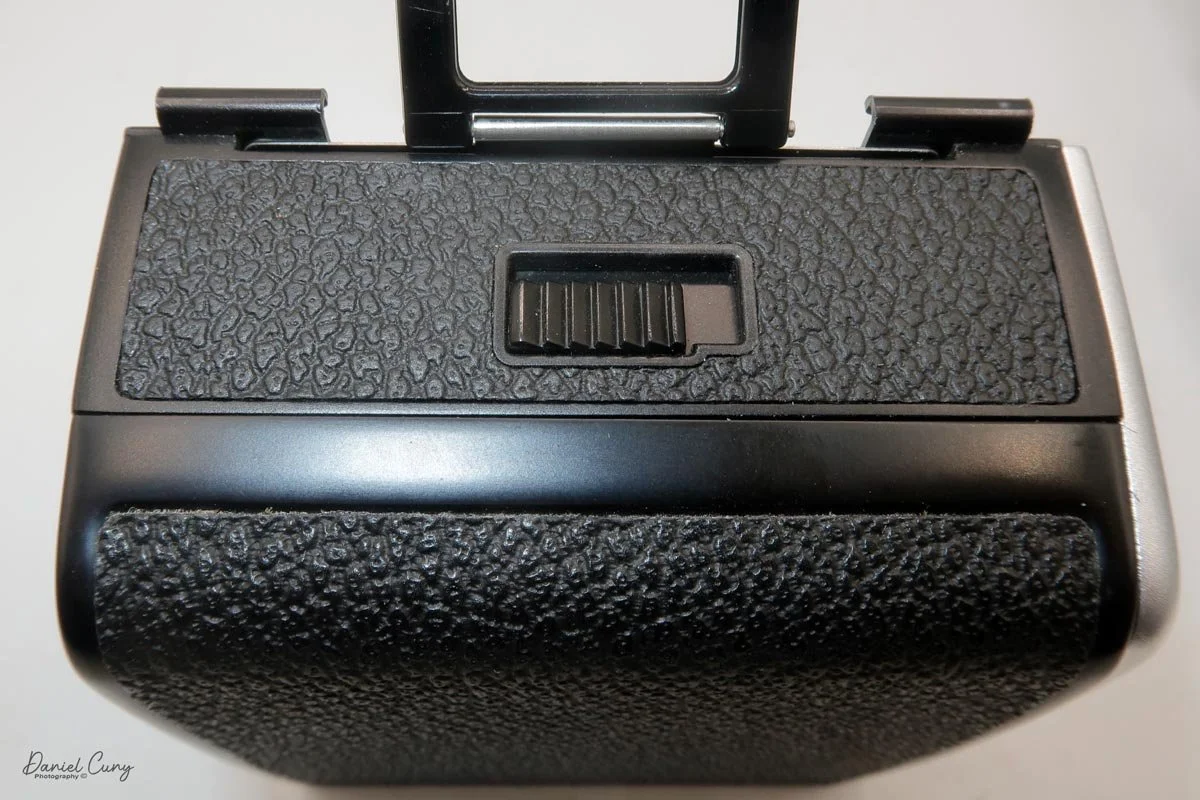
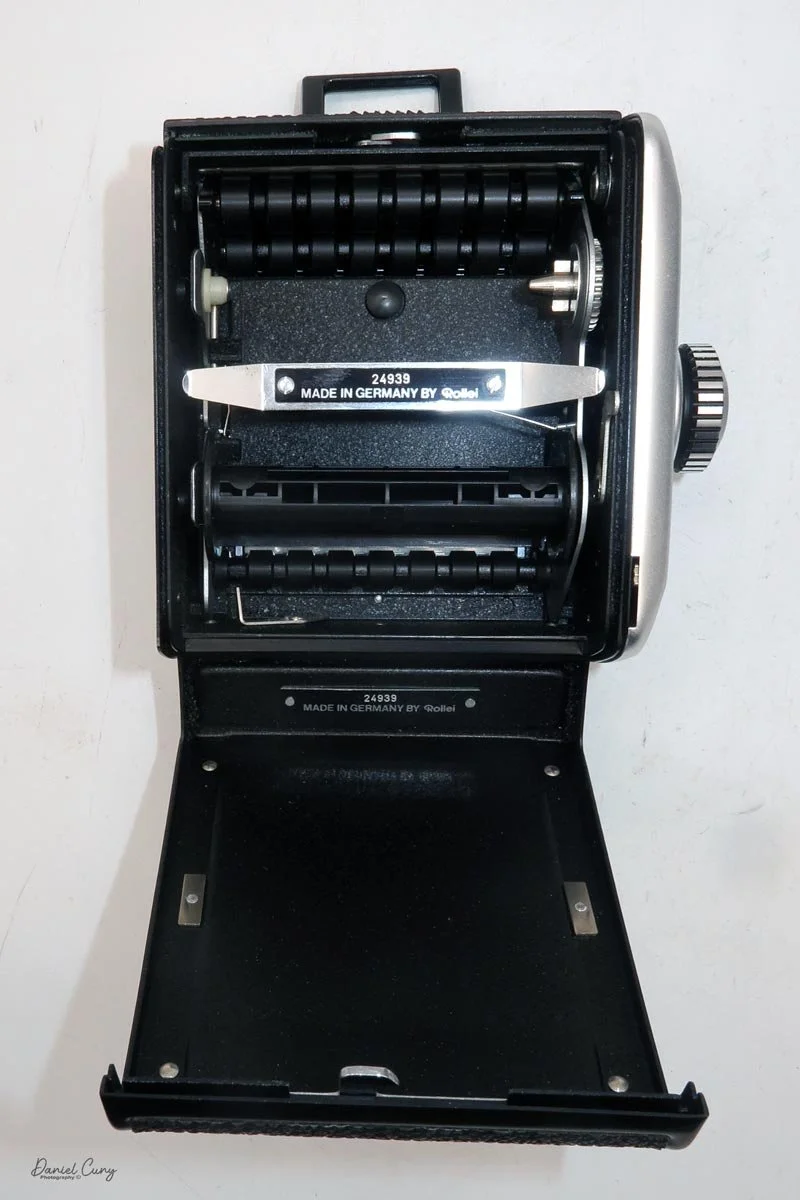
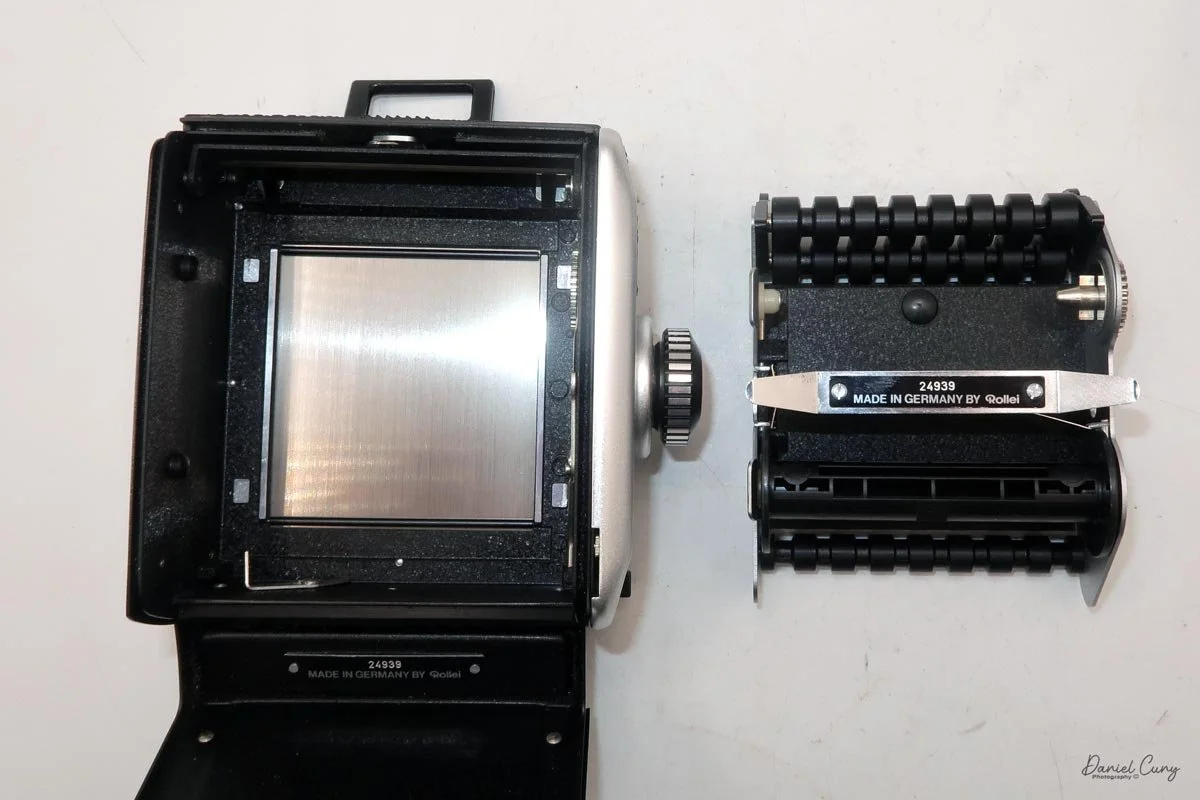
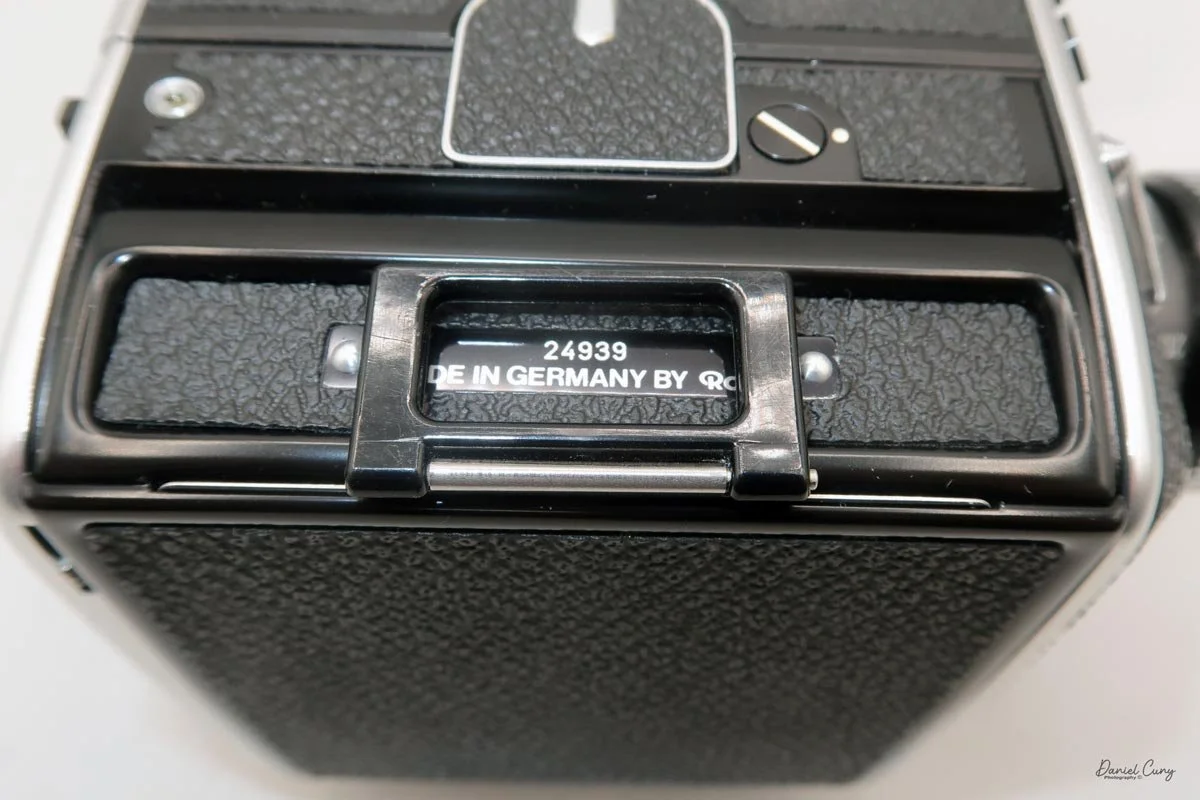
 The film back system is well thought out. The standard back takes either 120 or 220 film, and you can get inserts and backs for 6×6 or 6×4.5. The dark slide parks neatly on the back when you're shooting, which means you're not constantly wondering where you set it down. Loading is similar to Mamiya's insert‑based backs: open the door, pull the insert, load the film, reinsert, then wind to the first frame. A pop‑out winding wheel on the side of the back helps tension and advance the film before the main crank takes over. Once you've shot the twelve frames on 120, the wheel pops back out to let you wind the roll off before opening the back.

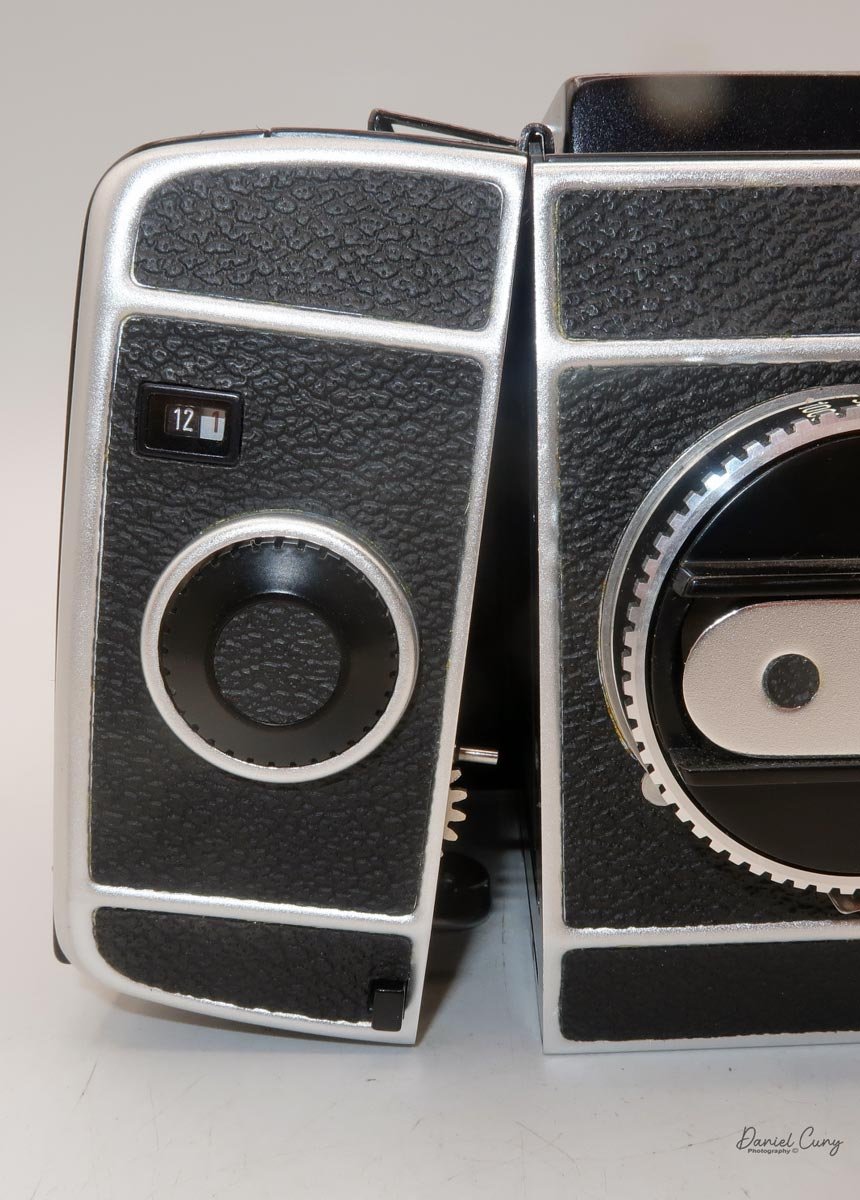
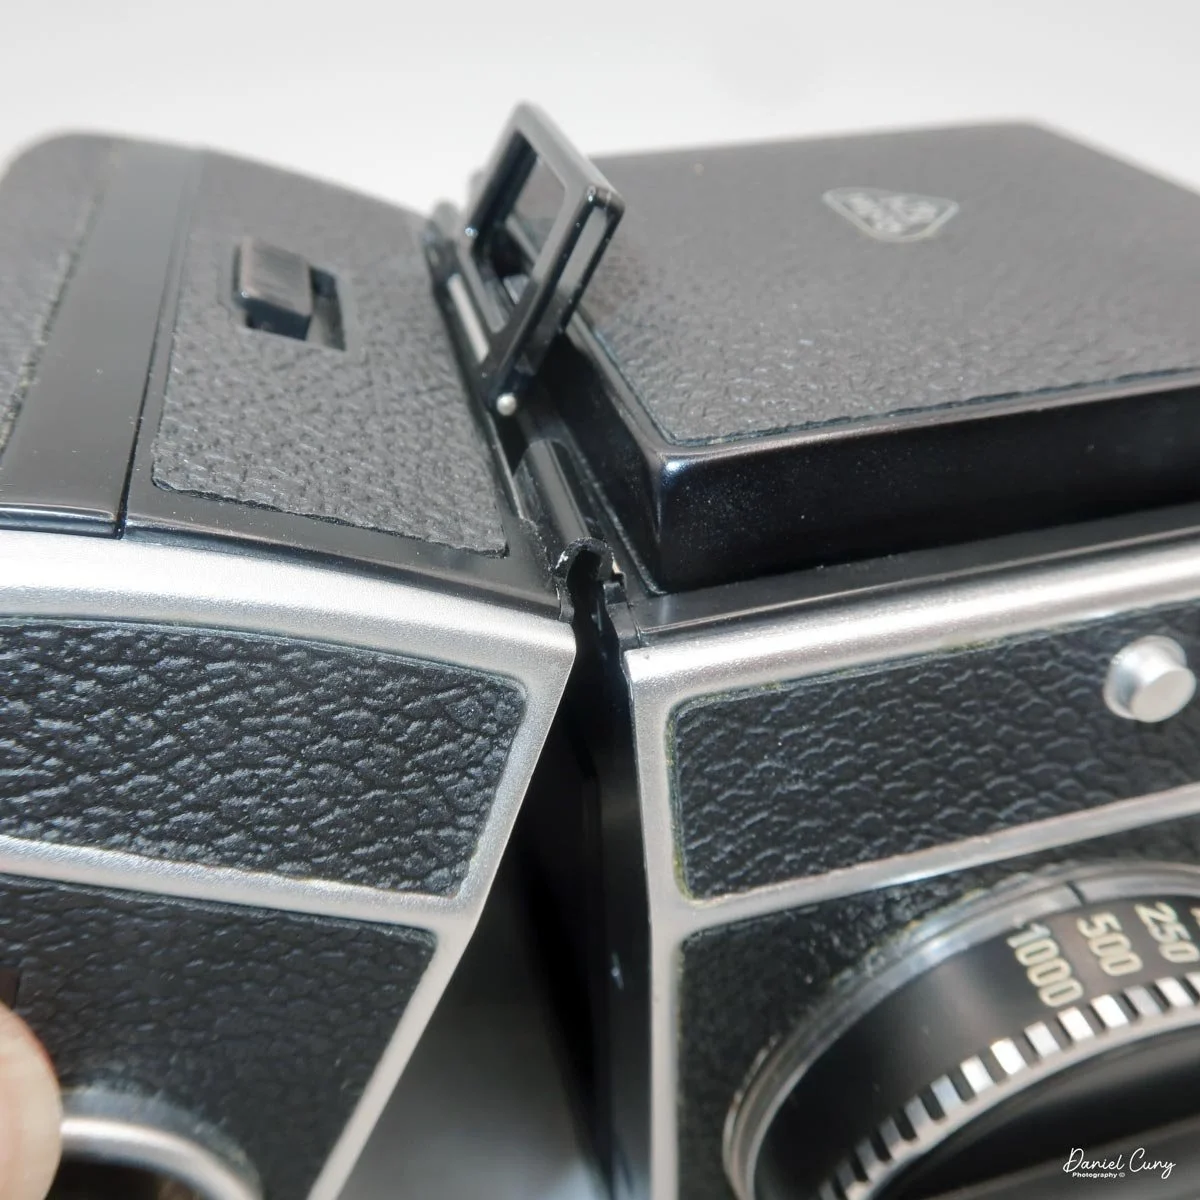
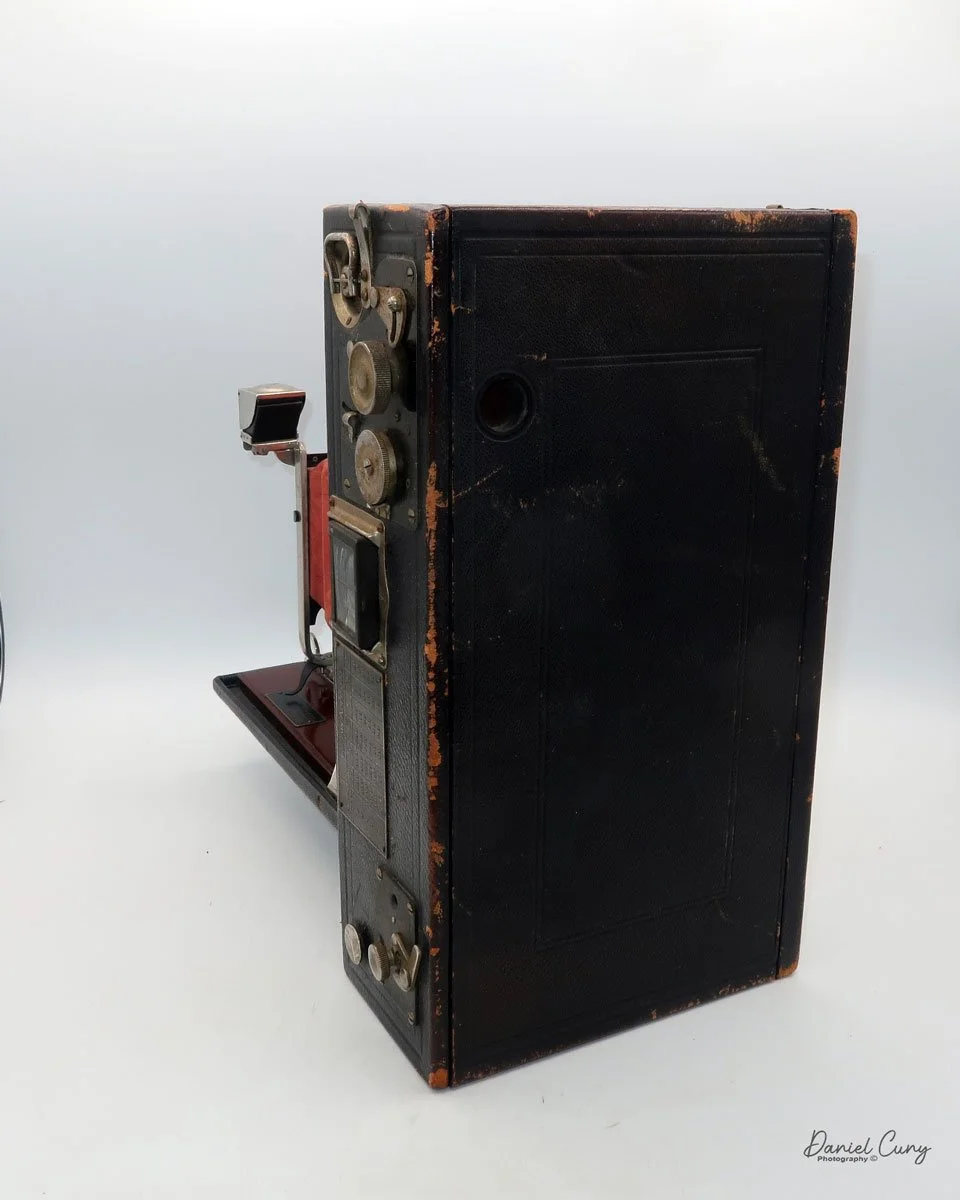
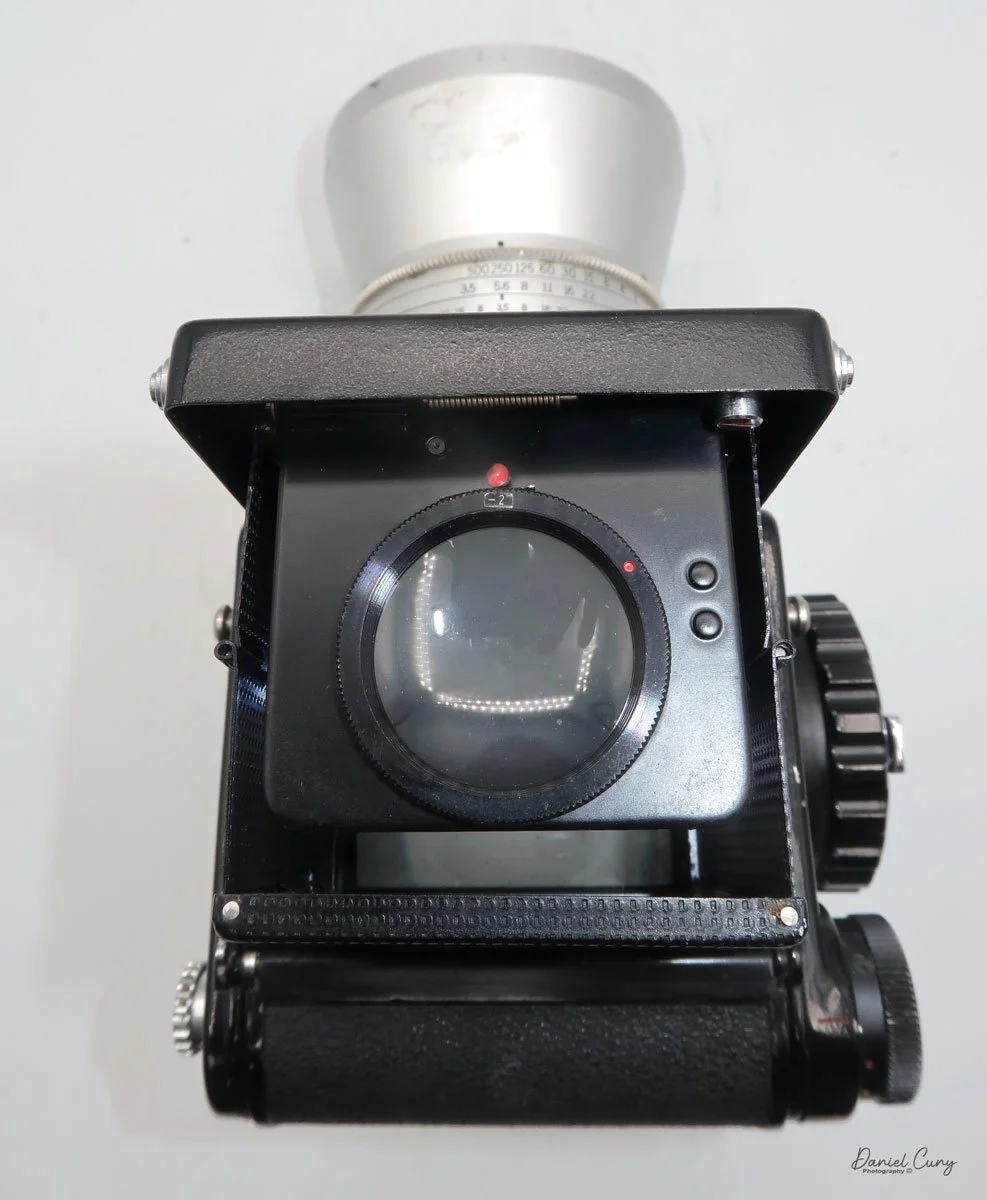
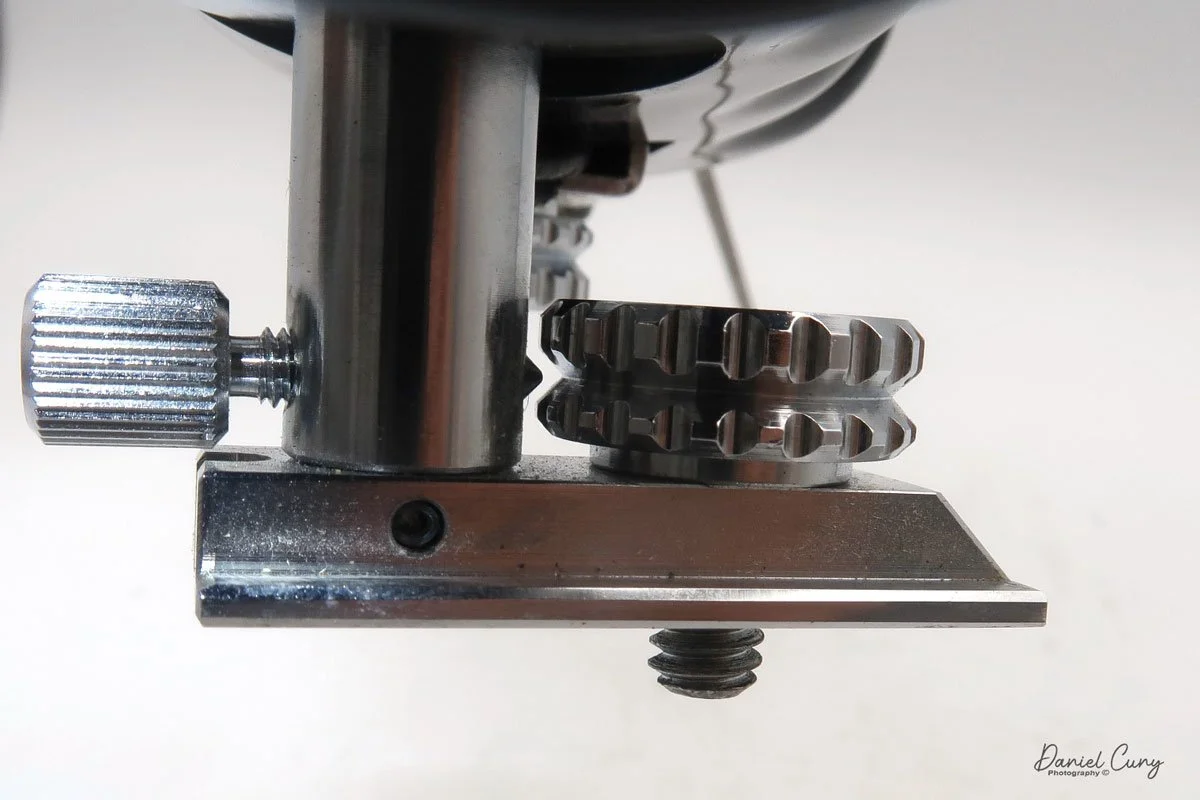
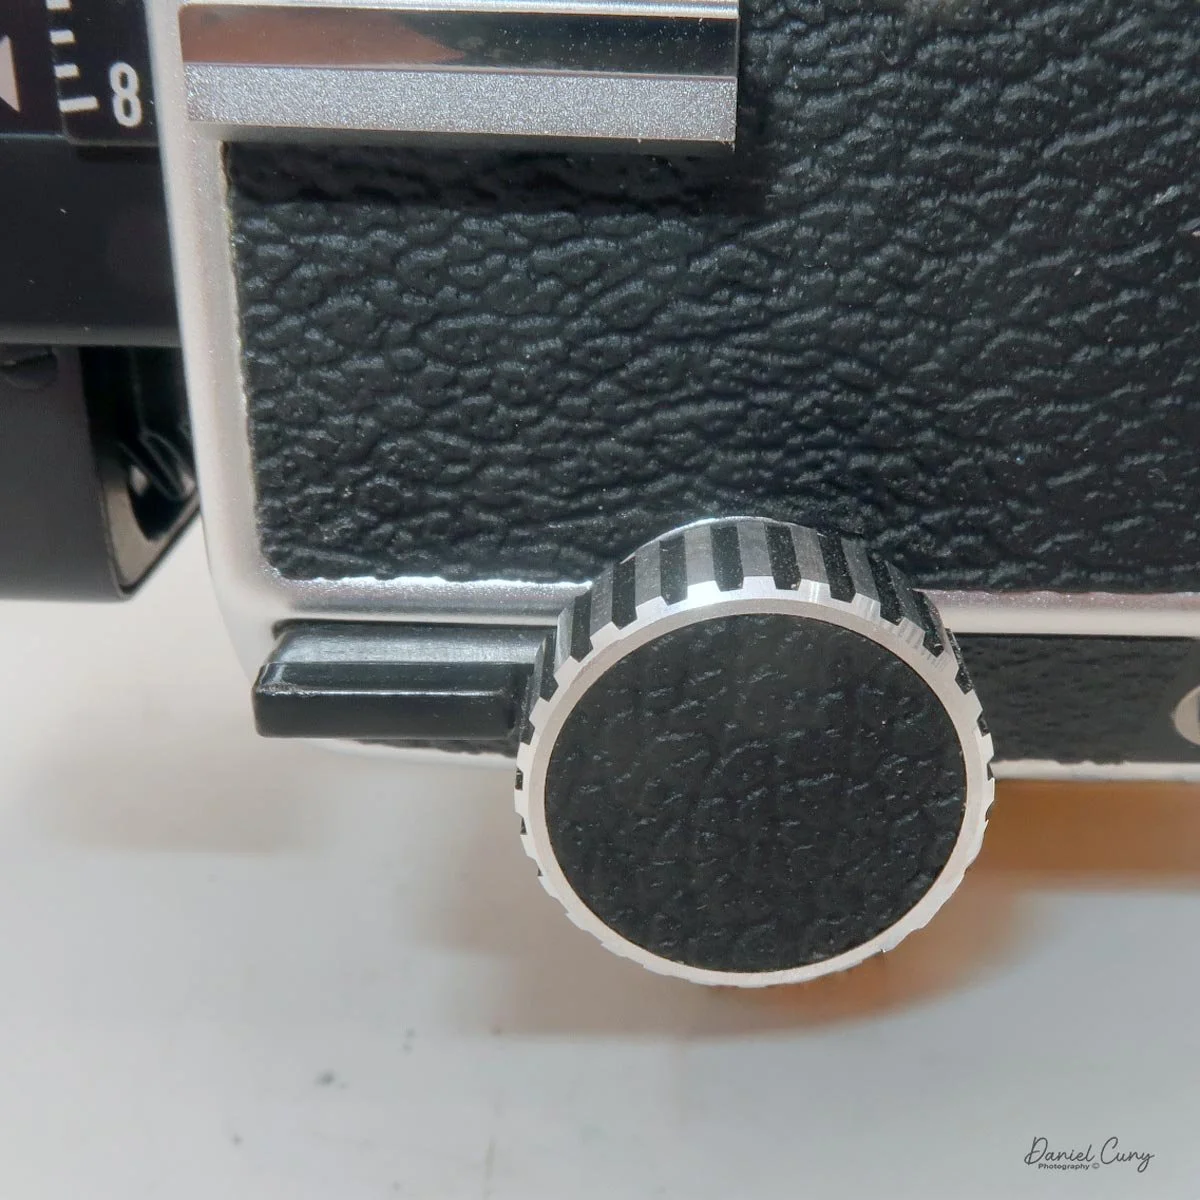
On the camera body's left side is that big focusing knob, which doubles as a reference for the lens in use; you can pull it out and set it for your focal length. The knob turns quite a bit when you're focused in tight, but the throw is smooth and precise. Just ahead of it is the tilt control: a locking lever and wheel for setting and securing the lens tilt angle. The body also carries a cold shoe for accessories and a pair of covered flash sync ports. Up top, pressing the chrome button opens the waist‑level finder, and a second press pops up the magnifier for critical focusing.

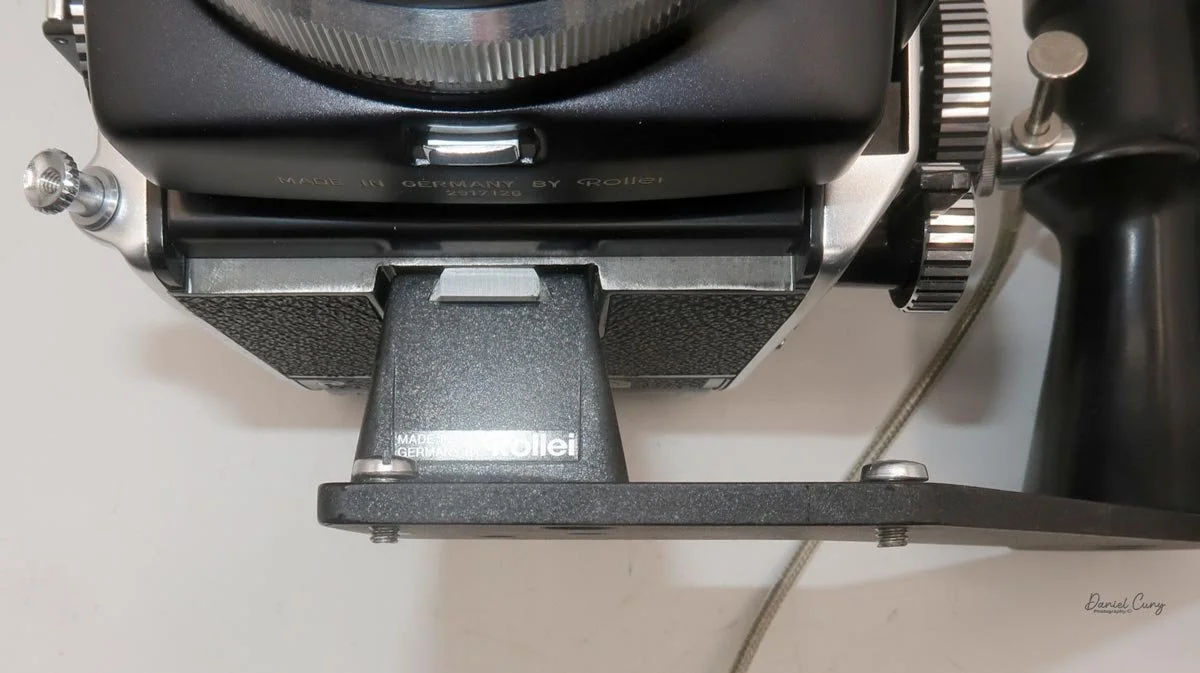
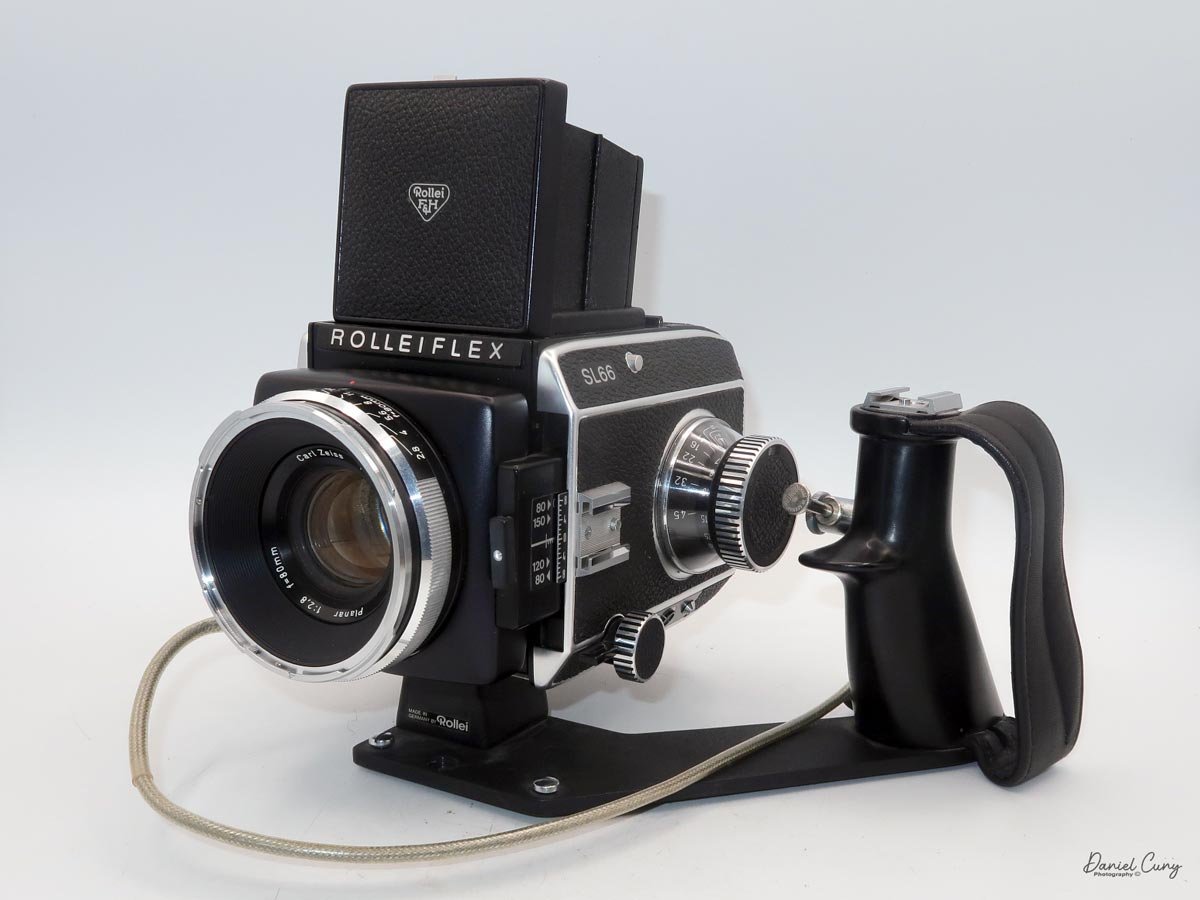
I use an L‑grip that mounts into the bottom quick‑mount slot alongside the tripod socket. That grip transforms the camera from a studio brick into something I'm comfortable hand‑holding for a walk, letting my left hand manage focus and support while my right handles shutter release and film advance. It doesn't make the SL66 light, but it does make it surprisingly usable off a tripod.

My Results

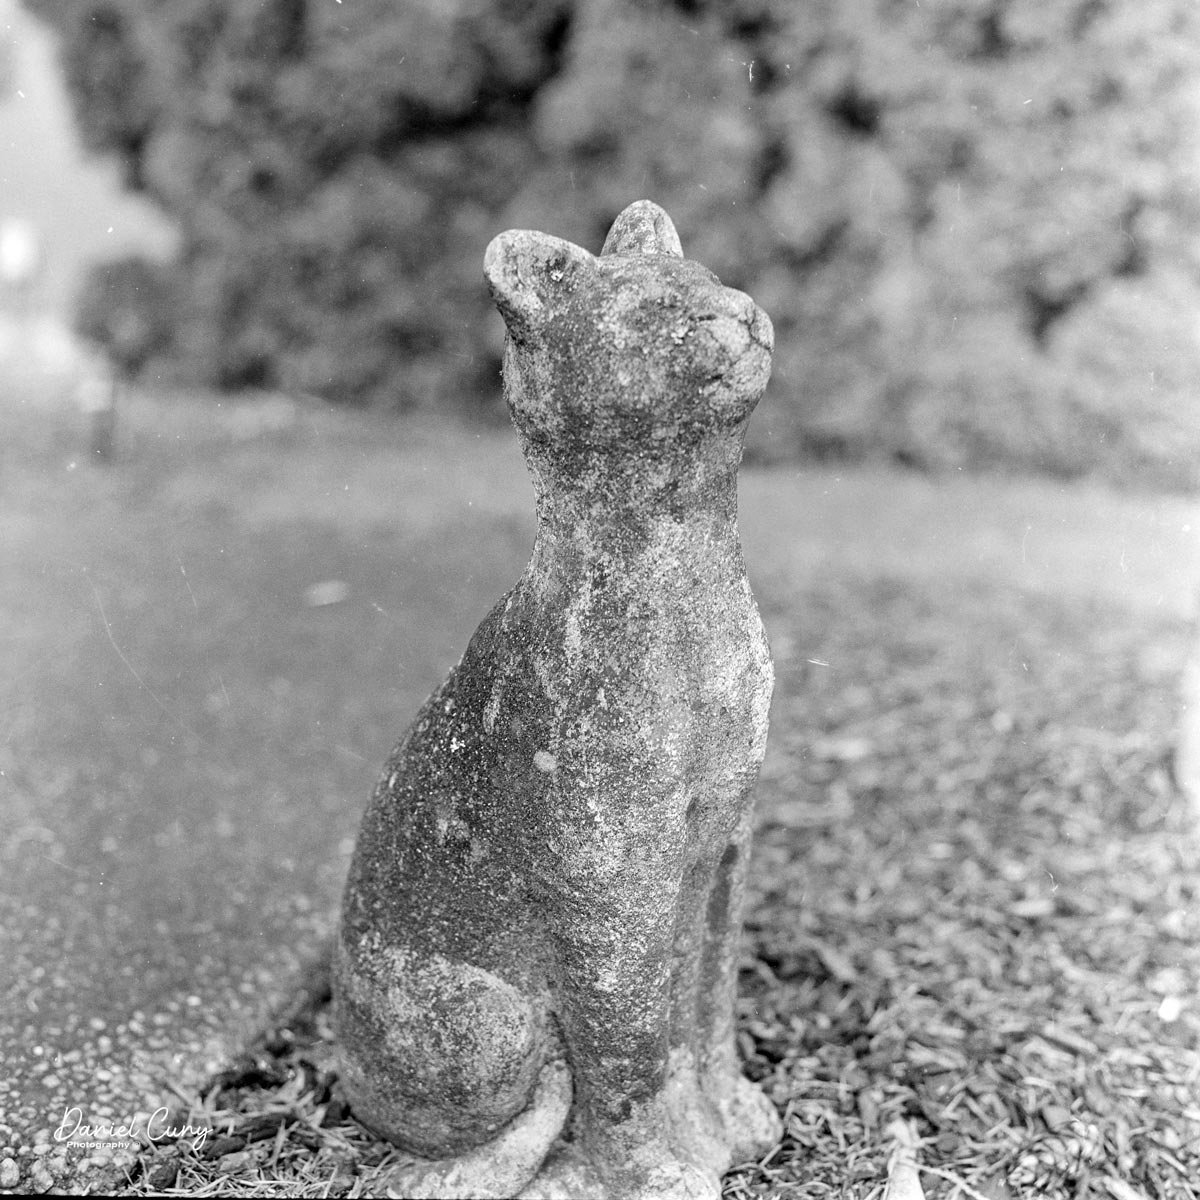
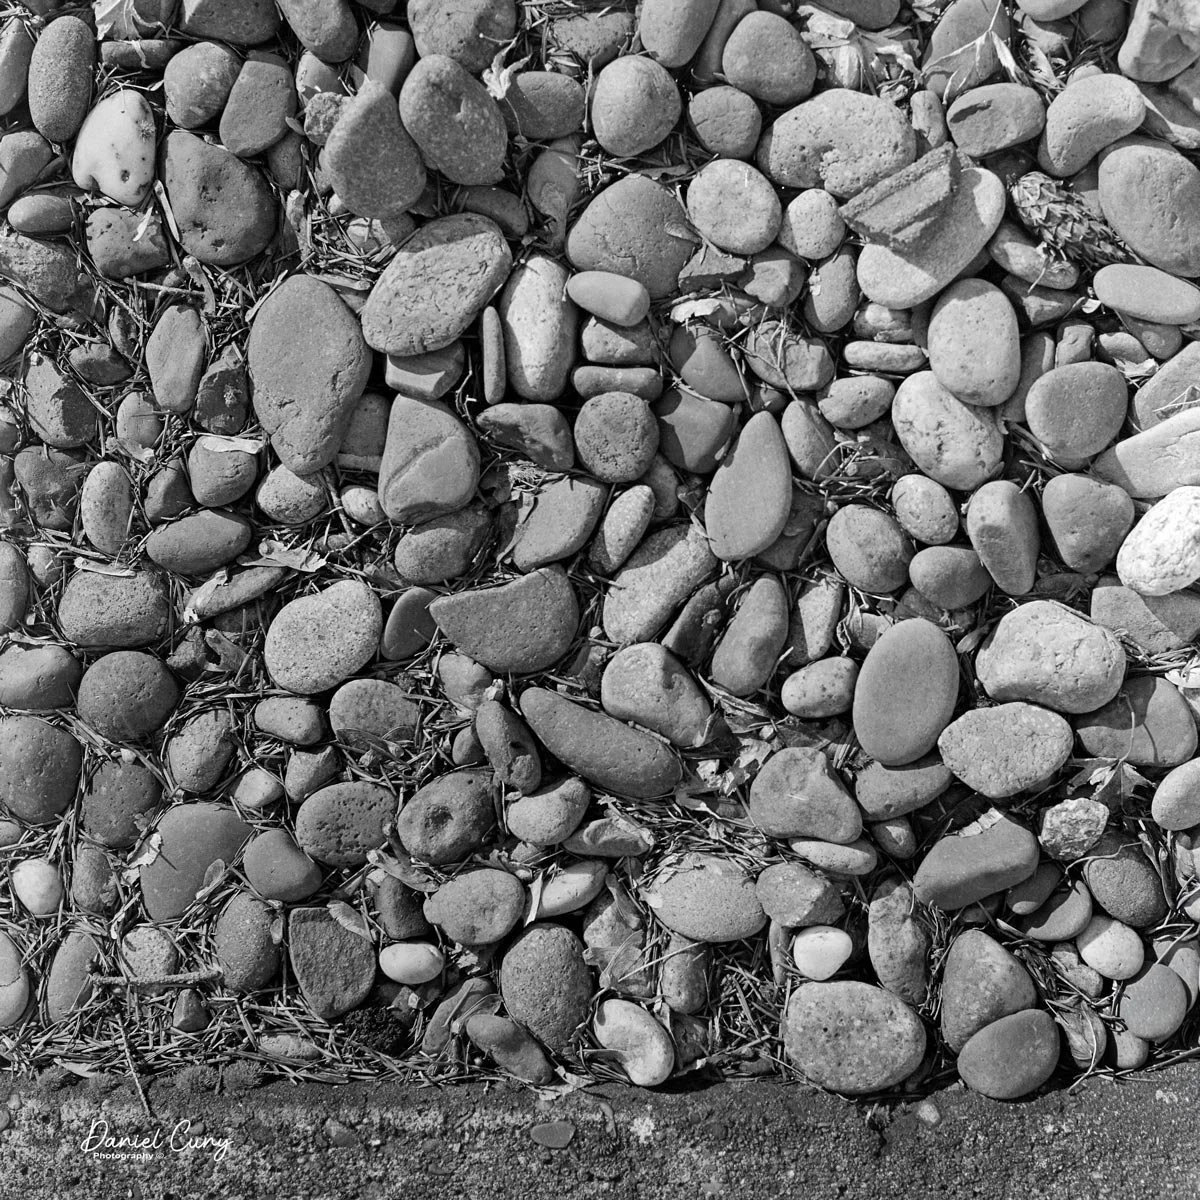
When I finally pulled the SL66 off the shelf this year, I decided not to overthink it. I loaded a roll of film, stepped out into my neighborhood on an uncharacteristically sunny February day in the Pacific Northwest, and treated it like any other camera I'd take for a walk. The first few frames were simple subjects—houses, trees, textures—mainly to get a feel for the shutter sequence, the advance, and how the camera balanced with the L‑grip in hand.

 What struck me almost immediately was how deliberate the camera feels. The weight and long focus throw slow you down in a good way; you don't "spray and pray" with an SL66. Composing on the waist‑level finder is a pleasure: the screen is bright, the magnifier makes critical focusing easy, and the big focus knob lets you land focus precisely rather than hunting back and forth. By the time I finished that first roll, the camera felt intuitive in a way only a well‑designed mechanical tool can.

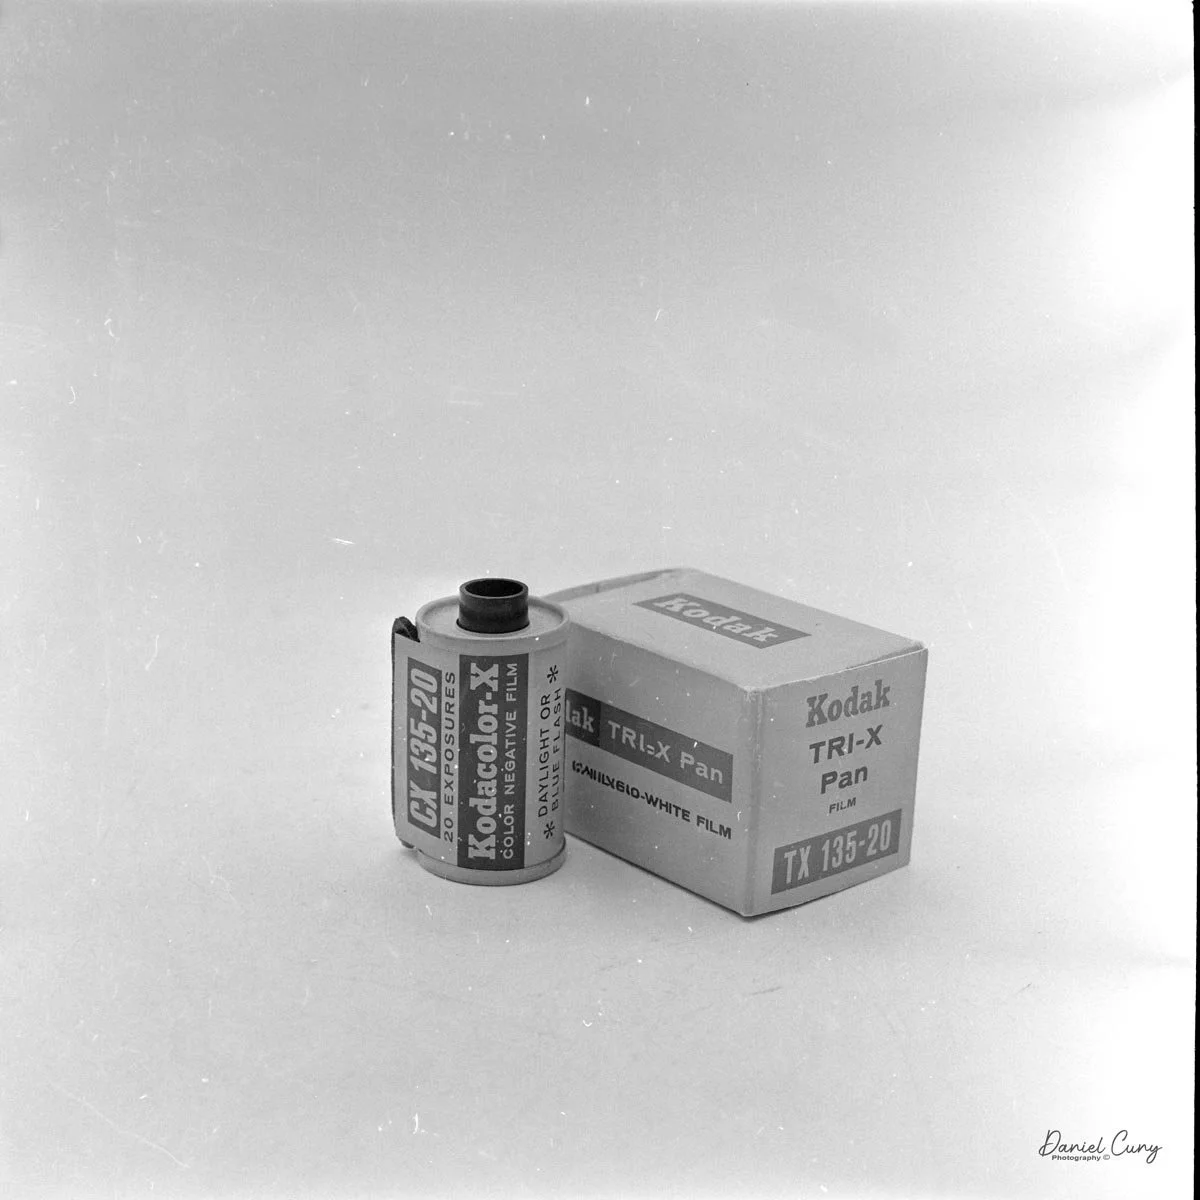
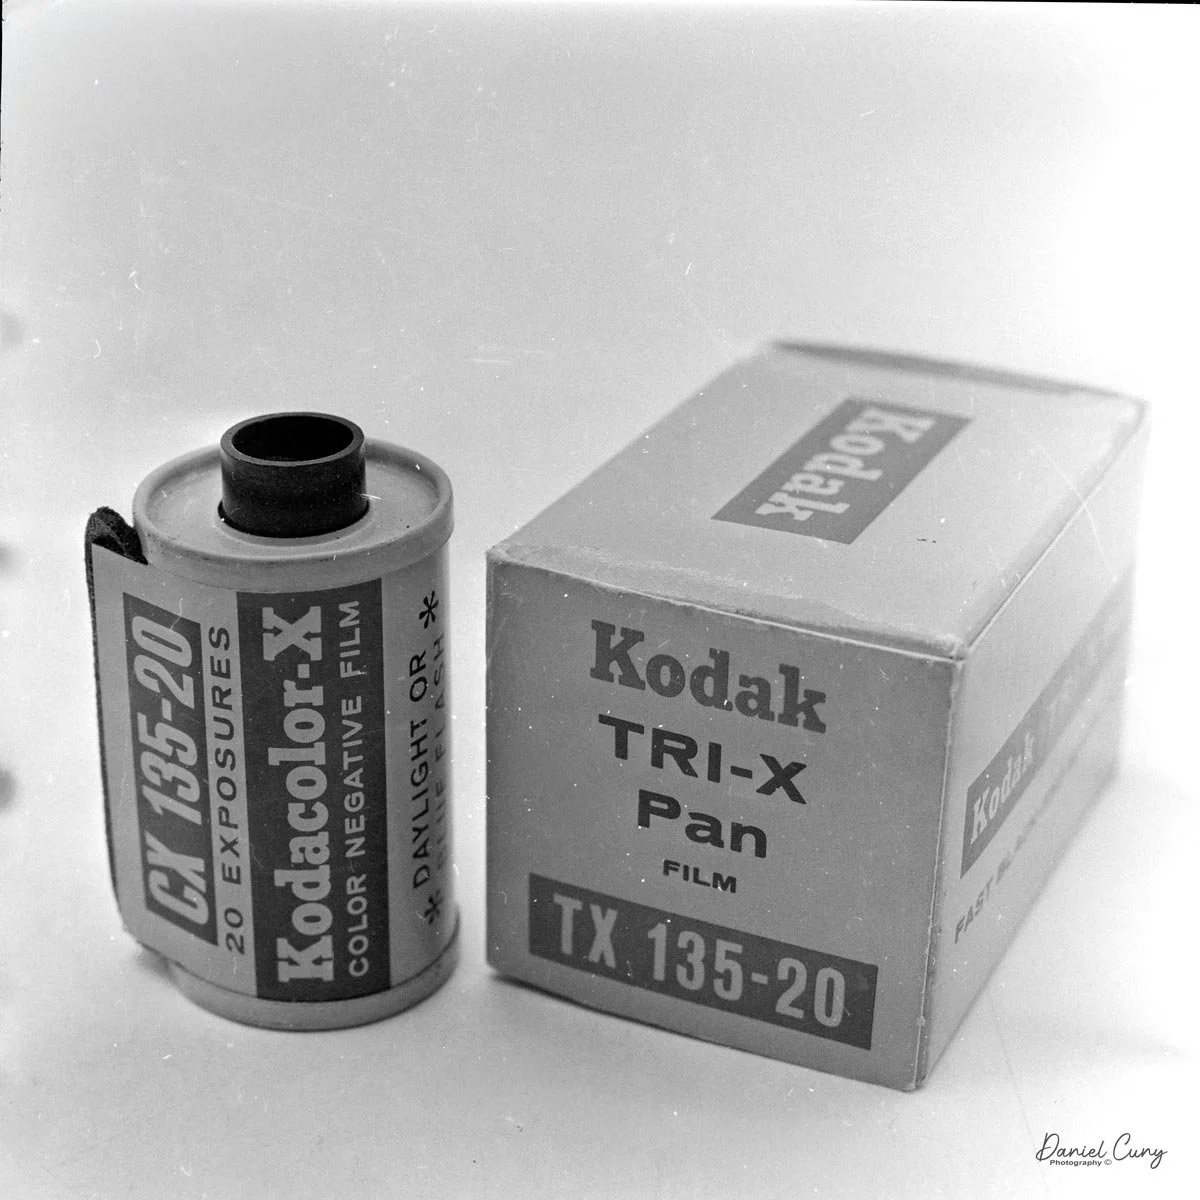
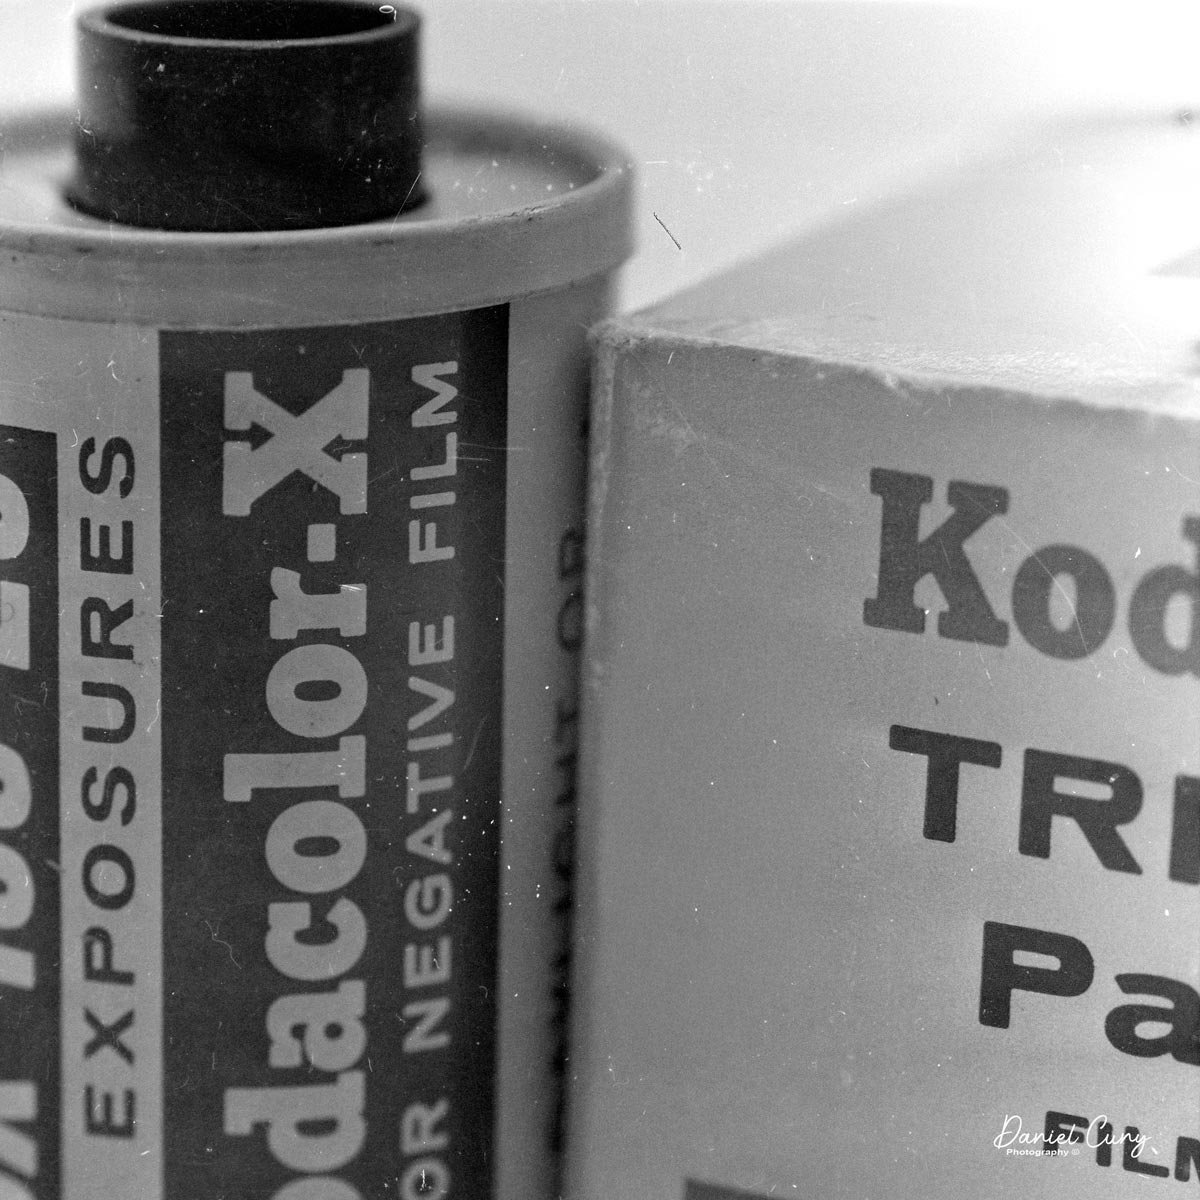
Back at home, I wanted to see what the SL66 could really do in its natural habitat: close‑up work. I set up a small scene with a 35mm film cassette and its box, first focusing as close as I could with the lens in the normal position. Even without reversing the lens, the built‑in bellows let me get in surprisingly tight. Then I flipped the lens around on the double bayonet mount and repeated the setup. The difference in magnification was obvious—the frame filled with the cassette and text on the box —and the tilt function came into its own, letting me hold both the front and top surfaces in focus at a reasonable working aperture.

My apologies for the dusty images.

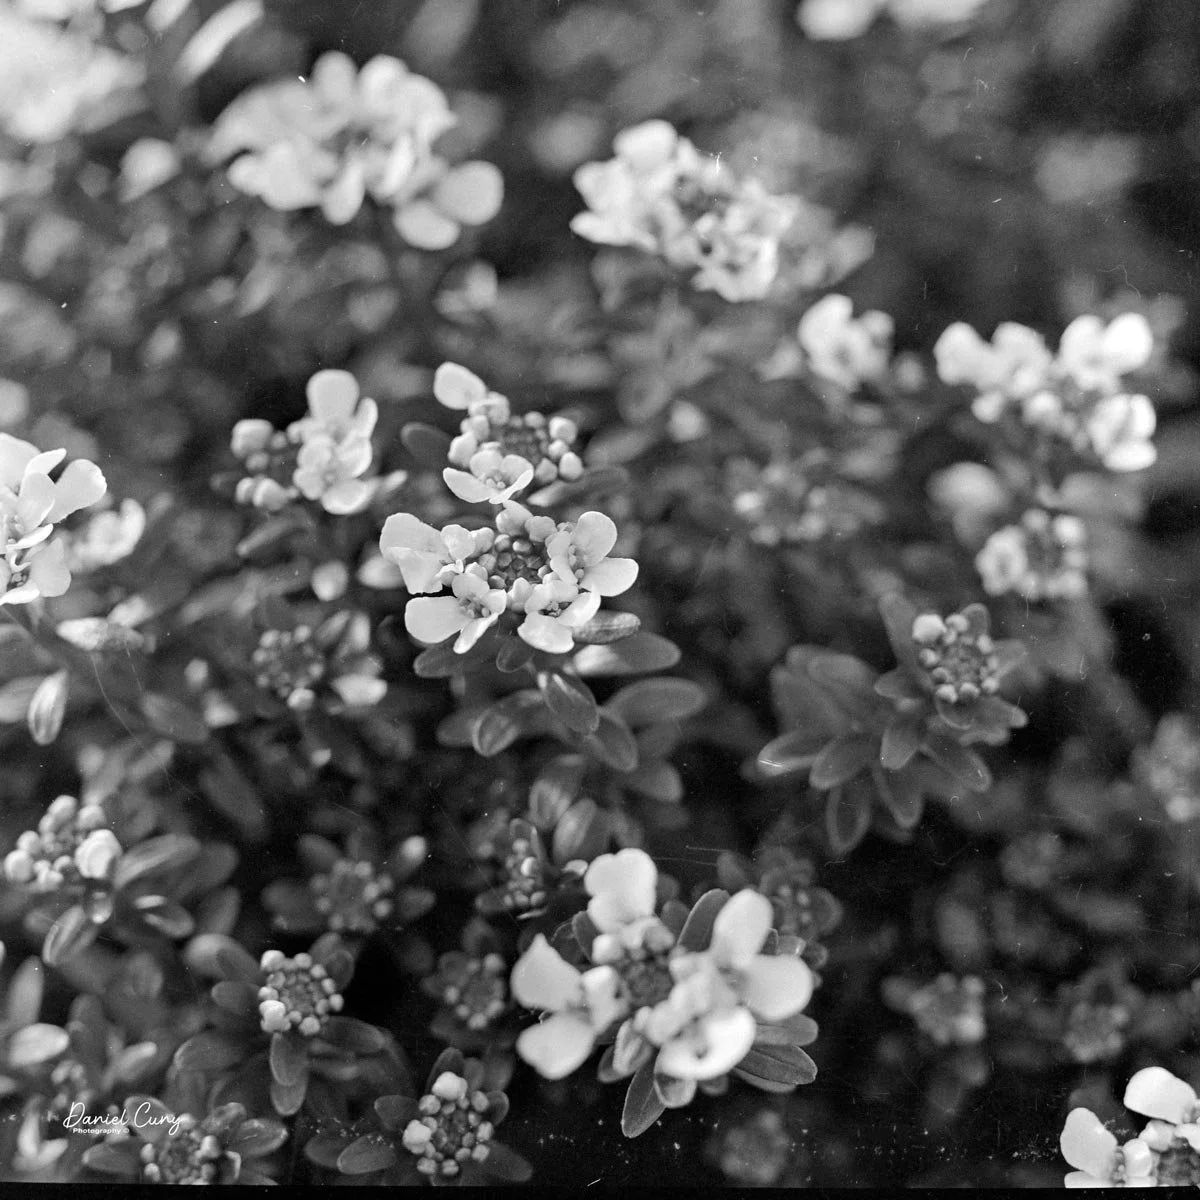
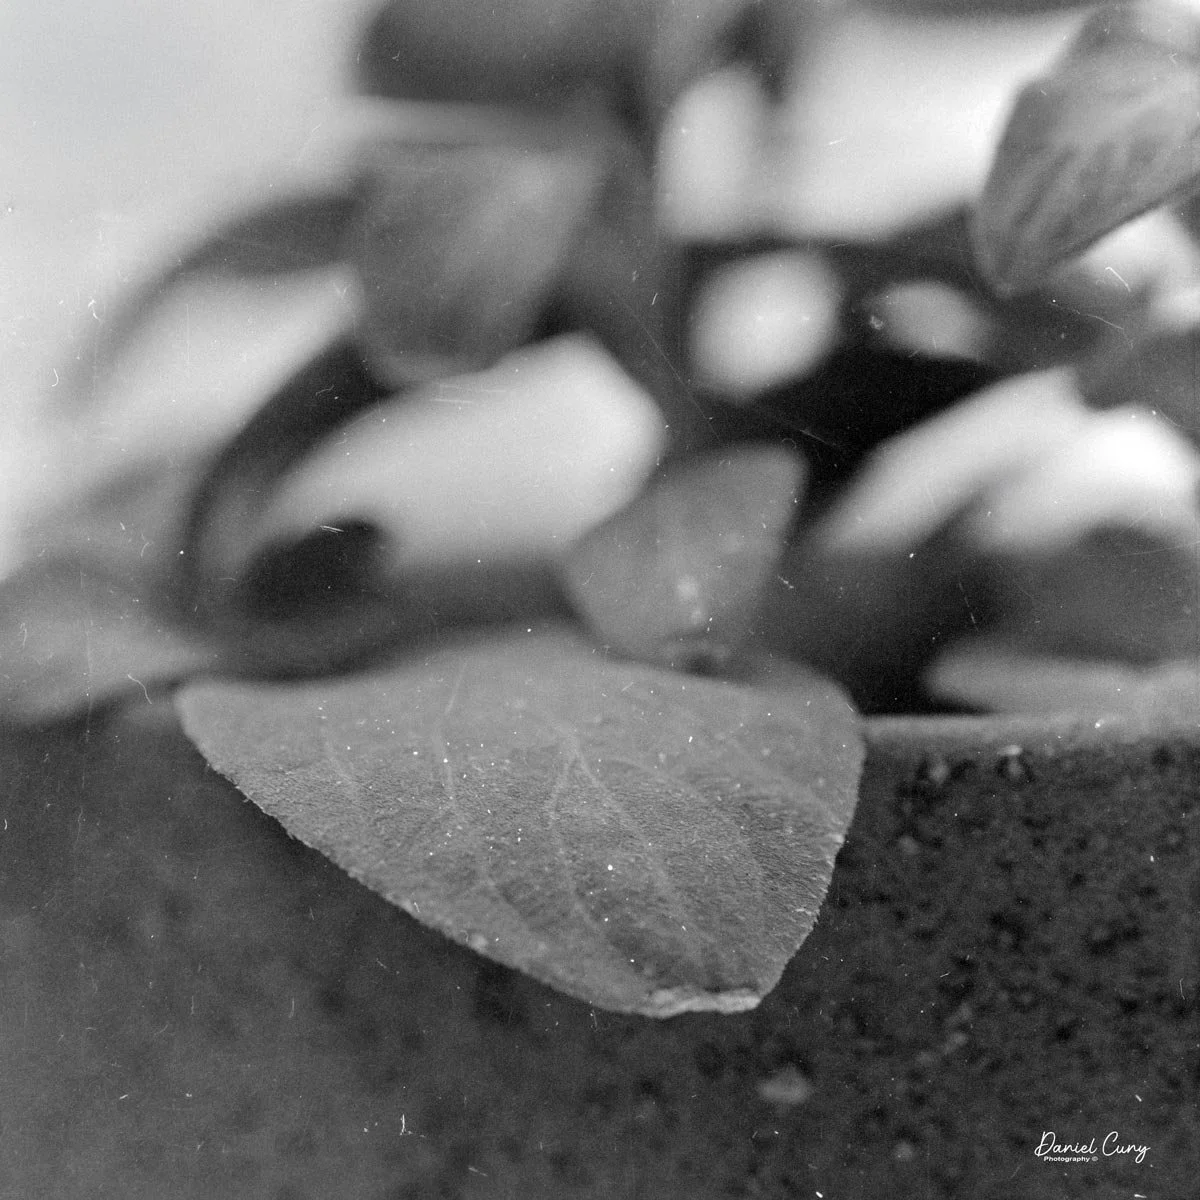
I also pointed the camera at a plant in my office, working closely again. Here, the combination of bellows, tilt, and that Zeiss glass really shone: crisp detail where I wanted it, smooth falloff where I didn't, and a rendering that feels more like a small view camera than a traditional medium‑format SLR. The process is slower than with a modern macro lens and autofocus, but the results—and the experience of making the images—are deeply satisfying.

Conclusion: Is the SL66 the Best Medium‑Format SLR?

In my personal opinion, the Rolleiflex SL66 is the best medium‑format single‑lens reflex camera I've ever used. It isn't the lightest, fastest, or most convenient option, but as a creative tool—especially for close‑up, product, and careful location work—it's truly exceptional.

 Why I let it sit so long is beyond me. The camera is a joy to shoot, and the results justify the effort. Small design touches like the dark‑slide holder, the smart film advance on the back, the generous close‑focusing via bellows, and the ability to reverse lenses for even greater magnification all add up to a macro photographer's dream. The overall build quality, leatherwork, and control layout make it feel every bit the premium instrument it was intended to be.

 That said, it's important to be honest about the downsides. The SL66 is heavy and bulky compared with many 6×6 systems; accessories and lenses can be harder to find and more expensive than Hasselblad equivalents, and the focal‑plane shutter's 1/30 flash sync may be a deal‑breaker for some styles of studio work. It's also an older, complex mechanical camera, which means a good technician and a healthy maintenance budget are essential.

 If you value portability, fast handling, and high sync speeds above all else, there are better choices. But if you're drawn to careful composition, close‑up and tabletop work, and you appreciate a camera that rewards deliberate, thoughtful photography, the Rolleiflex SL66 is tough to beat. It has become one of my favorite medium‑format cameras, and I fully expect it to see regular use.

 Thank you for taking the time to learn about my new favorite medium‑format camera. I'd love to hear your experiences with the SL66—or your questions about this or any of my other camera reviews—and if you're curious about owning one yourself, feel free to stop by my eBay store, Cuny's Cameras and Photos, to see what I currently have available.

No. 4A Speed Kodak Camera

My No. 4A Speed Kodak camera

The No. 4A Speed Kodak camera is a massive camera. It's one of the largest folding-style cameras in my collection. I recently acquired this camera as a trade during a camera show in Seattle, where I was a vendor. 

 The person I acquired the camera from has a very similar collection to mine. During our discussion, he mentioned that he had two No. 4A Speed Kodak cameras. On display at the show was a large and heavy Japanese machine gun camera. I owned the camera for many years, but I didn't want to transport it back to my home, so I asked if he was interested in trading one of his No. 4A cameras for my Japanese machine gun camera. I was very excited when the discussion of trading one camera for the number four speed Kodak became official.

 This is the second No. 4A Speed Kodak camera I've had the pleasure of owning. The first number for a Kodak camera that I purchased was from a customer in Atlanta, Georgia. During a visit to an antique store, I mentioned that I collect cameras. The owner of the shop told me that they were the trustees of an estate that owned many cameras and were getting ready to sell them. I asked if I could see their collection, and they said yes. 

 Unfortunately, I only had about 30 minutes to rummage through what they had, as I had a sales appointment with a customer and didn't want to be late. While rummaging through the cameras I had set aside, I came across 15 to 20 items I wanted to purchase from the estate, including a No. 4A Speed Kodak camera. The camera was in my collection for several years until one day I decided to sell it. 

After selling the No. 4A Speed Kodak, I regretted selling it due to how rare they are and how seldom you see them for sale. It's a camera that I've been looking to purchase again for many years.  I was thrilled to find one and strike a deal for it while I was a vendor at the Camera show in Seattle.

 History:

From Kodak 1912 Sales Catalog.

 George Eastman, a self-taught chemist and businessman, revolutionized the world of photography with the founding of the Eastman Kodak Company. Born in 1854, Eastman's early life was marked by financial hardship, forcing him to leave school at 14 to support his family. His foray into photography began in the late 1870s, a time when the process was cumbersome and expensive, requiring heavy equipment and on-the-spot chemical processing. Eastman envisioned a more straightforward, more accessible method for capturing images.

Advertisement for Speed Kodak cameras.

 After years of experimenting in his mother's kitchen, Eastman developed a successful dry-plate formula and a machine for mass-producing them. This innovation led to the establishment of the Eastman Dry Plate Company in 1881. A pivotal moment came in 1888 with the introduction of the first Kodak camera. It was a small, user-friendly box camera that came pre-loaded with a roll of film capable of 100 exposures. The company's slogan, "You press the button, we do the rest," perfectly encapsulated its business model. Once the roll was finished, the entire camera was sent back to the factory in Rochester, New York, where the film was developed and printed, and a new roll of film was inserted before being returned to the customer.

 The turn of the century saw another groundbreaking innovation with the release of the Kodak Brownie camera in 1900. Priced at just one dollar, the Brownie was marketed towards children but was embraced by all. This affordable and easy-to-use camera democratized photography, turning it from a professional trade into a popular hobby. For the first time, ordinary people could create their own visual records of their lives, leading to the advent of the "snapshot."

 For much of the 20th century, Kodak dominated the photography industry, pioneering advancements in color film and motion picture technology. However, the company's reliance on its highly profitable film business model proved to be its undoing. Despite inventing the first digital camera in 1975, Kodak was slow to embrace the new technology, fearing it would cannibalize its film sales. This hesitation allowed competitors to seize the digital market. By the time Kodak fully committed to digital, it was too late. The company filed for bankruptcy in 2012, a poignant end for a company that had once put a camera in everyone's hands.

My Camera:

As I mentioned in the first line of this blog, the No. 4A Speed Kodak is a behemoth of a camera, which has a beautiful red bellows, measuring 11.75" tall, by 6.5" wide, and 3.5" deep when the camera is closed. When the camera is opened, the lens extended, the camera is 12" deep. My camera weighs in at 5 lbs. 11.5 ounces. The camera first appeared in the Kodak sales catalogue in 1908 and remained there until 1912.

The serial number of my camera is 519-D, which you can find on the back side of the "Kodak" leg used to support the camera when opened. My No. 4A Speed Kodak camera has a batch ID number of 747, which is found on the inside of the back door, along with a matching number on the film "wings" used when loading film. 

 The negative size of the No. 4A Speed Kodak is a whopping 4 1/4" x 6 1/2" on 126-sized roll film. Not to be confused with the 126 cartridge film from the 1960s. Please note the size of the film spool for the No. 4A speed Kodak compared to a spool from a 120 size film.

The unique feature of the No. 4A Speed Kodak is its built-in Focal Plane shutter system. This shutter allows the camera to shoot from speeds of 1/5 on the slow end to a top-end shutter speed of 1/1000. The camera could also do timed exposures if necessary. The focal plane shutter is set by a series of tension wheels and settings done on the top of the camera. To achieve the desired shutter speed, the tensions and sliders are adjusted according to the graph displayed on top of the camera.

 To open the camera and take a photo, as with many other Kodaks, a button on the side unlocks the folding bed. Once the bed is opened and in the locked position, the lens can be slid out onto the bed by pinching the two grips just under the lens and sliding it into the "taking" position. There is a fine focus adjustment on the folding bed, allowing you to focus on your subject. 

 Similar to other folding cameras, a waist-level finder is located to the top right of the lens and covered by a chrome cover to prevent dirt from hindering your ability to frame your subject. This waist-level finder can be used for vertical or swung sideways for horizontal images. There is a secondary finder on top of the camera that flips up, and according to the catalog, this is an extra called the Direct Viewfinder.  

 To close the camera, use the two grips to slide the lens back into the camera body. Once you're all the way in, press down on the arms that lock the camera erect. They will unlock, allowing you to fold the bed back into the camera's body and lock it back in place.

To open the back of the camera and load the film, use the two buttons located on each side of the camera body near the back. Press both buttons, and the back will come off the camera. Sometimes you'll need to pull the back away from the body to remove it if it doesn't spring open. The sides of the camera will also swing open, making it easier to insert or remove the roll. You'll also need to unhook the side strap before taking the back off. Unfortunately, my No. 4A Speed Kodak is missing the strap, but this procedure is similar to how the Kodak Panoram cameras open and close.

 Once the film is loaded in the camera, slide the bottom of the back into the slot and press it into position, ensuring the side wings are closed. The back will then snap and lock into place.

Conclusion:

 The focal plane shutter on my camera is not operable, and the shutter curtains are very brittle. After a bit of coaxing and taking the time to work with it, I managed to get one of the shutter curtains to close, but you can see how brittle it is from the photos.

 Also, on my No. 4A Speed Kodak, the red bellows have separated from the black fabric on the inside of the bellows on the right side of the camera. That's why the bellows seem so wonky on that side. Still, having one of these cameras for display purposes is a wonderful thing, and I'm pleased to have this 110-year-old camera back in my collection.

 Thank you for taking the time to look over and read about this fascinating camera from Kodak's past.

 Click the link to see other Camera Reviews.

 Visit Cuny's Camera and Photos on my eBay store to see cameras and other photo odds and ends I have for sale. At times, I even sell cameras from my reviews.

 Until next week, please be safe.


Kowa Six MM Camera

My Kowa Six MM camera.

For some odd reason, I've always felt negative about Kowa cameras. It goes back to when I worked in a camera store in the mid- to late 1970s. The first job I had was handling camera repairs for the shop, which meant packing up the cameras, shipping them to the manufacturer or independent repair facilities, handling the repair estimates, pricing them when they came back from repairs, and calling the customers to let them know their camera was back and ready to be picked up. 

 I can remember when I received notices from many of the camera repair facilities that Kowa cameras were no longer serviceable due to a lack of parts, and that still sticks in my mind to this day. There was always a thought in the back of my mind that if you had a Kowa camera and something happened to it, it was not repairable. 

 It wasn't until many years later, and when I say many, probably 40 years later, that I visited a repair facility in Los Angeles. This person had many Kowa cameras and said he could repair them. He liked the quality of the camera. These weren't the 35mm Kowa camera but the Kowa Six medium-format camera. At that moment, my thought process switched, and the negative stigma of a horrible camera turned to something somewhat positive.

Kowa Six MM with grip.

 Fast-forward about five years, and I had the opportunity to pick up a Kowa Six MM camera for a reasonable price. I didn't know if the camera was in good working condition, but I knew where to get it fixed if it wasn't working.

 When the camera arrived, I started to fiddle with it for a bit, and my negative thoughts faded when the camera was in good working condition. The Kowa Six had a 55mm f3.5 lens, which I like, and a grip for the camera, which gave the purchase more value. As I was playing with the camera, I went from a negative feeling about the camera from many years ago, to WOW, this is a nice and well-built camera. It was time to put some film in the camera and see what this camera can do.

Company History:

Kowa, a Japanese company, has a long and fascinating history in optics, including producing high-quality cameras and lenses. Founded in 1894 as a trading company, Kowa Co., Ltd. initially focused on textiles and later expanded into various industries, including pharmaceuticals and electronics. Its entrance into the optical and photographic industry began in the mid-20th century, marking a significant era for the company.

Ad for Kowa Six camera.

 Kowa began producing photographic equipment in the 1950s, when Japan's camera industry flourished. One of its earliest camera lines was the Kowa Six, a medium-format 6x6 cm single-lens reflex (SLR) camera introduced in the early 1960s. The Kowa Six and its successors—the Kowa 6 MM and Kowa Super 66—became particularly popular among professional and serious amateur photographers due to their solid construction, sharp lenses, and competitive pricing. These cameras were often praised for their simplicity and reliability. They offered interchangeable lenses and accessories similar to more expensive competitors like Hasselblad.

 In addition to medium-format cameras, Kowa produced a range of 35mm film cameras. The Kowa SW, a fixed-lens wide-angle camera introduced in 1964, was particularly notable for its ultra-wide 28mm lens. Other models, like the Kowa SER and Kowa H series, featured leaf shutters and high-quality fixed lenses, catering to various photographic needs. Despite strong optical performance, Kowa's 35mm cameras struggled to gain significant market share, especially against major players like Canon, Nikon, and Minolta.

 Kowa eventually withdrew from the still camera market in the 1970s, focusing instead on its core strengths in optics and electronics. However, the company remained in the optical field, becoming well-known for producing spotting scopes, binoculars, and lenses for industrial and medical applications. Today, Kowa lenses are used in various professional contexts, from wildlife observation to television broadcasting.

 Though Kowa's time in the consumer camera market was relatively brief, its medium-format cameras have left a lasting impression. Collectors and film photography enthusiasts who value their durability, sharp optics, and mechanical precision still seek them out. While sometimes overlooked, Kowa's contribution to photographic history represents a unique chapter in Japan's post-war camera industry boom.

My Camera:

 My Kowa Six MM camera is 5" tall when the light chimney is closed and 7.5" tall with it open, 4.5" wide including the winding lever, and 4" deep without the lens attached. The serial number on my Kowa Six MM is 325240. The lens on my camera is the first of three generations and is a  55mm f3.5 lens. The serial number on my lens is 153507. One of the great things about the Kowa Six system is that all the lenses have leaf shutters built into them, which is very similar to the Hasselblad system. My Kowa Six MM with 55mm F3.5 lens weighs 4lb. 9.7oz without the side grip.

The shutter speed built into the lens goes from 1/500 to 1 sec. Along with "T" for timed exposure, the aperture ranges from F3.5 to F22. One of the advantages I found about the Kowa Six MM was how easy it is to set the focus, shutter speed, and aperture, which are all located on the lens barrel. Each setting has its ring and is easily moved and marked. The focus ring moves smoothly, and the shutter speed and aperture rings click into the desired setting. The lens also has the flash PC socket, along with a switch to set the 10-second self-timer (V), along with the flash settings for bulb (M), electronic flash (X). The shutter release is on the front and bottom right of the camera body. There is also a locking collar around the shutter release to prevent releasing the shutter when you don't want to.

 When reading about the camera, a few things were mentioned. One of the items mentioned was that the camera tends to move the focus slightly due to the mirror movement, causing the image to lose sharpness. I'm unsure if the focus or the camera is moving, which causes the image to be a bit soft, but I'll be aware of that when I shoot the camera.

 To view your subject, open the light chimney. Pull up on either side of the light chimney, and the viewfinder opens easily. There is a magnifier for critical focus, which you can activate by sliding a button along the back of the front. Sliding the button to the right pops up the magnifying lens. Pushing it down will lock it out of position. The light chimney has hinges on the side that must be squeezed together to close the viewfinder.

You can change to a different viewfinder by pressing a chrome button between the strap lug and film locking lug. Once the button is pressed, slide the viewfinder forward to remove it. You can also remove and change the focus screen by pressing the same chrome button and lifting the focusing screen. Put the focus screen back, line up the red dot on the camera with the red dot on the focusing screen, and drop the screen back into place. Pressing the chrome button to seat the focusing screen into position. You can slide the viewfinder back on, and it will lock into position once it's pushed back onto the camera.

The collar on the body must be turned counterclockwise to remove the lens. Before moving the collar, you'll need to wind the camera so the camera is in the "cocked" position and the mirror is down. You can move the collar somewhat, but until you slide the lens locking button back, the collar won't move the entire way to remove the lens. To put the lens back onto the camera, you'll line up the red mark on the lens to the red mark on the camera body, and turn the collar clockwise to lock the lens back onto the camera body.

To open the back to load film, turn the lever on the bottom of the camera to the "O" position, and the back of the camera unlocks. Lift the back door, which exposes the film chamber. Bring the empty reel from the bottom of the chamber to the top, which will now be your take-up spool. Pull out the film locking knobs on the side of the camera to put in the empty spool and the new roll of film you're loading into the camera. Bring the leader up to the empty spool and thread the lead into the slot and turn the winding knob on the right side of the camera to take up the loose film. There ia a handle built into the winding knob to make the turning of the knob easier. Keep winding until the "start" arrow points to the red dots on the sides of the shutter, close the back, and continue to wind until the winding lever stops. At this point, the frame counter will be on number one, and you're ready to start taking photos.

 The Kowa Six MM will take either 120 or 220 film. If you plan on shooting 220 film, be sure to change the pressure plate to the proper position, and on the side of the camera, make sure you've selected "24" on the selector between the strap lug and frame counter on the right side of the camera. Selecting 24 tells the camera you're shooting 24 images on 220 film instead of 12 exposures on 120 film.

You can also lock the mirror "up" by turning the knob on the right side of the camera to the "up" position. This function reduced camera vibration. You can also do double or multiple exposures on the Kowa Six MM. To do so, after your fist image, turn the knob on the top of right side of the camera from the orange dot and orange line which is for normal film advance to the red dot and red line. This is disengaging the film advance so you can do multiple exposures. Once you're done, turn the dial back to the orange dot and line position, and the film will advance.

As I mentioned, my Kowa Six MM camera has a side bracket, making it easy to hold and handle. Still, I didn't realize how nice this grip was when I went to take it off. Not only is there a nut that hold the bracket onto the camera, but there also a screw that locks the nut into place so it doesn't accidentally get unscrewed and have the camera fall off the grip.

My Results:

Since the clouds were moving in and out, I didn't want to shoot a slow-speed film, so I loaded the Kowa Six MM with a roll of Ilford 125 ISO film and proceeded to walk through the neighborhood, focusing on many of the spring flowers that have been blooming this time of year. After walking around, I went home and processed the film. Here are the results from my walk through the neighborhood.

My Conclusion.

WOW!!! Was I wrong for so many years? This camera worked fantastically and was fun to use. The viewfinder was bright, the magnifier was easy to use, the shutter speeds sounded accurate, and having the shutter speed, aperture ring, and focus all in the same spot was fantastic.

 The film advance was smooth, and carrying the camera with the grip made it very comfortable. I understand why the technician who coveted the Kowa liked the camera so much. The system offers nine lenses from 19mm to 500mm, different viewfinders and focusing screens, so it's complete. The price of these cameras is less than half of Hasselblad's, and they are smaller and easier to handle. I'll keep this camera for a while and see if I can expand the lenses I have for it. While I like the wide-angle lenses, getting an 85mm standard lens would be nice and slightly cut down on the weight.

 I love to hear from the people who read my posts. If you have a question or comment, please let me know. I'm always looking for ways to improve this experience.

 Until next week, please be safe.

Hasselblad 1600F Camera

Looking through my collection, I had a couple of different cameras in mind, but they use 127-size film, which I ordered a few days before the intended day to take photos. Unfortunately, the film hasn't arrived in time for me to shoot photographs when the weather is nice and sunny, so I'll put them off for the next blog. 

 As I gazed at the items in my collection, the Hasselblad 1600F caught my eye. I had purchased it many years ago, and the last time I had the pleasure of using it was a couple of years ago. The thought of loading a roll and exercising the focal plane shutter in this early version of the Hasselblad camera filled me with anticipation. 

 I generally use the Zeiss 80mm f2.8 lens on the camera, but looking through some of the lenses I have for this and the 1000F, I do have the Kodak Ektar 80mm f2.8 lens, which was the lens initially sold with the 1600F here in the US, and later the Zeiss 80mm f2.8 was available. For this shoot, I got out a roll of Ilford FP4 125 film, which I loaded into the film back, and I put on the Ektar lens to see how it would work. I was pleasantly surprised.

The Company:

When I think of cameras that have made an indelible mark on the field of photography, Hasselblad undoubtedly comes to mind. They are known for capturing iconic moments on Earth and beyond. Hasselblad cameras are synonymous with precision, durability, and unmatched image quality. At the heart of this remarkable brand is the story of its founder, Victor Hasselblad, and his relentless pursuit of excellence.

Original Swedish Ad for Hasselblad 1600f

 Victor Hasselblad was born in Gothenburg, Sweden, in 1906 into a family with a photography and photographic supplies background. While Victor initially followed in his family's footsteps, he soon developed a desire to innovate and improve upon existing camera technology. At 18, he traveled to Dresden, Germany, to work with the best optical manufacturers of the time, gaining invaluable experience in the technical aspects of cameras and photography. This laid the foundation for his future endeavors and innovations.

 During World War II, Victor's knowledge of cameras caught the attention of the Swedish Air Force. They approached him with a German aerial surveillance camera they wanted to replicate. Victor accepted the challenge and famously responded, "I don't want to make a copy of it—I want to make a better one." This led to the development of the first Hasselblad camera, the HK7, designed explicitly for military aerial photography. Victor's ingenuity soon proved invaluable, and his cameras became crucial tools for aerial reconnaissance.

 After the war, Victor focused on developing cameras for the consumer market. In 1948, the first consumer-oriented Hasselblad, the 1600F, was introduced. This camera was revolutionary for its time, featuring a modular design that allowed photographers to change lenses, viewfinders, and film magazines, making it highly versatile. The 1600F also used medium-format film, which produced images of superior quality compared to 35mm film cameras available at the time. However, the early models faced technical issues, particularly durability, and required further refinement.

Ad for the Hasselblad 1600F

Despite the initial technical issues, Hasselblad was committed to improving its designs. By the 1950s, Hasselblad cameras had developed a reputation for being highly reliable, and photographers worldwide began to take notice. In 1952, Hasselblad introduced the 1000F with an improved shutter and slower maximum speed of 1/1000. The camera also came with a Zeiss 80mm f2.8 lens, marking a significant improvement in the brand's offerings.


The subsequent 500C model, released in 1957, solidified Hasselblad's place in the professional photography world. With its leaf-shutter system and modular components, the 500C became a workhorse for studio photographers, renowned for its reliability and image quality. This camera design remained in production, with upgrades, for decades and became the foundation of Hasselblad's success.


Hasselblad cameras are most famous for their role in space exploration. In 1962, NASA astronaut Walter Schirra brought a Hasselblad 500C on the Mercury-Atlas 8 mission, sparking a long-standing relationship between Hasselblad and NASA. The camera's build quality, high resolution, and adaptability made it an ideal choice for capturing images in the challenging conditions of space.

Walter Schirra and the Hasselblad 500C

 Hasselblad worked closely with NASA to modify the cameras for space use. The resulting 500EL model was specially adapted for the Apollo missions, where it would ultimately capture some of the most iconic images in history, including the first steps on the moon by Neil Armstrong in 1969. The modifications included [specific modifications], which allowed the camera to function effectively in the challenging conditions of space. To this day, the image of Earth from space, known as the 'Blue Marble,' remains one of the most famous photographs ever taken, and it was captured with a Hasselblad. The brand's involvement in the space program elevated its reputation further and established Hasselblad as a premium name in photography.

 With the arrival of digital photography, Hasselblad continued to innovate, embracing the transition while retaining the high standards that defined its analog cameras. In the early 2000s, Hasselblad launched the H-System, a line of digital medium-format cameras that maintained the quality associated with the brand while integrating advanced digital features. This line set new benchmarks in the industry, offering extremely high-resolution sensors, modular components, and sophisticated imaging capabilities that appealed to professional photographers and high-end studios alike.

 More recently, Hasselblad has also embraced the mirrorless trend, launching the X1D, a compact digital medium-format camera that balances portability with the image quality of medium format. This new direction has helped the brand stay relevant, catering to a new generation of photographers who demand portability without sacrificing image quality.

 Today, Hasselblad remains a symbol of excellence in photography. Known for its attention to detail, superior image quality, and dedication to craftsmanship, Hasselblad has cultivated a loyal following of professional photographers, collectors, and photography enthusiasts. While the digital age has transformed the landscape of photography, Hasselblad continues to adapt and push the boundaries of what is possible, ensuring that its legacy endures.

Victor Hasselblad's legacy is a testament to the power of innovation, and his vision inspires photographers worldwide. From capturing wartime reconnaissance to the moon's surface and beyond, Hasselblad has not only documented history but has become a part of it.

My Camera:

My Hasselblad with the Kodak Ektar 80mm f2.8 lens is 6.5" long by 4.5" wide, including the winding knob, and is 4" tall with the waist level finder closed. The camera weighs in at 2 lbs. 15.9oz. This camera is in excellent condition for being around 75 years old. Hasselblad made this camera with a maximum shutter speed of 1/1600, which was very ambitious for a medium-format camera. There is some minor tarnish on some chrome, a small dent in one of the shutter curtains,  and the leatherette is starting to come loose around the waist level finder, but that seems to be it. It's also important to know that the 1600F and the 1000F use focal plane shutters. After these models, the 500c and model moving forward have leaf shutters in the lenses, not the camera body. The exception was the 2000FC model.

Having owned several different Hasselblad models, the camera operations are similar to mine. The film back on my camera is the older C12 film back. To load the film, you need to take the film back off the camera. Well, you don't need to, but I've always done it. You have to have the dark slide in the slot on the left to remove the film back from the camera. The dark slide in the holder presses a pin within the film back that allows the back to come off. If the dark slide isn't in the film back, you cannot take the back off the camera. To remove the film, on the top of it is a sliding circle with a Hasselblad "V" logo that you slide to the right and pull back down to remove it from the body.

 On the left side of the film back is the lock. Pull up the tab on the lock and turn it counterclockwise until it stops, then pull it away from the film back, and the insert will pull out. The film insert is what you load the film into. With the lock on the left, take the empty film spool from the bottom holder by pulling out the roll holder on a hinge to quickly load and unload the rolls of film. Put the empty spool onto the top. The top has a knurled grip on the hinged holder to wind the film before loading it back into the film back to shoot. Put your fresh roll of film into the lower holding area, pull the paper over the black pressure plate and slide the leader into the empty spool and turn the knurled knob to load the film onto the reel. Keep turning the knob until you see the "start" word on the paper backing. 

 Slide the film into the body portion and lock the back securely into the body. On the right side of the film back is a winding knob. Lift one of the handles and wind. On my film back, which is a C12 back, there is a hinged door where you can see the frame numbers as you turn the winding handle. Open the backdoor, watch for "1" to appear, and stop winding. At this point, turn the winding lever in a counterclockwise motion, and the frame counter under the winding knob will reset to number 1. Put the back onto the camera and prepare for the first photo. As you take photos, the film will advance back in, and you can check the frame counter on the film back to see what frame you're on.

Now that the film is loaded into the camera let's go out and shoot a few frames. Remove the front lens cap to focus the camera and pop up the waist level finder. A smaller "V" Hasselblad logo slider is on top of the waist level finder to open the finder. Slide that to the right, and the waist-level finder will pop open, showing an image you're pointing the camera toward. Turn the focus ring on the lens to get a sharp image. If you want a more critical focus, you can slide the slider to the right again, and a magnifying lens will pop up. You can put your eye closer to the magnifying lens to see an enlarged area of the focusing screen to fine focus on your subject. To close the waist level finder, one by one, flip down the side panels over the focusing screen, then the back panel, and close the top, which will click when closed.

 Before you press the shutter button on the front of the camera in the lower right corner, as you're holding the camera, you need to take out the dark slide from the film's back. The camera will not fire if the dark slide is engaged in the film's back. Be sure the shutter is cocked and ready to shoot. To cock the shutter, there is a large knob on the right side of the camera. Pull out the dark slide and turn that knob in a clockwise motion, or so the knob is going forward. This cocks the shutter. Set the shutter speed, which is on the right side of the camera, on the knob that cocks the shutter. 

 Because this model and the 1000F cameras use a focal plane shutter, it's VERY IMPORTANT: DO NOT SET THE SHUTTER SPEED WITHOUT COCKING THE SHUTTER FIRST. If you do, the camera can jam, and with this and the 1000F models, it's extremely expensive to service and, due to the age, possibly not able to be serviced due to lack of parts.

On my Eastman Kodak Ektar lens, the aperture is entirely manual, meaning you need to open the aperture for focus and then stop down to take the photo. Being used to "automatic" apertures where the aperture closes during exposure and opens after the exposure, it's easy not to remember to stop the lens down before taking the photo. Being one that uses a myriad of different cameras, I'm getting used to checking before, but every once in a while, I forget and need to retake the photo.

 If you want to change the lens on your camera, as you hold the camera, there is a button on the front of the camera in the lower left corner, opposite the shutter release. Press the button and turn the lens in a counterclockwise motion to release the lens and put on a new one. To put on a different lens, line up the red dot on the lens and the red dot on the camera body and turn the lens clockwise until the lens "clicks" into place and is secure on the body.

 Now that you've shot the 12 frames on the roll of film, it's time to take the film out, get it processed, and see how you did. To do so, take the dark slide out of the film back, remove the film back from the camera, open the film chamber, unload the film, and put in a fresh roll to shoot some more.

My Results:

After walking around my block taking photos on a sunny afternoon, I wanted to see how the lens would handle and the image quality it would produce. The lens focuses close, down to 20" from the film plane, so I was able to get in close for detail. Here are the results from the Eastman Kodak Ektar 80mm f2.8 lens.


 Conclusion:

I'm a photo nerd. I love using cameras, especially the older mechanical versions. There's something gratifying and calming about having a mechanical camera in my hands. Whether looking through an eye-level or waist-level finder, taking photos is an absolute joy.

 The Ektar 80mm f2.8 lens is terrific. I liked how the focus was fluid and easy to turn, the ease of opening and closing the aperture, and the picture quality was better than expected. The older Ektar lenses are superb, like those on the Ektar 35mm camera.

 Thank you for taking a few minutes out of your day to read about this early Hasselblad camera. I plan to use it for more shoots in the upcoming months.

 Until next week, please be safe.

Reference:

Hasselblad Website: https://www.hasselblad.com/about/history/first-consumer-camera/

Purma Special Camera

As I was cleaning out a box of cameras, looking for the next camera to shoot with and use for my next camera blog, I grabbed a brown case that I had put in the box a long time ago. As I turned the case around, I saw the name Purma on the front of the case and thought to myself, This will be my next camera to discuss or talk about in my blog.

My Purma Special Camera

 The Purma Special is a camera I purchased well over 20 years ago. I remember it was early in my collecting and when I was buying and selling on eBay. I started on eBay as a seller and buyer back in early 1997. When you engaged with eBay then, you didn't have your name as an ID, but they assigned you a number you'd use to log in and for sales purposes. I remember my number was 1032 before changing it to my current name, "Clix."

 At that time on eBay, there were no photos on the site, and it was similar to a message board where people would describe what they had for sale, what you were asking for, etc., Very similar to what Craigslist was before photos. Having McKeown's guide for cameras and thumbing through it daily, I was intrigued by cameras from other countries, and the Purma Special was one that I desired at the time due to its odd diamond shape and the fact that it was made in England.

Because the Purma Special camera is, in my opinion, a camera oddity due to the design of the camera, the shutter used, and the somewhat popularity of the camera, it's been reviewed and discussed by several of my camera blog friends like Peggy of Go Camera Go and Mike Eckman. Still, I wanted to make sure people were aware of my odd and unusual take on cameras from yesteryear, so this is more like Peggy's post about my thoughts on using the camera and the overall take on what a camera gem this is.

My Purma Special with Case

The Company:

Purma Cameras Ltd. was founded in 1935 in London. The name Purma is a combination of the two owners of the company: Tom Purvis, a well-known artist and lithographer who worked for LNER (London and North East Railway) from 1923 to 43, producing beautiful and popular advertising posters. 

Diagram on how the shutter system works on Purma Camera

 The other partner in the company was inventor Alfred Croger Mayo, who, along with Joseph Terrett, invented the unusual and very simple gravity-controlled focal plane shutter used in the Purma cameras. I believe this is Purma's real claim to fame and set them apart from other camera companies of the time. They also had financial backing from David Brock of Brock Fireworks, a company that started in 1698 and is the oldest British fireworks manufacturer.

Purma introduced its first camera in 1936, the Purma Speed. It was an enameled metal and chrome camera with a pop-up viewfinder. The Purma Speed camera had six shutter speeds and looked like a more traditional rounded-corner, rectangular camera.

Ad for the Purma Special

 With the introduction of the Purma Special camera in 1937, the company turned to an all Bakelite camera, along with a flatted diamond shape design with an art deco appeal to the camera due to the thin ridges built into the camera, which extend all around the camera. The Purma Special only had three shutter speeds but has a classic sleek design, and one that was the camera that set them apart design-wise from other cameras. The unique diamond shape and the use of Bakelite, a revolutionary material at the time, gave the Purma Special a distinct look and feel, setting it apart from its contemporaries. 

 The Purma Special was imported to many different countries, including the United States. According to an ad I found from 1939, the camera sold in the US for $14.95. It's my understanding that this was their most popular camera, although I cannot find sales records to prove these claims, as it's just from what I see for sale and the quantity of Purma Special cameras available today. The Purma Special was a popular choice among amateur photographers and was widely available in the market, contributing to its popularity and the large number of units still in circulation today.

There are a couple of unique features of the Purma camera. One is the 'pop out' lens, which is concealed by a thread in the lens cap, a clever design that protects the lens when not in use. When you screw the lens cap back onto the camera, it also locks the shutter. Unfortunately, these lens caps get lost, and many of the used Purma cameras are sold without the lens cap. The second is the use of plastics in the viewfinder. Purma was the first to do this, a pioneering move that made the camera lighter and more durable. These innovative features were ahead of their time and contributed to the Purma Special's appeal among photographers.

Purma also introduced the Purma Plus in 1951, which had an aluminum body and sold for £12.00 at the time. Production for the Purma Plus lasted until 1959. I cannot find why the company stopped producing its camera, so I assume it closed around 1960.


The Camera:

My Purma Special camera measures 6 3/4" wide by 2 3/4" tall by 2 1/4" deep with the lens cap on the camera, and the camera weighs 12 oz without the fitted leather case.  The camera has a Beck 2 1/4"  F6.3  lens with a fixed focus from 12' to infinity. Purma did sell a series of close-up and portrait attachment lenses that allowed for focus from 3.5 to 5' but were sold separately. These are items I do not have.

The Purma cameras use 127-size roll film and produce 16-1 1/4" square images on the negative. The Purma special doesn't have a locking mechanism to keep the back attached to the front of the camera. They are held together just by friction, but the back of the camera fits tightly to the front. The friction held back doesn't prevent it from accidentally opening if something were to happen. To open the back of the camera, there is a tiny thumb notch where you put your fingernail in and pull the back from the front.

The camera utilizes two red windows on the back of the camera, so you get 16 frames on the film; the photographer winds the film to the #1 exposure on the left window, then after taking the photo, winds the film so the #1 exposure shows up on the right side window utilizing the same frame number for both the left and right red window on the back of the camera. Once you shoot frame #1 on the right red window, the photographer winds to frame #2 on the left side window, and so on.

The Purma Special has a curved film track that holds the film flat against the shutter with a two-sided pressure plate attached to the camera's back door. The shutter system only has three shutter speeds. The shutter uses a series of different size slits in the metal curtain along with a brass weight within the camera to determine what shutter speed is used. The camera also depends on how you hold it, which would set the shutter speeds used. Remember, the negative is square, so having the camera in either vertical position doesn't change the image in the frame. It will only change the orientation of how the image is captured on the negative.

When you hold the camera in the usual horizontal position, the shutter would shoot, and the medium shutter speed would be 1/150th second. Turning the camera so the advance lever was at the bottom, or the "slow" speed, the shutter, the camera shutter is set to 1/25th sec. When you turn the camera in the other direction, with the film advance lever at the top, which puts the shutter in the "fast" position, the shutter speed is set to 1/450 sec.

Top view of Purma Special camera with circular wheel to cock the shutter, and shutter release

To take a photo, the photographer needs to cock the shutter. To do this, you turn the circular wheel on the top of the camera in the direction of the arrow. There is a small piece of bakelite sticking out to turn the wheel fairly easily. Once you turn the wheel in the counterclockwise position, the wheel will stop, and you'll hear a click which means the shutter is cocked and ready to make the exposure. You can do this with the lens cap on, but the shutter won't release until the lens cap is off. 

 The shutter release is on the top and left side of the camera. Simply press the shutter release to trip the shutter. BUT REMEMBER. Turn the camera as needed to change the shutter speed, especially since the camera has a fixed aperture lens. Wind the film to the next frame, then repeat until. It was odd for me to use this camera as I'm not used to having the shutter release on the camera's left side.

For those interested, here’s the original instruction manual for the Purma Special Camera

My Results:

I did have some outdated Film for Classics 127 film in my drawer, so I loaded up the camera and went to a local waterfall to take photos on an overcast Sunday afternoon. Go figure a cloudy day when living near Portland, Oregon. That will be my life for the next four months or so. The results were OK, but I was mildly disappointed when I looked at what Peggy and Mike did with the camera.

 It may also have been the fact that the film I processed was processed in a different tank than I'm used to using for 127 film, and I messed up putting it on the developing reel, so that was my fault. I have noticed whenever I use the Film From Classics film, the imprint from the paper backing seems to bleed onto the negatives, and I'm unsure if that's due to the film's age and being out of date by a year or two or something else.

 Here's what I salvaged from the messed-up developing roll I put through the Purma Special camera. It's nowhere near as lovely as Peggy or Mike's photos, but overall, it yielded decent results.

My Conclusion:

It was a fun camera to shoot with. Turn the camera to set the speed, point at your subject, and shoot the camera (with your left hand). Wash, rinse, and repeat. I hoped for better results but tried a different reel to process the film.

 Thank you for reading the blog post on the Purma Special camera. I'll definitely use it in the future due to its simplicity and unique shutter system.

 Until next week, please be safe.